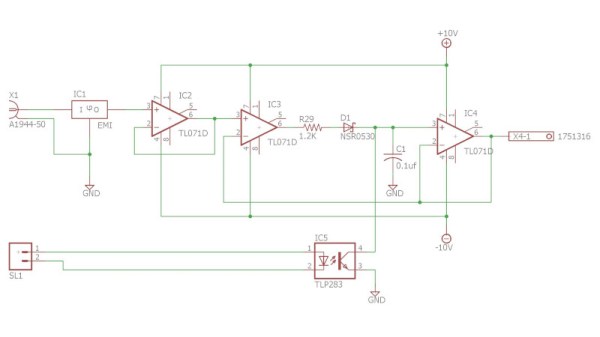
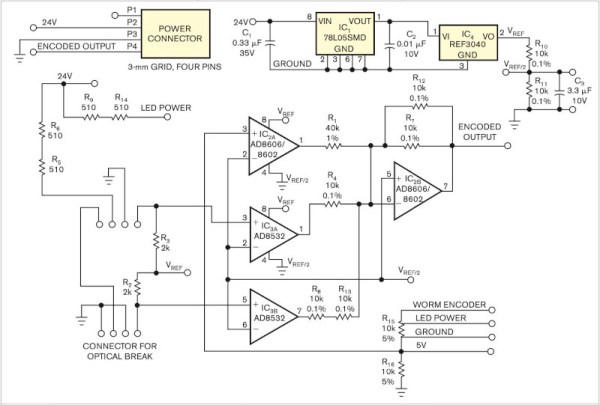
Op Amp Contest: A Slice Of The ’70s

The 1970s was a great time to be an electronics hobbyist, as a whole new world of analogue integrated circuits was coming down in price while new devices would appear to tempt the would-be constructor. Magazines and project books were full of simple circuits to do all manner of fun things, including many synthesizers and sound generators.

We’re reminded of those days by [Burkhard Kainka]’s triggered sound generator, which couples an op-amp timer to another op-amp phase shift oscillator to produce a sound described as “the unwilling meowing of a cat, which does not want to be disturbed“. Yes, we did make things like this back in the day.

The timer is triggered by a few millivolts on its input, which can come from a bit of mains hum or a flash of light to an LED operating as a photodiode. This provides enough DC voltage to the input of the phase shift oscillator to start oscillation, and in turn the oscillator drives a piezo speaker. It’s a fun little project, it shows that a microcontroller isn’t always needed to make something work, and maybe those of you without the experience of a 1970s childhood can learn a little bit of analogue magic from it. Need to know op-amps better? Read our primer!

Op Amp Contest: Go Down An Octave, No FFT, No PLL, No Oscillator!

We like a project that makes us think, and that was certainly the case with [MS-BOSS]’s octave downshifter that’s an entry in our current op-amp contest. Instead of resorting to an FFT, or a PLL, it uses a technique best described as a custom analogue computer to implement the maths of octave downshifting. It’s an extremely clever approach, and we don’t mind admitting took us more than one read to understand how it works.

Just as you would with any mathematical problem, he’s split the job of halving the frequency into its constituent mathematical functions. The square root calculation circuit is probably the one that most required the dredging up of dimly-remembered analogue circuitry undergraduate courses for us.

The result is a fascinating read that’s well worth taking the time to understand if you have any interest in analogue electronics. It’s by no means the easiest way to make this particular effect in 2023, as we’re much more used to seeing our community make digital effects, but if you fancy yourself as any kind of op-amp designer, you really need to give it a look.

A High Precision ADC That You Can Understand!

In a world where an analogue to digital converter is all too often an integrated peripheral buried inside a microcontroller, it’s easy to forget how simple these devices can be when built from first principles. An entry in our Op-Amp Challenge from [NNNI] demonstrates this perfectly, it’s a high resolution multi-slope ADC for instrumentation purposes, constructed using a mixture of op-amps, logic chips, and a Raspberry Pi Pico. Best of all, it’s easy to understand, so there’s little of that analogue mystique to worry about.

This type of ADC measures an analogue value by counting how long it takes to charge a capacitor to that voltage. A simple version that measures charge time has a few drawbacks, so this project goes from single slope to multi slope by measuring both charge and discharge times compared to the voltage. Pay attention to component matching and reference stability, and such a design can offer a very high resolution measurement.

The value in this project lies not only in the design itself, but also in the extremely comprehensive description of its operation, which should teach most readers a thing or two. That curvy-line PCB is rather nice, too. We used single slope ADCs to read analogue joysticks back in the day, but we certainly learned something here. Want to see another? This isn’t the first dual slope ADC we’ve seen.

Audio Playback Toy For DSP Adventures

The declining costs of single-board computers has made serious computing power available for even the most trivial of tasks. It’s easy enough to slap a Raspberry Pi onto almost anything for nearly the same cost as a powerful 32-bit microcontroller platform, but this takes some of the fun out of projects for a few of us. Looking to get into the weeds can be a challenge as well, as [Michal Zalewski] demonstrates in this audio playback device he built from a simple 8-bit microcontroller.

The small toy takes audio input from a microphone through an op-amp and feeds this signal to an ADC within the AVR128DA28 microcontroller. The data is then stored on a separate memory chip ready to be played back through another op-amp paired with a speaker. This is where being familiar with the inner workings of the microcontroller comes in handy. By manipulating the interrupt routines in specific ways, the audio stored in memory can be played back at various speeds.

[Michal] intended this build to be a toy for one of his younger relatives, and for the price of a few ICs and buttons it does a pretty good job of turning a regular voice into a chipmunk voice like some commercial children’s toys some of us might remember. If the design aesthetics of this gadget look familiar, you may be thinking of his minimalist gaming device which we recently featured.

Surface Mount Breathing Light PCB, using LM358 op-amp

Surface-Mount Light Breathes Life Into Your Project

If you’ve ever seen those gadgets with the “breathing light” LEDs on them and wondered how to do it, then [DIY GUY Chris] can show you how to design your own surface-mount version, using only analogue electronics.

Simulation trace showing the LED breathing light circuit operating. Traces for voltage and current are shown over a few seconds
The LED current tracks up and down in an approximately triangular-wave pattern

The circuit itself is built around a slow triangular-wave oscillator, that ramps the current up and down in the LEDs to make it look as if the lights are breathing in and out. The overall effect is rather pleasing, and the oscillation speed can be adjusted using the on-board potentiometer.

This project is actually an update to a previous version that used through-hole components (also shown in the video below), and goes to show that revisiting completed projects can give them a new lease of life. It also shows how easy it has become to design and order custom circuit boards these days. It’s not so long ago that a project like this would have been either made on stripboard or etched from copper-plated FR4 in a bubbling tank of acid!

If you have revisited an old project that you’re proud of and would like to show others, why not drop us a message on our tips line?

We have covered some other options for breathing LEDs in the past, such as this digital logic version, and this Arduino library that has a host of other effects to choose from, too. Continue reading “Surface-Mount Light Breathes Life Into Your Project”

Hackaday Links Column Banner

Hackaday Links: June 12, 2022

“Don’t worry, that’ll buff right out.” Alarming news this week as the James Webb Space Telescope team announced that a meteoroid had hit the space observatory’s massive primary mirror. While far from unexpected, the strike on mirror segment C3 (the sixth mirror from the top going clockwise, roughly in the “south southeast” position) that occurred back in late May was larger than any of the simulations or test strikes performed on Earth prior to launch. It was also not part of any known meteoroid storm in the telescope’s orbit; if it had been, controllers would have been able to maneuver the spacecraft to protect the gold-plated beryllium segments. The rogue space rock apparently did enough damage to be noticeable in the data coming back from the telescope and to require adjustment to the position of the mirror segment. While it certainly won’t be the last time this happens, it would have been nice to see one picture from Webb before it started accumulating hits.

Continue reading “Hackaday Links: June 12, 2022”

Gaze Inside These Nanopower Op-Amps

[Robo] over at Tiny Transistor Labs has a fascinating look at what’s inside these modern, ultra low-power devices that consume absolutely minuscule amounts of current. Crank up the magnification, and go take a look at the dies on these two similar (but internally very different) devices.

Texas Instruments LPV801, under the hood.

The first unit is the Texas Instruments LPV801, a single-channel op-amp that might not be very fast, but makes up for it by consuming only a few hundred nanoamps. Inside, [Robo] points out all the elements of the design, explaining how a part like this would be laser-trimmed to ensure it performs within specifications.

The second part is the Texas Instruments LPV821 which uses a wee bit more power, but makes up for it with a few extra features like zero-drift and EMI hardening. Peeking inside this device reveals the different manufacturing process this part used, and [Robo] points out things like the apparent lack of fuses for precise trimming of the part during the manufacturing process.

Seeing these structures up close isn’t an everyday thing for most of us, so take the opportunity to check out [Robo]’s photos. Tiny Transistor Labs definitely takes the “tiny” part of their name seriously, as we’ve seen with their 555 timer, recreated with discrete transistors, all crammed into a package that’s even the same basic size as the original.