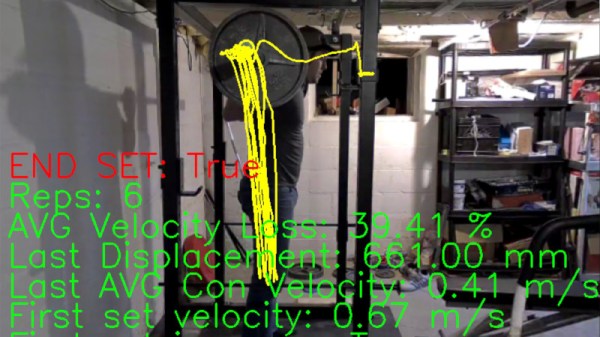
Robotic Ball Bouncer Uses Machine Vision To Stay On Target

When we first caught a glimpse of this ball juggling platform, we were instantly hooked by its appearance. With its machined metal linkages and clear polycarbonate platform, its got an irresistibly industrial look. But as fetching as it may appear, it’s even cooler in action.

You may recognize the name [T-Kuhn] as well as sense the roots of the “Octo-Bouncer” from his previous juggling robot. That earlier version was especially impressive because it used microphones to listen to the pings and pongs of the ball bouncing off the platform and determine its location. This version went the optical feedback route, using a camera mounted under the platform to track the ball using OpenCV on a Windows machine. The platform linkages are made from 150 pieces of CNC’d aluminum, with each arm powered by a NEMA 17 stepper with a planetary gearbox. Motion control is via a Teensy, chosen for its blazing-fast clock speed which makes for smoother acceleration and deceleration profiles. Watch it in action from multiple angles in the video below.

Hats off to [T-Kuhn] for an excellent build and a mesmerizing device to watch. Both his jugglers do an excellent job of keeping the ball under control; his robotic ball-flinger is designed to throw the ball to the same spot every time.

Continue reading “Robotic Ball Bouncer Uses Machine Vision To Stay On Target”

Lego Machine Uses Machine Learning To Sort Itself Out

In our opinion, the primary evidence of a properly lived childhood is an enormous box of every conceivable Lego piece, from simple bricks to girders and gears, all with a small town’s worth of minifigs swimming through it. It takes years of birthdays and Christmases to accumulate a Lego collection best measured by the pound, but like anything worth doing, it’s worth overdoing.

But what to do with such a collection? Digging through it to find Just the Right Piece™ can be frustrating, and bringing order to the chaos with manual sorting is just so impractical. How about putting some of those bricks to work with a machine-vision Lego sorter built from Lego?

[Daniel West]’s approach is hardly new – we’ve even featured brick-built Lego sorters before – but we’re impressed by its architecture. First, the mechanical system is amazing. It uses a series of conveyors to transport bricks from a hopper, winnowing the stream down as it goes. The final step is a vibratory feeder that places one piece on a conveyor at a time. Those pass under a camera attached to a Raspberry Pi, where OpenCV does background subtraction from the video stream, applies bounding boxes to the parts, and runs the images through a convolutional neural network (CNN) that’s been trained on a database of every Lego part. Servo-controlled gates then direct the parts into one of 18 bins. See it in action in the video below.

We must admit that we’re not sure what the sorting criteria are, as some bins seem nearly as chaotic as the input mix. Still, we appreciate the fine engineering, and award extra style points for all the Lego goodness.

Continue reading “Lego Machine Uses Machine Learning To Sort Itself Out”

Generating Random Numbers With A Fish Tank

While working towards his Computing and Information Systems degree at the University of London, [Jason Fenech] submitted an interesting proposal for generating random numbers using nothing more exotic than an aquarium and a sufficiently high resolution camera. Not only does his BubbleRNG make a rather relaxing sound while in operation, but according to tools such as ENT, NIST-STS, and DieHard, appears to be a source of true randomness.

If you want to build your own BubbleRNG, all you need is a tank of water and some air pumps to generate the bubbles. A webcam looking down on the surface of the water captures the chaos that ensues when the columns of bubbles generated by each pump collide. In the video after the break [Jason] uses two pumps, but considering they’re cheaper than lava lamps, we’d probably chuck a few more into the mix. To be on the safe side, he mentions that the placement and number of pumps should be arbitrary and not repeated on subsequent installations.

To turn this tiny maelstrom into a source of random numbers, OpenCV is first used to identify the bubbles in the video stream that are between a user-supplied minimum and maximum radius. The software then captures the X and Y coordinates of each bubble, and the resulting values are shuffled around and XOR’d until a stream of random numbers comes out the other end. What you do with this cheap source of infinite improbability is, of course, up to you.

While this project has been floating around (no pun intended) the Internet for a few years now, it seems to have gone largely overlooked, and was only just brought to our attention thanks to a tip from one of our illustrious readers. An excellent reminder that if you see something interesting out there, we’d love to hear about it.

Continue reading “Generating Random Numbers With A Fish Tank”

Upgrade Your Shades To Find Lost Items

Ever wish you could augment your sense of sight?

[Nick Bild]’s latest hack helps you find objects (or people) by locating their position and tracking them with a laser. The device, dubbed Artemis, latches onto your eyeglasses and can be configured to locate a specific object.

Images collected from the device are streamed to an NVIDIA Jetson AGX Xavier board, which uses a SSD300 (Single Shot MultiBox Detection) model to locate objects. The model was pre-trained with the COCO dataset to recognize and localize 80 different object types given input from images thresholded in OpenCV. Once the desired object is identified and located, a laser diode activates.

Probably due to the current thresholds, the demo runs mostly work on objects placed further apart against a neutral background. It’s an interesting look at applications combining computer vision with physical devices to augment experiences, rather than simply processing and analyzing data.

The device uses two servos for controlling the laser: one for X-axis control and the other for Y-axis control. The controls are executed from an Adafruit Itsy Bitsy M4 Express microcontroller.

Perhaps with a bit more training, we might not have so much trouble with “Where’s Waldo” puzzles anymore.

Check out some of our other sunglasses hacks, from home automation to using LCDs to lessening the glare from headlights.

Continue reading “Upgrade Your Shades To Find Lost Items”

Improving Exposure On A Masked SLA Printer

It’s taken longer than some might have thought, but we’re finally at the point where you can pick up an SLA 3D printer for a few hundred bucks. These machines, which use light to cure a resin, are capable of far higher resolution than their more common FDM counterparts, though they do bring along their own unique issues and annoyances. Especially on the lower end of the price spectrum.

[FlorianH] recently picked up the $380 SparkMaker FHD, and while he’s happy with the printer overall, he’s identified a rather annoying design flaw. It seems that the upgraded UV backlight in the FHD version of the SparkMaker produces somewhat irregular light, which in turn manifests itself as artifacts on the final print. Due to hot spots on the panel, large objects printed on the SparkMaker show fairly obvious scarring.

Now you might expect the fix for this problem to be in the hardware, but he’s taken it in a different direction. These printers use an LCD panel to block off areas of the UV backlight, thereby controlling how much of the resin is exposed. This is technique is officially known as “masked SLA”, and is the technology used in most of these new entry level resin printers.

As luck would have it, the SparkMaker FHD allows showing various levels of grayscale on the LCD rather than a simple binary value for each pixel. At least in theory, this allows [FlorianH] to compensate for the irregular backlight by adjusting how much the UV is attenuated by the LCD panel. He’s focusing on the printer he personally owns, but the idea should work on any masked SLA printer that accepts grayscale values.

The first step was to map the backlight, which [FlorianH] did by soaking thin pieces of paper in a UV reactant chemical, and draping them over the backlight. He then photographed the illumination pattern, and came up with some OpenCV code that takes this images and uses the light intensity data to compensate for the local UV brightness underneath the sliced model.

So far, this method has allowed [FlorianH] to noticeably reduce the scarring, but he thinks it’s still possible to do better. He’s released the code for this backlight compensation script, and welcomes anyone who might wish to take a look at see how it could be improved.

An uneven backlight is just one of the potential new headaches these low-cost “masked” SLA printers give you. While they’re certainly very compelling, you should understand what you’re getting into before you pull the trigger on one.

Sensing, Connected, Utility Transport Taxi For Level Environments

If that sounds like a mouthful, just call it SCUTTLE – the open-source mobile robot designed at Texas A&M University. SCUTTLE is a low cost (under $350) robot designed for teaching Aggies at the Multidisciplinary Engineering Technology (MXET) program, where it is used for in-lab lessons and semester projects for the MXET 300 – Mobile Robotics undergraduate course. Since it is designed for academic purposes, the robot is very well documented, making it easy to replicate when you follow the instructions. In fact, the team is looking for others to build SCUTTLE’s and give them feedback in order to improve its design.

Available on the SCUTTLE website are a large collection of videos to walk you through fabrication, electronics setup, robot assembly, programming, and robot operation. They are designed to help students build and operate the mobile robot within one semester. Most of the mechanical and electronics parts needed for the robot are off-the-shelf and easy to procure and the rest of the custom parts can be easily 3D printed. Its modular design allows you the freedom to try different options, features and upgrades. SCUTTLE is powerful enough to carry a payload up to 9 kg (20 pounds) allowing additional hardware to be added. To keep cost low and construction easy, the robot uses a simple, two wheel drive system, using a pair of geared motors. This forces the robot to literally scuttle in a “non-holonomic” fashion to move from origin to destination in a sequence of left / right turns and forward moves, so motion planning is interestingly tricky.

The SCUTTLE robot is programmed using Python3 running under Linux and has been tested working on either a BeagleBone Blue or a Raspberry Pi. The SCUTTLE software guide is a good place to get acquainted with the system architecture.

The standard configuration uses ultrasonic sensors for collision avoidance, a standard USB camera for vision, and encoders coupled to the wheel drive pulleys for determining position with respect to the starting origin. An optional USB LiDAR can be added for area mapping. The additional payload capability allows adding on extra sensors, actuators or battery packs.

To complement information on the website, additional resources are posted on GitHub, GrabCAD and YouTube. Building a SCUTTLE robot ought to be a great group project at maker spaces wanting to get hackers started with Robotics. We have covered many Educational Robot projects in the past, but the SCUTTLE really shines with its ability to carry a pretty decent payload at a low cost.

Continue reading “Sensing, Connected, Utility Transport Taxi For Level Environments”

Lane Keeping RC Car Uses OpenCV

Automakers continue to promise that fully autonomous cars are around the corner, but we’re still not quite there yet. However, there are a broad range of driver assist technologies that have come to market in recent years, with lane keeping assist being one of them. [raja_961] decided to implement this technology on an RC car, using a Raspberry Pi.

A regular off-the-shelf RC car is used as the base of the platform, outfitted with two drive motors and a third motor used for the steering. Unfortunately, the car can only turn either full-left or full-right only, limiting the finesse of the steering. Despite this, the work continued. A Raspberry Pi 3 was fitted out with a motor controller and camera, and hooked up to the chassis. With everything laced up, a Python script is used along with OpenCV to run the lane-keeping algorithm.

[raja_961] does a great job of explaining the lane keeping methodology. Rather than simply invoking a library and calling it good, instead the Instructable breaks down each stage of how the algorithm works. Incoming images are converted to the HSL color system, before a series of operations is used to pick out the apparent slope of the lane lines. This is then used with a PID algorithm to guide the steering of the car.

It’s a comprehensive explanation of a basic lane-keeping algorithm, and a great place to start if you’re interested in learning about the technology. There’s plenty going on in the world of self-driving RC cars, you just need to know where to look! Video after the break.

Continue reading “Lane Keeping RC Car Uses OpenCV”