Hackaday Prize Entry: An Open Source Industrial Camera

Over the last few years, connecting a camera to the Internet has gotten cheaper and cheaper. The advances that made this possible did not come through security cameras, but instead tiny cell phone camera modules, ARM boards, and embedded computing. Right now, if you want a livestream of your back yard, you’d probably get a Raspberry Pi and camera module. This will work for 90% of cases, but what if you want to livestream a slightly harsher environment? What if you want image processing right on the camera? What if you want this camera to have a rating for environmental protection?

[Apodiant]’s entry for the 2015 Hackaday Prize is solving the latter problem. It’s an Open Source Industrial Smart Camera with Ethernet, USB, and serial outputs, an ARM CPU for image processing, all tucked away in a sturdy aluminum enclosure.

The preliminary BOM for this camera is an iMX6 – a very capable microcontroller that can run Linux and OpenCV. The image sensor is a 1.2 megapixel unit [Apodiant] already has experience with, and the enclosure is an off the shelf deal for anyone who wants to build their own.


If this sort of setup sounds familiar, you’re right: there have been a few projects that have taken camera modules, added a powerful microcontroller, and run image processing on them. The latest in a long line of these projects is the OpenMV. That had a successful Kickstarter, and since [Apodiant] is going for the Hackaday Prize Best Product competition, it looks like a good fit.


The 2015 Hackaday Prize is sponsored by:

Googly Eyes Follow You Around The Room

If you’re looking to build the next creepy Halloween decoration or simply thinking about trying out OpenCV for the first time, this next project will have you covered. [Glen] made a pair of giant googly eyes that follow you around the room using some servos and some very powerful software.

The project was documented in three parts. In Part 1, [Glen] models and builds the eyes themselves, including installing the servo motors that will eventually move them around. The second part involves an Arduino and power supply that will control the servos, and the third part goes over using OpenCV to track faces.

This part of the project is arguably the most interesting if you’re new to OpenCV; [Glen] uses this software package to recognize different faces. From there, the computer picks out the most prominent face and sends commands to the Arduino to move the eyes to the appropriate position. The project goes into great detail, from Arduino code to installing Ubuntu to running OpenCV for the first time!

We’ve featured some of [Glen]’s projects before, like his FPGA-driven LED wall, and it’s good to see he’s still making great things!

Continue reading “Googly Eyes Follow You Around The Room”

Eye-Controlled Wheelchair Advances From Talented Teenage Hackers

[Myrijam Stoetzer] and her friend [Paul Foltin], 14 and 15 years old kids from Duisburg, Germany are working on a eye movement controller wheel chair. They were inspired by the Eyewriter Project which we’ve been following for a long time. Eyewriter was built for Tony Quan a.k.a Tempt1 by his friends. In 2003, Tempt1 was diagnosed with the degenerative nerve disorder ALS  and is now fully paralyzed except for his eyes, but has been able to use the EyeWriter to continue his art.

This is their first big leap moving up from Lego Mindstorms. The eye tracker part consists of a safety glass frame, a regular webcam, and IR SMD LEDs. They removed the IR blocking filter from the webcam to make it work in all lighting conditions. The image processing is handled by an Odroid U3 – a compact, low cost ARM Quad Core SBC capable of running Ubuntu, Android, and other Linux OS systems. They initially tried the Raspberry Pi which managed to do just about 3fps, compared to 13~15fps from the Odroid. The code is written in Python and uses OpenCV libraries. They are learning Python on the go. An Arduino is used to control the motor via an H-bridge controller, and also to calibrate the eye tracker. Potentiometers connected to the Arduino’s analog ports allow adjusting the tracker to individual requirements.

The web cam video stream is filtered to obtain the pupil position, and this is compared to four presets for forward, reverse, left and right. The presets can be adjusted using the potentiometers. An enable switch, manually activated at present is used to ensure the wheel chair moves only when commanded. Their plan is to later replace this switch with tongue activation or maybe cheek muscle twitch detection.

First tests were on a small mockup robotic platform. After winning a local competition, they bought a second-hand wheel chair and started all over again. This time, they tried the Raspberry Pi 2 model B, and it was able to work at about 8~9fps. Not as well as the Odroid, but at half the cost, it seemed like a workable solution since their aim is to make it as cheap as possible. They would appreciate receiving any help to improve the performance – maybe improving their code or utilising all the four cores more efficiently. For the bigger wheelchair, they used recycled car windshield wiper motors and some relays to switch them. They also used a 3D printer to print an enclosure for the camera and wheels to help turn the wheelchair. Further details are also available on [Myrijam]’s blog. They documented their build (German, pdf) and have their sights set on the German National Science Fair. The team is working on English translation of the documentation and will release all design files and source code under a CC by NC license soon.

ps3 eyetoy

PS3 Eye Lives Again Thanks To Low Prices

[Henry Tonoyan] has started getting into OpenCV and digital control system projects. He needed a decent webcam that could do higher than standard frame rates. As it turns out, the PS3 Eye is actually a pretty capable little camera. Now that it’s kind of obsolete, you can have it for as little as $7 from places like Amazon!

The PS3 Eye has a standard USB interface, and after messing around with it a bit in Linux, [Henry] was able to adjust the frame rate settings for his application. He’s using a library called video for Linux with an application called qv4L2. It’s capable of 60fps at VGA, which we admit isn’t amazing, but at $7, we can’t complain — if you drop down to QVGA (320×240) you can go up to 120fps.

From there you can play around in OpenCV to your heart’s content.

Seeing as the Eye has been out for over 7 years now, it has been used in quite a few hacks since then. From an actual eyeball tracker (seriously), to an interactive projection globe with touch tracking to even a physical tower defense game.

Reading Resistors With OpenCV

Here’s a tip from a wizened engineer I’ve heard several times. If you’re poking around a circuit that has failed, look at the resistor color codes. Sometimes, if a resistor overheats, the color code bands will change color – orange to brown, blue to black, and so forth. If you know your preferred numbers for resistors, you might find a resistor with a value that isn’t made. This is where the circuit was overheating, and you’re probably very close to discovering the problem.

The problem with this technique is that you have to look at and decode all the resistors. If automation and computer vision is more your thing, [Parth] made an Android app that will automatically tell you the value of a resistor by pointing a camera at it.

The code uses OpenCV to scan a small line of pixels in the middle of the screen. Colors are extracted from this, and the value of the resistor is displayed on the screen. It’s perfect for scanning through a few hundred through hole resistors, if you don’t want to learn the politically correct mnemonic they’re teaching these days.

Video below, and the app is available for free on the Google Play store.

Continue reading “Reading Resistors With OpenCV”

Resource Monitoring Solution

Electricity, Gas and Water – three resources that are vital in our daily lives. Monitoring them using modern technology helps with conservation, but the real impact comes when we use the available data to reduce wasteful usage over time. [Sébastien] was rather embarrassed when a problem was detected in his boiler only during its annual inspection. Investigations showed that the problem occurred 4 months earlier, resulting in a net loss of more than 450 cubic meters, equivalent to 3750 liters per day (about 25 baths every day!). Being a self professed geek, living in a modern “connected” home, it rankled him to the core. What resulted was S-Energy – an energy resource monitoring solution (translated) that checks on electricity, gas and water consumption using a Raspberry Pi, an Arduino, some other bits of hardware and some smart software.

[Sébastien] wanted a system that would warn of abnormal consumption and encourage his household folks to consume less. His first hurdle was the meters themselves. All three utilities used pretty old technology, and the meters did not have pulse data output that is commonplace in modern metering. He could have replaced the old meters, but that was going to cost him a lot of money. reflective-power-meter-sensor
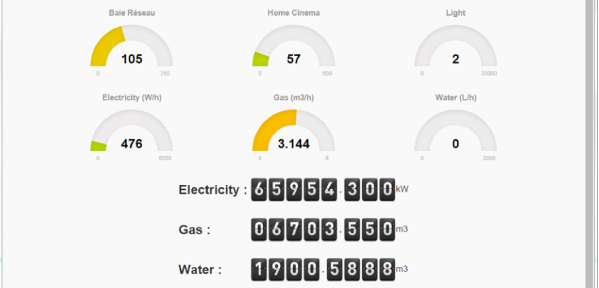
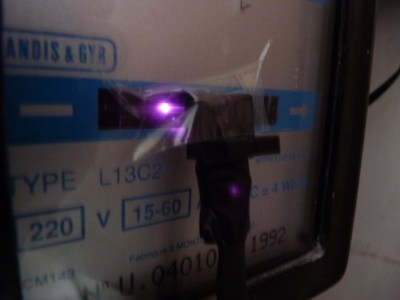
So he figured out a way to extract data from the existing meters. For the Electricity meter, he thought of using current clamps, but punted that idea considering them to be suited more for instantaneous readings and prone for significant drift when measuring cumulative consumption. Eventually, he hit upon a pretty neat hack. He took a slot type opto coupler, cut it in half, and used it as a retro-reflective sensor that detected the black band on the spinning disk of the old electro-mechanical meter. Each turn of the disk corresponds to 4 Watt-hours. A little computation, and he’s able to deduce Watt-hours and Amps used. The sensor is hooked up to an Arduino Pro-mini which then sends the data via a nRF24L01+ module to the main circuit located inside his house. The electronics are housed in a small enclosure, and the opto-sensor looks just taped to the meter. He has a nice tip on aligning the infra-red opto-sensor – use a camera to check it (a phone camera can work well).

Continue reading “Resource Monitoring Solution”

Mustachioed Nintendo Virtual Boy Gone Augmented Reality

Some people just want to watch the world burn. Others want to spread peace, joy and mustaches. [Joe Grand] falls into the latter group this time around. His latest creation is Mustache Mayhem, a hack, video game, and art project all rolled into one. This is a bit of a change from deconstructing circuit boards or designing electronic badges, but not completely new for [Joe], who wrote SCSIcide and Ultra SCSIcide for the Atari 2600 back in the early 2000’s.

Mustache Mayhem is built into a Nintendo Virtual Boy housing. The Virtual Boy itself was broken, and unfortunately was beyond repair. [Joe] removed most of the stock electronics and added a BeagleBone Black, Logitech C920 webcam, an LCD screen and some custom electronics. He kept the original audio amplifier, speakers, and controller connector. Angstrom Linux boots into [Joe’s] software, which uses OpenCV to detect faces and overlay mustaches. Gameplay is simple: Point the console at one or more faces. If you see a mustache, press the A button on the controller! The more faces and mustaches on-screen at once, the more points, or “mojo” the player gets. The code is up on Github, and can be built with Xcode targeted to the Mac, or directly on the BeagleBone Black.

[Joe’s] goal for the project was to make a ridiculous game that looks like it could have come out in the 90’s. He also used Mustache Mayhem as a fun way to learn some new skills which will come in handy for more serious projects in the future.

We caught up with [Joe] for a quick interview about his new creation.

How did you come up with the idea for Mustache Mayhem?

blockI was selling a bunch of my video game collection at PRGE (Portland Retro Gaming Expo) a few years ago and had a broken Virtual Boy that no one bought. A friend of mine was at the table and said I had to do something with it. I thought “People wear cosplay and walk around at conventions, so what if I could do something with the Virtual Boy that you could walk around with?” That was the seed.

A few months later, Texas Instruments sent me the original production release of the BeagleBone Black (rev. A5A). Eighteen months after that I actually started the project. The catalyst was to do something for an upcoming Portland, OR art show (Byte Me 4.0), which is an annual event that shows off interactive technology-based artwork. I wrote up a little description and got accepted. I had less than 2 months to actually get things working and it ended up taking about a month of full-time work. It was much more work than I expected for such a silly project. I originally was going to do something along the lines of walking around in a Doom-like perspective and shooting people when their faces were detected.

That would be pretty darn cool. How did you get from Doom to Mustaches? 

I saw a TI BeagleBoard demo called “boothstache” which drew mustaches on faces and tweeted the pictures. I thought that doing something non-violent with mustaches would be more suitable (and funny) to actually show my kids. I also secretly wanted to use this project as a way to experiment with Linux, write some code, and learn about face detection and image processing with OpenCV, which I plan to use for some actual computer security research in the future. Mustache Mayhem turned out to be a super cool project and I’m really happy with it. I sort of feel guilty spending so much time on it, since it’s basically just a one-off prototype, but I just got so obsessed with making it exactly as I wanted.

You mentioned on your website that Mustache was “designed to challenge the paradigms of personal privacy and entertainment.” What exactly did you mean there?

Continue reading “Mustachioed Nintendo Virtual Boy Gone Augmented Reality”