Printable Case For Pinecil And TS100 Soldering Irons (Mis)Uses A 608 Bearing

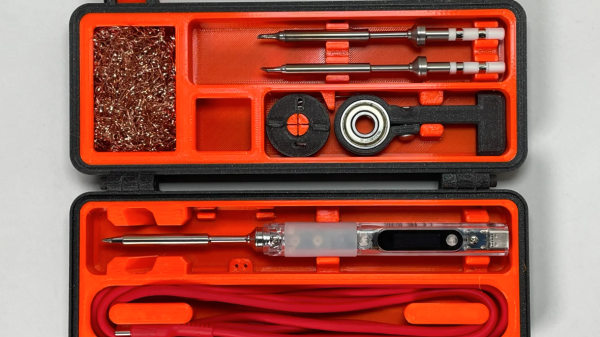
[PjotrStrog]’s rugged Pinecil / TS100 storage case is the perfect printable accessory to go with a hacker’s choice of either the Pine64 Pinecil, or the Miniware TS100 soldering irons. There are some thoughtful features beyond just storing the iron, too!

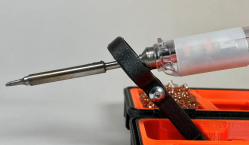
A standard 608 bearing makes for a handy heat-resistant stand.

Some of you may have spotted a 608 bearing in the image above, and might be wondering what it is for. In proud hacker tradition of using things for something other than their intended purpose, the bearing makes a heat-resistant stand to hold the iron while in use.

This design has a pretty deep history that illustrates the value of sharing one’s designs and allowing others to remix and refine ideas. [PjotrStrog]’s work makes use of the earlier and highly thoughtful TS100, Pinecil, TS80 & TS80p cases with options by [Termiman], which themselves are based on bearing-equipped TS100 case by [Olvin] that we covered back in 2020.

We loved the Pine64 Pinecil soldering iron, and this looks like a fantastic printable storage and carry option. There are a few pieces of hardware needed to put the rugged version together, but [PjotrStrog] also offers a less rugged design with fewer hardware needs, so check that out as well.

Make Your Own Tabletop Game Organizers With Online Tool

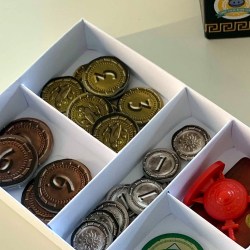
There is a vibrant cottage industry built around selling accessories to improve the storage and organization of tabletop games, but the more DIY-minded will definitely appreciate [Steve Genoud]’s deckinabox tool, which can create either 3D-printable designs, or ones more suited to folded paper or cardstock. Making your own organizer can be as satisfying as it is economical, and [Steve]’s tool aims to make customization simple and easy.

The tool can also generate models for folded paper or cardstock.

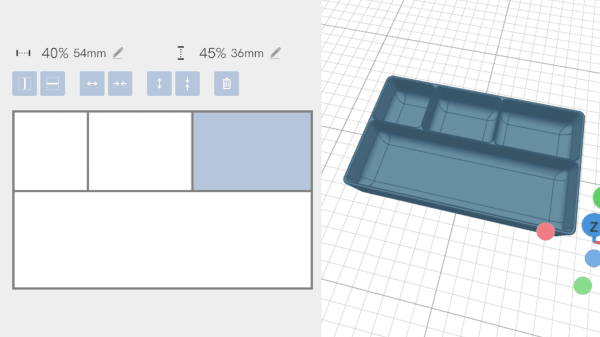
The interface for customizing the 3D-printable token tray, for example, begins with a simple filleted receptacle which one can split into additional regions by adding horizontal or vertical separators. The default is to split a given region down the middle, but every dimension can of course be specified.  Things like filleting of edges (for easier token scooping) and other details are all handled automatically. A handy 3D view gives a live render of the design after every change.

[Steve] has a blog post that goes into some added detail about how the tool was made, and it makes heavy use of replicad, [Steve]’s own library for generating browser-based 3D models in code. Intrigued by the idea of generating 3D models programmatically, and want to use it to make your own models? Don’t forget to also check out OpenSCAD; chances are it’s both easier to use and more capable than one might think.

Rex Wasn’t Really A PDA, It Was The First Great Digital Rolodex

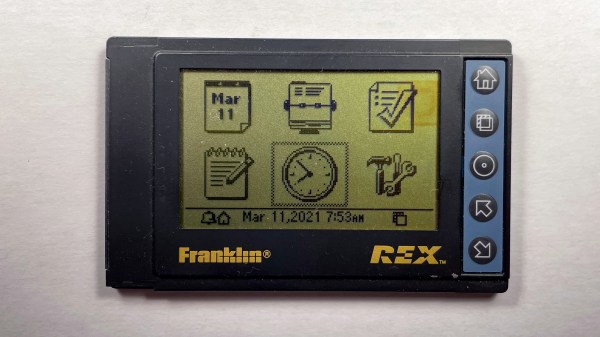
Back in the 1990s I was fascinated with small computers. I used the HP200LX palmtop computer for almost ten years, which I wrote about back in December. Naturally, the Franklin Rex 3 PCMCIA-sized organizer caught my attention when it was released in 1997. Here was a Personal Digital Assistant (PDA) the size of a credit card that could fit not just in your pocket, but in your shirt pocket.

Viewed today, it was an interesting paradigm. The screen takes up almost the entire front face of the device with a few buttons for navigation. But isn’t it a deal-breaker that you can’t enter or edit contact info on the device itself? This was long before cellphones were pervasive, and if you had the option to connect to the internet a telephone or Ethernet cable was involved. The ability to have a large data set in your pocket viewable without slapping a brick-like laptop on a table was pretty huge.

I think the killer feature was the PCMCIA interface. I challenged myself to reverse engineer the API so that I could sync data outside of the

Continue reading “Rex Wasn’t Really A PDA, It Was The First Great Digital Rolodex”

Give Workshop Pencils A Flush-Mounted Home

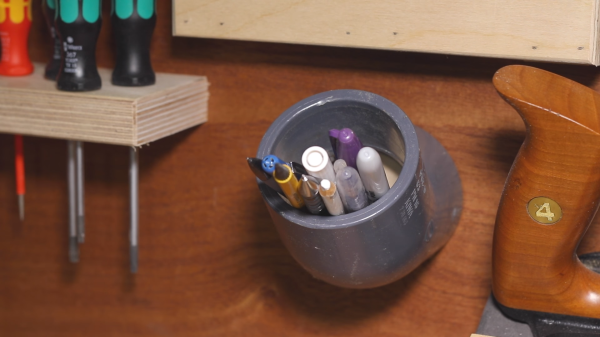
Pencils and pens are apt to go wandering in a busy workshop if they don’t have a handy storage spot. For most of us a soup can or an old coffee mug does the trick, but for a prettier and more useful holder [Stuff I Made] has a short video demonstrating a storage unit made from an elbow fitting and a scrap piece of plywood. He cuts a plywood disk that is friction-fit into one end of the elbow, then it gets screwed into a wall making an attractively flush-mounted holder in a convenient spot.

With the right joint the bottom of the holder remains accessible, as a 90 degree bend would be no good. With a shallower joint angle, a regular screwdriver can still reach the mounting screw and it’s possible to access the bottom of the holder just in case it needs cleaning or something small falls inside. You can see the process and results in the video embedded below. Not bad for one screw, a spare joint, and a scrap piece of plywood.

Continue reading “Give Workshop Pencils A Flush-Mounted Home”

Hackaday Links: Sunday, April 7th, 2013

hackaday-links-chain

Let’s wind down the weekend with some projects that didn’t quite warrant their own feature, but we think they’re still worth a look.

First up is a quick tip on cracking the lids on those hard to open jars of food. [Jason] says just grab about a foot of duct tape and the lid will come flying off. And while you’re searching for that roll of tape why not grab some foil tape to build a cooking oven. [Gabriel] built this solar oven by covering curved wedges of cardboard with foil tape and combining them to form a parabolic reflector.

Next we’ve got a trio of hacks that will come in useful in your home shop or at the local Hackerspace. Organization is key, and here’s a resistor storage system that uses #6 envelopes [via Reddit]. Also useful is the tip from [Felix] about using a tile saw to get clean cuts on your circuit boards. And if you’ve ever been plagued by a laser cutter job that doesn’t fully sever the material [Dan] wrote a guide on using a fence so that you can reposition the piece for another run.

Finally, we’re hoping we weren’t the only ones that didn’t realize the Raspberry Pi has an unpopulated footprint for a reset button. Now we’ve got to figure out if it’s okay to leave the PSU plugged in (based on it’s current consumption while the RPi is in power down) and hack together some sort of TV-based reset circuit for our RPi XBMC setup.