Refinishing A Vintage KitchenAid Mixer

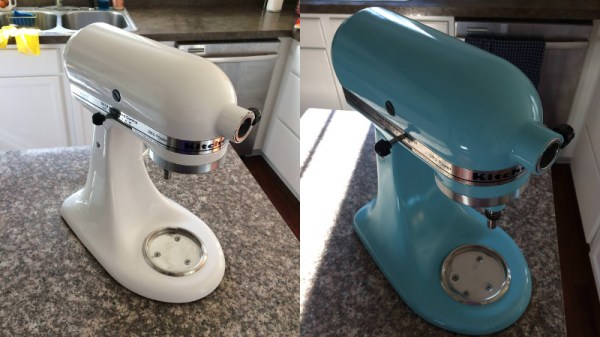
If you know anyone who is serious about baking, there’s a good chance you’ve seen one of these classic KitchenAid mixers. Built to last, they are often handed down generation to generation (or at least, when a newer model comes out), which is how [Kaitlin Flannery] received hers. While it didn’t look too bad considering its long life and the fact it’s been through a motor replacement already, she decided to spruce it up a bit by stripping it down and repainting the whole machine.

Sanding between coats of paint.

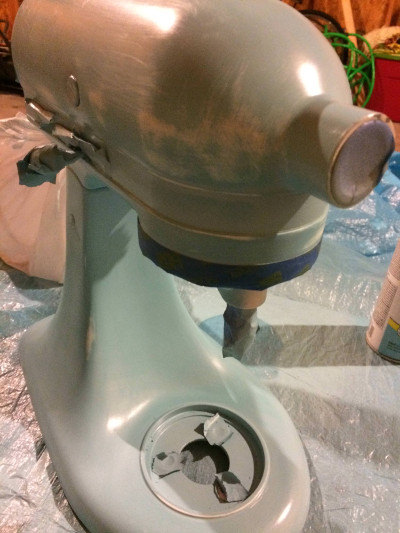
These KitchenAid mixers are solidly built and look highly serviceable, it’s refreshing to see a teardown that doesn’t involve any finicky plastic clips or glue. A standard philips screwdriver gets you inside the case, and a couple more screws allow the trim pieces to be removed.

Most of the work [Kaitlin] does is not completely unlike what you might have to do if you wanted to respray the fender of your car. You take off as much extra hardware as your patience allows, put painters tape over everything you want to keep over-spray off of, and then go to town.

To get the smooth metallic finish that you’d expect on a kitchen appliance, [Kaitlin] sands with 220 paper between the coats of hardware store Rust-Oleum. Generally we’d advise switching over to wet sanding at a higher grit once a few coats of paint have been laid down, but we can’t argue with the final results [Kailtin] got. The last coat is followed up with a clear enamel, which will help protect the finish from scratches; very important for a kitchen appliance.

[Kaitlin] does mention that she mistakenly taped off a bit more than she should have, and there’s still some of the original color visible on the rear of the machine. But beyond that, the finish looks fantastic, and with the new motor installed it looks like this machine is going to stick around long enough to get handed down a second time at least.

Hackaday has regrettably made few inroads into the kitchen as of late, one might get the impression that there isn’t a whole lot of overlap between the workbench and the counter-top. If you’ve got something you’ve made or remade sitting in your kitchen as you read this, by all means let us know.

MIDI Drawings Paint With Piano Keyboards

Musician [Mari Lesteberg] is making music that paints pictures. Or maybe she’s making pictures that paint music. It’s complicated. Check out the video (embedded below) and you’ll see what we mean. The result is half Chinese scroll painting, and half musical score, and they go great together.

Lots of MIDI recorders/players use the piano roll as a model for input — time scrolls off to the side, and a few illuminated pixels represent a note played. She’s using the pixels to paint pictures as well: waves on a cartoon river make an up-and-down arpeggio. That’s a (musical) hack. And she’s not the only person making MIDI drawings. You’ll find a lot more on reddit.

Of course, one could do the same thing with silent pixels — just set a note to play with a volume of zero — but that’s cheating and no fun at all. As far as we can tell, you can hear every note that’s part of the scrolling image. The same can not be said for music of the black MIDI variety, which aims to pack as many notes into a short period of time as possible. To our ears, it’s not as beautiful, but there’s no accounting for taste.

It’s amazing what variations we’re seeing in the last few years on the ancient piano roll technology. Of course, since piano rolls are essentially punch-cards for musical instruments, we shouldn’t be too surprised that this is all possible. Indeed, we’re a little bit surprised that new artistic possibilities are still around. Has anyone seen punch-card drawings that are executable code? Or physical piano rolls with playable images embedded in them?

Continue reading “MIDI Drawings Paint With Piano Keyboards”

MDF as a mold master. It works, but nowhere near as well as tooling board.

Materials To Know: Medium Density Fiberboard

MDF is the cheapest and flattest wood you can buy at local hardware stores. It’s uniform in thickness, and easy to work with. It’s no wonder that it shows up in a lot of projects. MDF stands for Medium Density Fiberboard. It’s made by pressing materials together along with some steam, typically wood, fibers and glue. This bonds the fibers very tightly. Sometimes MDF is constructed much like plywood. Thinner layers of MDF will be made. Then those layers will be laminated together under glue and steam.The laminated MDF is not as good as the monolithic kind. It tends to tear and break out along the layers, but it’s hard to tell which kind you will get.

Proper way to attatch a fastener to MDF.

MDF is great, but it has a few properties to watch for. First, MDF is very weak in bending and tension. It has a Modulus of Elasticity that’s about half of plywood. Due to its structure, short interlocking fibers bound together by glue and pressure, it doesn’t take a lot to cause a crack, and then, quickly, a break. If you’d like to test this, take a sheet of MDF, cut it with a knife, flip it over, and hit the sheet right behind your cut. Chances are the MDF will split surprisingly easily right at that point.

Because of the way MDF is constructed, fasteners tend to pull out of it easily. This means that you must always make sure a fastener that sees dynamic loads (say a bearing mount) goes through the MDF to the other side into a washer and bolt. MDF also tends to compress locally after a time, so even with a washer and bolt it is possible that you will see some ovaling of the holes. If you’re going to use screws, make sure they don’t experience a lot of force, also choose ones with very large threads instead of a finer pitch. Lastly, always use a pilot hole in MDF. Any particle board can split in alarming ways. For example, if you just drive a screw into MDF, it may appear to go well at first. Then it will suddenly jump back against you. This happened because the screw is compressing the fibers in front of it, causing an upward force. The only thing pressing against that force is the top layer of laminate contacting the threads. The screw then jumps out, tearing the top layer of particle board apart.

Continue reading “Materials To Know: Medium Density Fiberboard”

Aurora Painting

“Arduino Borealis” Combines LEDs And Paint

[Stef Cohen] decided to combine three different artistic mediums for her latest project. Those are painting, electronics, and software. The end goal was to recreate the aurora borealis, also known as the northern lights, in a painting.

The first step was to make the painting. [Stef] began with a shadow box. A shadow box is sort of like a picture frame that is extra deep. A snowy scene was painted directly onto the front side of the glass plate of the shadow box using acrylic paint. [Stef] painted the white, snowy ground along with some pine trees. The sky was left unpainted, in order to allow light to shine through from inside of the shadow box. A sheet of vellum paper was fixed to the inside of the glass pane. This serves to diffuse the light from the LEDs that would eventually be placed inside the box.

Next it was time to install the electronics. [Stef] used an off-the-shelf RGB LED matrix from Adafruit. The matrix is configured with 16 rows of 32 LEDs each. This was controlled with an Arduino Uno. The LED matrix was mounted inside the shadow box, behind the vellum paper. The Arduino code was easily written using Adafruit’s RGB Matrix Panel library.

To get the aurora effect just right, [Stef] used a clever trick. She took real world photographs of the aurora and pixelated them using Photoshop. She could then sample the color of each pixel to ensure that each LED was the appropriate color. Various functions from the Adafruit library were used to digitally paint the aurora into the LED matrix. Some subtle animations were also included to give it an extra kick.

Play Music With Your Painting Using Teensy

[sab-art], a collaboration between [Sophia Brueckner] and [Eric Rosenbaum], has created a touch-sensitive musical painting. Initially, basic acrylic paint is used for the majority of the canvas. Once that is dry, conductive paint is used to make the shapes that will be used for the capacitive touch sensing. As an added step to increase the robustness, nails are hammered through each painted shape and connected with wiring in the back of the painting. These wires are then connected to the inputs of a Teensy++ 2.0, using Arduino code based on MaKey MaKey to output MIDI. The MIDI is then sent to a Mac Mini which then synthesizes the sound using Ableton Live.  Any MIDI-processing software would work, though. For this particular painting, external speakers are used, but incorporating speakers into your own composition is certainly possible.

A nice aspect of this project is that it can be as simple or as complex as you choose. Multiple conductive shapes can be connected through the back to the same Teensy input so that they play the same sound. While [sab-art] went with a more abstract look, this can be used with any style. Imagine taking a painting of Dogs Playing Poker and having each dog bark in its respective breed’s manner when you touch it, or having spaceships make “pew pew” noises. For a truly meta moment, an interactive MIDI painting of a MIDI keyboard would be sublime. [sab-art] is refining the process with each new painting, so even more imaginative musical works of art are on the horizon. We can’t wait to see and hear them!

Continue reading “Play Music With Your Painting Using Teensy”

Robot Painter Works Like A Photobooth

robot-painter-photo-booth

[Ben], [David], [Drew], [Kayla], and [Peter] built a robotic artist as their senior design project. This mashes up a bunch of different project ideas, but the thing we like the most about it is that it works much like a photo booth that produces a painting. A Raspberry Pi uses a webcam to snap the picture, converts the image to three colors (plus the white background of the canvas) and sets the robot in motion. The team laments that initial testing of the completed project (seen in the clip below) worked out quite well but took hours to produce the painting. What do they expect? It’s art!

This is quite a bit different from the WaterColorBot (whose manufacturing process we just looked in on yesterday). WaterColorBot uses a flat canvas and a gantry system. This offering, which is called PICASSAU, uses an upright canvas with the paintbrush mounted in much the same way as a plotter robot. The biggest difference is that there is the ability to pivot the paint brush in order to pick up more paint, and for cleaning in between color changes.

Continue reading “Robot Painter Works Like A Photobooth”

Priceless Paintings – Scanned And Printed In 3D

painting

When we think of works by Van Gogh and Rembrandt, most of us remember a picture, but we aren’t accustomed to seeing the actual painting. [Tim Zaman], a scientist at Delft University of Technology in the Netherlands, realized that the material presence of the paint conveys meaning as well. He wanted to create a lifelike reproduction in full dimension and color. While a common laser-based technique could have been used for depth mapping, resolution is dependent on the width of the line or dot, and the camera cannot capture color data simultaneously with this method. In his thesis, [Tim] goes into great detail on a hybrid imaging technique involving two cameras and a projector. He and his team eventually used two 40-megapixel Nikon cameras in conjunction with a fringe projector to capture a topographical map with in-plane resolution of  50 μm, and depth resolution of 9.2 μm.

We can’t find a lot of information on the printing process they used, other than references to high-resolution 3D printers by Océ (a Canon company). That said, [Tim] has provided a plethora of images of some of the reproductions, and we have to say they look amazing. The inclusion of depth information takes this a big step further than that gigapixel scanning setup we saw recently.

Check out the BBC interview with Tim, as well as time lapse videos of the scanning and printing process after the break.

Continue reading “Priceless Paintings – Scanned And Printed In 3D”