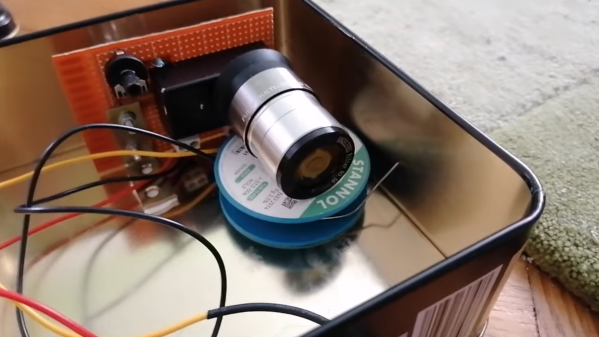
A microscope objective is sitting on a spool of solder in a metal tin, in front of a circuit board which has wires running away from it.

Watching Radioactive Decay With A Homemade Spinthariscope

Among the many science toys that have fallen out of fashion since we started getting nervous around things like mercury, chlorinated hydrocarbons, and radiation is the spinthariscope, which let people watch the flashes of light on a phosphor screen as a radioactive material decayed behind it. In fact, they hardly expose their viewers to any radiation, which makes [stoppi]’s homemade spinthariscope much safer than it might first seem.

[Stoppi] built the spinthariscope out of the eyepiece of a telescope, a silver-doped zinc sulfide phosphor screen, and the americium-241 capsule from a smoke detector. A bit of epoxy holds the phosphor screen in the lens’s focal plane, and the americium capsule is mounted on a light filter and screwed onto the eyepiece. Since americium is mainly an alpha emitter, almost all of the radiation is contained within the device.

After sitting in a dark room for a few minutes to let one’s eyes adjust, it’s possible to see small flashes of light as alpha particles hit the phosphor screen. The flashes were too faint for a smartphone camera to pick up, so [stoppi] mounted it in a light-tight metal box with a photomultiplier and viewed the signal on an oscilloscope, which revealed many small pulses.

Continue reading “Watching Radioactive Decay With A Homemade Spinthariscope”

Engineering Lessons From The Super-Kamiokande Neutrino Observatory Failure

Every engineer is going to have a bad day, but only an unlucky few will have a day so bad that it registers on a seismometer.

We’ve always had a morbid fascination with engineering mega-failures, few of which escape our attention. But we’d never heard of the Super-Kamiokande neutrino detector implosion until stumbling upon [Alexander the OK]’s video of the 2001 event. The first half of the video below describes neutrinos in some detail and the engineering problems related to detecting and studying a particle so elusive that it can pass through the entire planet without hitting anything. The Super-Kamiokande detector was built to solve that problem, courtesy of an enormous tank of ultrapure water buried 1,000 meters inside a mountain in Japan and lined with over 10,000 supersized photomultiplier tubes to detect the faint pulses of Chernkov radiation emitted on the rare occasion that a neutrino interacts with a water molecule.

Continue reading “Engineering Lessons From The Super-Kamiokande Neutrino Observatory Failure”

How Photomultipliers Detect Single Photons

If you need to measure the presence of photons down to a very small number of them, you are looking at the use of a photomultiplier, as explained in a recent video by [Huygens Optics] on YouTube. The only way to realistically measure at such a sensitivity level is to amplify them with a photomultiplier tube (PMT). Although solid-state alternatives exist, this is still a field where vacuum tube-based technology is highly relevant.

Despite being called ‘photomultipliers’, these PMTs actually amplify an incoming current (electron) in a series of dynode stages, to create an output current that is actually easy to quantify for measurement equipment. They find uses in everything from Raman spectroscopy to medical diagnostics and night vision sensors.

The specific PMT that [Huygens Optics] uses in the video is the Hamamatsu R928. This has a spectral response from 185 nm to 900 nm. The electrode mesh is where photons enter the tube, triggering the photo cathode which then ejects electrons. These initial electrons are then captured and amplified by each dynode stage, until the anode grid captures most of the electrons. The R928 has a gain of 1.0 x 10⁷ (10 million) at -1 kV supply voltage, so each dynode multiplies the amount of electrons by six, with a response time of 22 ns.

PMTs are unsurprisingly not cheap, but [Huygens Optics] was lucky to find surplus R928s on Marktplaats (Dutch online marketplace) for €100 including a cover, optics and a PCB with the socket, high-voltage supply (Hamamatsu C4900) and so on. Without documentation the trick was to reverse-engineer the PCB’s connections to be able to use it. In the video the components and their function are all briefly covered, as well as the use of opamps like the AD817 to handle the output signal of the R928. Afterwards the operation of the PMT is demonstrated, which makes clear just how sensitive the PMT is as it requires an extremely dark space to not get swamped with photons.

An interesting part about the demonstration is that it also shows the presence of thermionic emissions: anode dark current in the datasheet. This phenomenon is countered by cooling the PMT to prevent these emissions if it is an issue. In an upcoming video the R928 will be used for more in-depth experiments, to show much more of what these devices are capable of.

Thanks to [cliff claven] for the tip.

Continue reading “How Photomultipliers Detect Single Photons”

Celebrating The [Jack Ells] Automatic Photometric Telescope

Here at Hackaday, we take pride in presenting the freshest hacks and the best of what’s going on today in the world of hardware hacking. But sometimes, we stumble upon a hack from the past so compelling that we’ve got to bring it to you, so we can all marvel at what was possible in the Before Times.

This one, a completely homebrewed automatic photometric telescope, was designed and built by the father-son team of [Jack Ells] and [Peter Ells]. From the elder [Ells]’ field notes, the telescope saw its first light in 1988, giving us some idea of the scale of problems that had to be overcome to get this wonderful machine working. The optics are straightforward, as least as telescopes go — it’s an f-4.0 Newtonian reflector with an 8.5″ (221 mm) primary mirror on an equatorial mount. The telescope is very rugged-looking indeed, and even stands on brick piers for stability. The telescope’s mount is controlled by a BBC Micro running custom BASIC software.

For the photometric parts, the [Ells] boys installed a photo-multiplier tube at the focus of the telescope. More precisely, they used a liquid light guide to connect the eyepiece to a rack full of equipment, which included the PM tube, its high-voltage power supply, and a series of signal conditioners and counter circuits. The idea was to view a single star through a pinhole mask over the objective of the telescope and count the rate of photons received over time. Doing so would reveal periodic changes in the star’s brightness. Today we’d use similar data to search for exoplanet transits; while we don’t think that was a thing back in 1988, it looks like this telescope could easily have handled the job.

Sadly, [Jack Ells] died only two years after finishing the telescope. But he left it with his son, who eventually moved it to a location with better seeing conditions, where it gathered data for another eight years. The quality of the work is amazing, and as father-son projects go, this one is tough to beat.

Continue reading “Celebrating The [Jack Ells] Automatic Photometric Telescope”

Gamma Ray Spectroscopy The Pomelo Way

Depending on the circumstances you find yourself in, a Geiger counter can be a tremendously useful tool. With just a click or a chirp, it can tell you if any invisible threats lurk. But a Geiger counter is a “yes or no” instrument; it can only tell you if an ionizing event occurred, revealing nothing about the energy of the radiation. For that, you need something like this gamma-ray spectroscope.

Dubbed the Pomelo by [mihai.cuciuc], the detector is a homebrew solid-state scintillation counter made from a thallium-doped cesium iodide crystal and a silicon photomultiplier. The scintillator is potted in silicone in a 3D printed enclosure, to protect the hygroscopic crystal from both humidity and light. There’s also a temperature sensor on the detector board for thermal compensation. The Pomelo Core board interfaces with the physics package and takes care of pulse shaping and peak detection, while a separate Pomelo Zest board has an ESP32-C6, a small LCD and buttons for UI, SD card and USB interfaces, and an 18650 power supply. Plus a piezo speaker, because a spectroscope needs clicks, too.

The ability to determine the energy of incident photons is the real kicker here, though. Pomelo can detect energies from 50 keV all the way up to 3 MeV, and display them as graphs using linear or log scales. The short video below shows the Pomelo in use on samples of radioactive americium and thorium, showing different spectra for each.

[mihai.cuciuc] took inspiration for the Pomelo from this DIY spectrometer as well as the CosmicPi.

Continue reading “Gamma Ray Spectroscopy The Pomelo Way”

Single Photon Detection With Photomultipliers

Unless you are an audiophile, you likely think of tubes as mostly relegated to people who work on old technology. However, photomultiplier tubes are still useful compared to more modern sensors, and [Jaynes Network] has a look into how they work, especially with scintillating detectors.

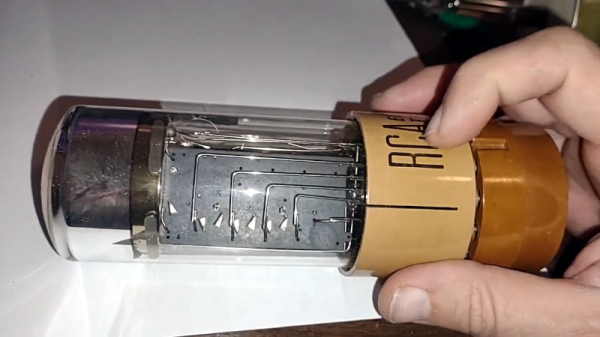
The RCA photomultiplier he examines has ten stages and can detect even a single photon. Combined with a scintillating detector, they make good radiation detectors.

We can’t help but smile when we hear someone obviously in love with the engineering behind a tube like this. We get it. The inside of the tube is crowded, so it is hard to identify the dynodes and other portions, but some diagrams make it readily apparent how the tube does its job.

We were impressed with how good the documentation that came with the tube looked, considering its age. We mean the condition it was in. The document itself was obviously a reproduction of a typewritten document with hand-drawn figures and graphs.

We were hoping for some footage of the tube in action, but we’ll have to wait for a future video. We are betting that is coming, though. Although there are some solid-state detectors, they are not suitable for all applications. There was a time, though, when the tubes were in many applications, including X-ray scanners and photography equipment.

Continue reading “Single Photon Detection With Photomultipliers”

Digital X-Ray Scanner Teardown Yields Bounty Of Engineering Goodies

We’ll just go ahead and say it right up front: we love teardowns. Ripping into old gear and seeing how engineers solved problems — or didn’t — is endlessly fascinating, even for everyday devices like printers and radios. But where teardowns really get interesting is when the target is something so odd and so specialized that you wouldn’t normally expect to get a peek at the outside, let alone tramp through its guts.

[Mads Barnkob] happened upon one such item, a Fujifilm FCR XG-1 digital radiography scanner. The once expensive and still very heavy piece of medical equipment was sort of a “digital film system” that a practitioner could use to replace the old-fashioned silver-based films used in radiography, without going all-in on a completely new digital X-ray suite. It’s a complex piece of equipment, the engineering of which yields a lot of extremely interesting details.

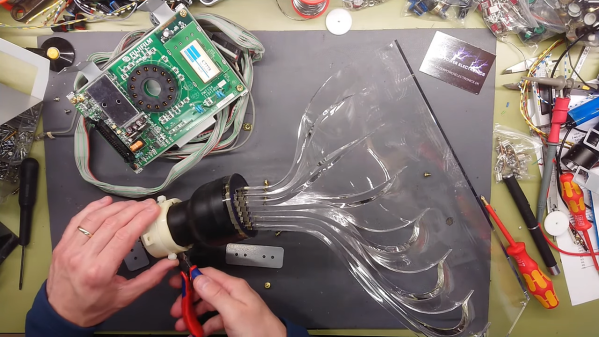
The video below is the third part of [Mads]’ series, where he zeroes in on the object of his desire: the machine’s photomultiplier tube. The stuff that surrounds the tube, though, is the real star, at least to us; that bent acrylic light pipe alone is worth the price of admission. Previous videos focused on the laser scanner unit inside the machine, as well as the mechatronics needed to transport the imaging plates and scan them. The video below also shows experiments with the PM tube, which when coupled with a block of scintillating plastic worked as a great radiation detector.

We’ve covered a bit about the making of X-rays before, and a few of the sensors used to detect them too. We’ve also featured a few interesting X-ray looks inside of tech, from a Starlink dish to knock-off adapters.

Continue reading “Digital X-Ray Scanner Teardown Yields Bounty Of Engineering Goodies”