Pick-And-Place Machine For Candy

Every December and May the senior design projects from engineering schools start to roll in. Since the students aren’t yet encumbered with real-world detractors (like management) the projects are often exceptional, unique, and solve problems we never even thought we had. Such is the case with [Mark] and [Peter]’s senior design project: a pick and place machine that promises to solve all of life’s problems.

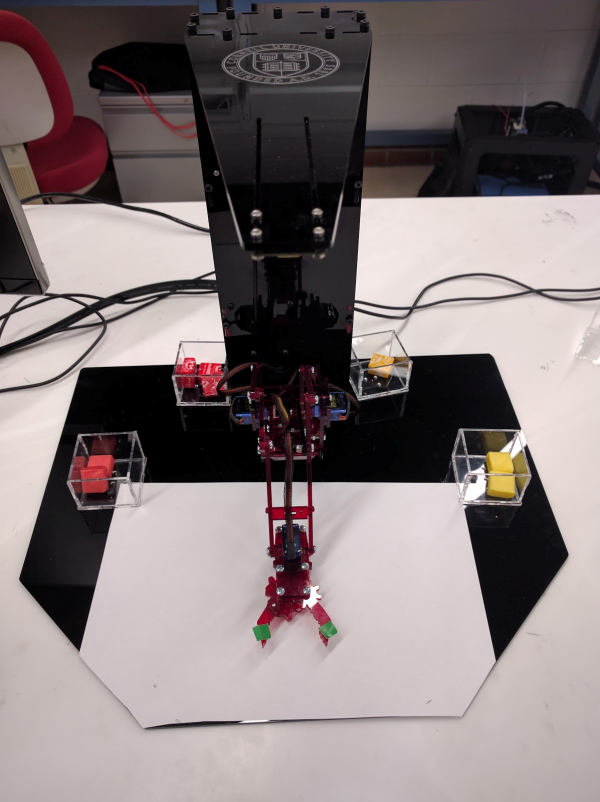
Of course we’ve seen pick-and-place machines before, but this one is different. Rather than identifying resistors and capacitors to set on a PCB, this machine is able to identify and sort candies. The robot — a version of the MeARM — has three degrees of freedom and a computer vision system to alert the arm as to what it’s picking up and where it should place it. A Raspberry Pi handles the computer vision and feeds data to a PIC32 which interfaces with the hardware.

One of the requirements for the senior design class was to keep the budget under $100, which they were able to accomplish using pre-built solutions wherever possible. Robot arms with dependable precision can’t even come close to that price restraint. But this project overcomes the lack of precision in the MeArm by using incremental correcting steps to reach proper alignment. This is covered in the video demo below.

Senior design classes are a great way to teach students how to integrate all of their knowledge into a final class, and the professors often include limits they might find in the real world (like the budget limit in this project). The requirement to thoroughly document the build process is also a lesson that more people could stand to learn. Senior design classes have attempted to solve a lot of life’s other problems, too; from autonomous vehicles to bartenders, there’s been a solution for almost every problem.

Continue reading “Pick-And-Place Machine For Candy”

80-PIC32 Cluster Does Fractals

One way to get around limitations in computing resources is to throw more computers at the problem. That’s why even cheap consumer-grade computers and phones have multiple cores in them. In supercomputing, it is common to have lots of processors with sophisticated sharing mechanisms.

[Henk Verbeek] decided to take 80 inexpensive PIC32 chips and build his own cluster programmed in — of all things — BASIC. The devices talk to each other via I2C. His example application plots fractals on another PIC32-based computer that has a VGA output. You can see a video of the device in action, below.

Continue reading “80-PIC32 Cluster Does Fractals”

PIC Mesh, Accessible Distributed Networking

Wireless networks have been reduced to a component, for most of us. We fit a device, maybe an ESP8266 module or similar, and as if by magic a network exists. The underlying technology has been abstracted into the firmware of the device, and we never encounter it directly. This is no bad thing, because using wireless communication without having to worry about its mechanics gives us the freedom to get on with the rest of our work.

It is however interesting once in a while to take a look at the operation of a real wireless network, and [Alex Wong], [Brian Clark], and [Raghava Kumar] have given us a project with the opportunity to do just that. Their PIC Mesh university project is a distributed wireless mesh network using 2.4GHz NRF24L01 transceiver modules and PIC32 microcontrollers. They have it configured for demonstration purposes with a home automation system at the application layer, however it could be applied to many other applications.

The real value in this project is in its comprehensive but easy to read write-up of the kind you’d expect from a university project. The front page linked above has an overview of how the mesh works, but there are also pages taking us through the hardware, the networking software layer, and the home automation application layer. If you have ever wanted to understand a simple mesh networking system, this is a good place to start.

We’ve covered quite a few mesh networks over the years, but sadly we can only link you to a few of them. We’ve had a mesh network using the Raspberry Pi, Project Byzantium’s “ad-hoc wireless mesh networking for the zombie apocalypse“, and a 1000-node Xbee network for testing purposes.

Hybrid Raspberry Pi + PIC32 = Oscilloscope And Function Generator

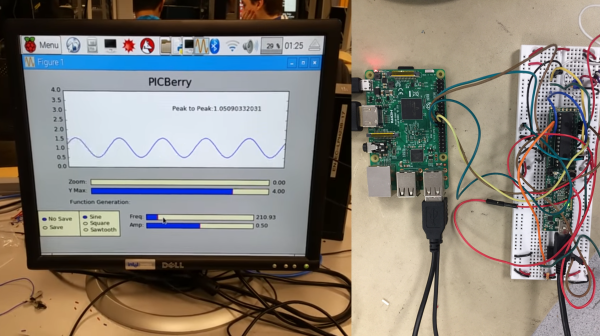
The PicBerry is a student final project by [Advitya], [Jeff], and [Danna] that takes a hybrid approach to creating a portable (and affordable) combination digital oscilloscope and function generator. It’s based on the Raspberry Pi, features an intuitive Python GUI, and can generate and measure simultaneously.

But wait! The Raspberry Pi is a capable little Linux machine, but meeting real-time deadlines isn’t its strong suit. That’s where the hybrid approach comes in. The Pi takes care of the user interface and other goodies, and a PIC32 over SPI is used for 1 MHz sampling and running a DAC at 500 kHz. The idea of combining them into PicBerry is to get the best of both worlds, with the Pi and PIC32 each doing what they are best at. The readings are sent in batches from the PIC32 to the Pi, where the plot is updated every 30 ms so that user does not perceive any visible lag.

The project documentation notes that improvements can be made, the speeds are a far cry from regular bench equipment, and the software lacks some typical features such as triggering, but overall not bad at all for under $50 of parts. In fact, there are hardly any components at all beyond the Raspberry Pi, the PIC32, and a MCP4822 digital-to-analog converter. A short demo video is embedded below.

Continue reading “Hybrid Raspberry Pi + PIC32 = Oscilloscope And Function Generator”

PIC32 DMA SPI

[Mike] wanted to drive several SPI peripheral from a PIC32. He shows how much latency his conventional interrupt handlers were taking away from his main task. He needed something more efficient. So he created the SPI channels using DMA. He also made a video (see below) with a very clear explanation about why he did it and shows oscilloscope traces about how it all works.

Although the project is specific to the PIC32, the discussion about DMA applies to any computer with direct memory access. The only thing missing is the code. However, there are plenty of examples on the web you can look at, including a Microchip webinar.

Continue reading “PIC32 DMA SPI”

4-Bit Audio Output Via Voltage Reference

[Bruce Land] switched his microprocessor programming class over from Atmel parts to Microchip’s PIC32 series, and that means that he’s got a slightly different set of peripherals to play with. One thing that both chips lack, however is a digital-to-analog converter (DAC). Or do they? (Dun-dun-dun-duuuuhnnnn!)

The PIC part has a programmable, sixteen-level voltage reference. And what is a Vref if not a calibrated DAC? With that in mind, [Bruce] took to documenting its performance and starting to push it far beyond the manufacturer’s intentions. Turns out that the Vref has around 200 kHz of bandwidth. (Who would update a voltage reference 200,000 times per second?)

Anyway, [Bruce] being [Bruce], he noticed that the bits weren’t changing very often in anything more than the least significant bit: audio waveforms, sampled fast enough, are fairly continuous. This suggests using a differential PCM encoding, which knocks the bitrate down by 50% and saves a lot on storage. (Links to all the code for this experiment is inline with his writeup.)

The audio hacks that come out of [Bruce]’s Cornell ECE classes are always a treat. From the lock that you have to sing to open, to chiptunes programmed into an FPGA, there’s something for music fans of all inclinations.

A Shareable Wireless Biometric Flash Drive

Wireless storage and biometric authentication are both solved problems. But as [Nathan] and [Zhi] have noticed, there is no single storage solution that incorporates both. For their final project in [Bruce Land]’s ECE 4760, they sought to combine the two ideas under a tight budget while adding as many extras as they could afford, like an OLED and induction coil charging.

final_product_600Their solution can be used by up to 20 different people who each get a slice of an SD card in the storage unit There are two physical pieces, a base station and the wireless storage unit itself. The base station connects to the host PC over USB and contains an Arduino for serial pass-through and an nRF24L01+ module for communicating with the storage side. The storage drive’s components are crammed inside a clear plastic box. This not only looks cool, it negates the need for cutting out ports to mount the fingerprint sensor and the OLED. The sensor reads the user’s credentials through the box, and the authentication status is displayed on an OLED. Files are transferred to and from the SD card over a second nRF24L01+ through the requisite PIC32.

Fingerprint authorization gives the unit some physical security, but [Nathan] and [Zhi] would like to add an encryption scheme. Due to budget limitations and time constraints, the data transfer isn’t very fast (840 bytes/sec), but this isn’t really the nRF modules’ fault—most of the transmission protocol was implemented in software and they simply ran out of debugging time. There is also no filesystem architecture. In spite of these drawbacks, [Nathan] and [Zhi] created a working proof of concept for wireless biometric storage that they are happy with. Take a tour after the break.
Continue reading “A Shareable Wireless Biometric Flash Drive”