JumpRoaCH Is Kind Of Cute, Kind Of Creepy

There’s a theory that the fear of scurrying things is genetic. Likewise, a similar theory arose about the tendency for humans to find helpless things cute. After all, our useless babies do best in a pest free environment. This all could explain why we found this robotic roach to be both a little cute and a little creepy.

The university sponsored project, JumpRoaCH, is a collaboration between South Korea’s SNU Biorobotics Lab and Berkeley’s Biomimetic Millisystems Lab. Imitating insects has been a popular avenue for robotic research, and often results in very interesting experiments.

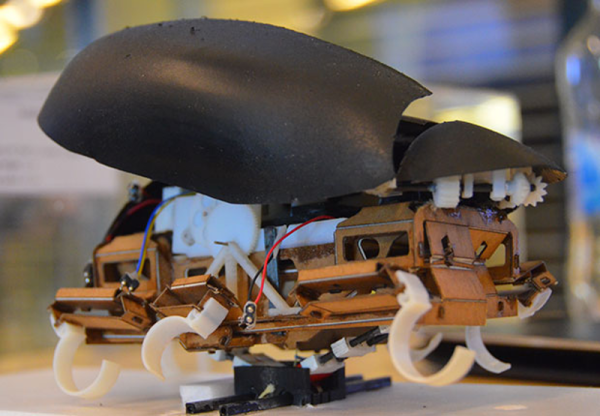
This robot looks like a ladybug going through its rebellious teen phase. It runs on six hook shaped legs which allow it to traverse a wider array of surfaces than wheels would, at the expense of speed and higher vibrations. The robot does a very convincing, if wobbly, scurry across the surface of its test table.

It also has a secret attack in the form of a single Rockem Sockem Robot arm located on its belly. With a powerful burst, the arm can launch the robot up a few feet to a higher surface. If the robot lands on its wheels the researchers high-five. If the robot lands on its back, it can use its ,”wings,” to flip itself right-side-up again.

The resulting paper (PDF file) has a nice description of the robot and its clever jumping mechanism. At least if these start multiplying like roaches, hackers will never short for tiny motors for their projects. Video after the break.

Continue reading “JumpRoaCH Is Kind Of Cute, Kind Of Creepy”

Simple Clock Is Great Stepper Motor Project

You’d think that we’ve posted every possible clock here at Hackaday. It turns out that we haven’t. But we have seen enough that we’ve started to categorize clock builds in our minds. There are the accuracy clocks which strive to get every microsecond just right, the bizzaro clocks that aim for most unique mechanism, and then there are “hello world” clocks that make a great introduction to building stuff.

Today, we’re looking at a nice “hello world” clock. [electronics for everyone]’s build uses a stepper motor and a large labelled wheel that rotates relative to a fixed pointer. Roll the wheel, and the time changes. It looks tidy, it’s cyclical by design, and it’s a no-stress way to get your feet wet driving stepper motors. And it comes with a video, embedded below.

Continue reading “Simple Clock Is Great Stepper Motor Project”

Unary Clock For The Binary-Challenged

If binary clocks have you confused by all the math required to figure out what time it is, we have the solution for you: a unary clock. After all, what’s simpler than summing up powers of two? Powers of one! To figure out the time, you start with the ones digit. If it’s on, you add one to the total. Then move on to the next digit. Since 12 equals one, you add another one if it’s lit. Then on to the third LED. 13 = 1, so if it’s lit, you add another one, and so on.

OK, we’re messing around. Calling this a “unary” clock is ridiculous. When it’s seven o’clock, there are seven LEDs lit. Nice and easy to read. Sixty minute LEDs is silly, so here each minute LED stands for five minutes. Good enough.

What we really like about this clock is the build. It’s intended as educational for school kids, so it has to be simple to build and easy to personalize. Building the body out of Lego bricks fits the specs nicely. Transparent Lego bricks are used to give the white LEDs some color. That was too bright, so [Shrimping It] added paper cutouts from a hole punch as diffusers.

Clock builds are a great intro to electronics because they offer so many possibilities. Whether you want to go geary, use the clock as an excuse to try out fabrication techniques, or showcase a neat display technology, your imagination has a lot of room to wander. Show us yours?

Mike Szczys Ends 8-Bit Vs 32-Bit Holy War!

If you’ve read through the comments on Hackaday, you’ve doubtless felt the fires of one of our classic flame-wars. Any project done with a 32-bit chip could have been done on something smaller and cheaper, if only the developer weren’t so lazy. And any project that’s squeezes the last cycles of performance out of an 8-bit processor could have been done faster and more appropriately with a 32-bit chip.

bits_argument

Of course, the reality for any given project is between these two comic-book extremes. There’s a range of capabilities in both camps. (And of course, there are 16-bit chips…) The 32-bit chips tend to have richer peripherals and run at higher speeds — anything you can do with an 8-bitter can be done with its fancier cousin. Conversely, comparatively few microcontroller applications outgrow even the cheapest 8-bitters out there. So, which to choose, and when?

Eight Bits are Great Bits

The case that [Mike] makes for an 8-bit microcontroller is that it’s masterable because it’s a limited playground. It’s a lot easier to get through the whole toolchain because it’s a lot shorter. In terms of debugging, there’s (often) a lot less that can go wrong, letting you learn the easy debugging lessons first before moving on to the truly devilish. You can understand the hardware peripherals because they’re limited.

And then there’s the datasheets. The datasheet for a chip like the Atmel ATMega168 is not something you’d want to print out, at around 660 pages long. But it’s complete. [Mike] contrasts with the STM32F405 which has a datasheet that’s only 200 pages long, but that’s just going over the functions in principle. To actually get down to the registers, you need to look at the programming manual, which is 1,731 pages long. (And that doesn’t even cover the various support libraries that you might want to use, which add even more to the documentation burden.) The point is, simpler is simpler. And if you’re getting started, simpler is better.

Continue reading “Mike Szczys Ends 8-Bit Vs 32-Bit Holy War!”

Link Trucker Is A Tiny Networking Giant

If you’re a networking professional, there are professional tools for verifying that everything’s as it should be on the business end of an Ethernet cable. These professional tools often come along with a professional pricetag. If you’re just trying to wire up a single office, the pro gear can be overkill. Unless you make it yourself on the cheap! And now you can.

[Kristopher Marciniak] designed and built an inexpensive device that verifies the basics:

  • Is the link up? Is this cable connected?
  • Can it get a DHCP address?
  • Can it perform a DNS lookup?
  • Can it open a webpage?

What’s going on under the hood? A Raspberry Pi, you’d think. A BeagleBoard? Our hearts were warmed to see a throwback to a more civilized age: an ENC28J60 breakout board and an Arduino Uno. That’s right, [Kristopher] replicated a couple-hundred dollar network tester for the price of a few lattes. And by using a pre-made housing, [Kristopher]’s version looks great too. Watch it work in the video just below the break.

Building an embedded network device used to be a lot more work, but it could be done. One of our favorites is still [Ian Lesnet’s] webserver on a business card from way back in 2008 which also used the ENC28J60 Ethernet chip.
Continue reading “Link Trucker Is A Tiny Networking Giant”

How To Build A Pocket-Sized MBed Signal Generator

Last month, I talked about how to get started with mBed and ARM processors using a very inexpensive development board. I wanted to revisit mBed, though, and show something with a little more substance. In particular, I often have a need for a simple and portable waveform generator. It doesn’t have to be too fancy or meet the same specs as some of the lab gear I have, but it should be easy to carry, power off USB, and work by itself when required.

My requirements mean I needed a slightly more capable board. In particular, I picked up a K64F board. This is very similar to the KL25Z board but has a bit more of everything–speed, memory, etc. What I really wanted, though, was the SD card slot. I did, however, do my early testing on a KL25Z, so if you have one, you can still work through the code, although standalone operation won’t be possible. The price jumps from $13 to $35, but you get a lot more capability for the price.

Continue reading “How To Build A Pocket-Sized MBed Signal Generator”

Flat Pack Lamp

Flat Pack Elastic Band Lamp Is A Thing Of Beauty

[Matt] was looking for a project for his senior industrial design studio at Wentworth Institute of Technology. He ended up designing a clever lamp that can be flat packed. [Matt] started by drawing out designs on paper. He really liked the idea of combining curves with straight lines, but he wanted to translate his two-dimensional drawings into a three-dimensional shape.

zOz0ys6 - Imgur
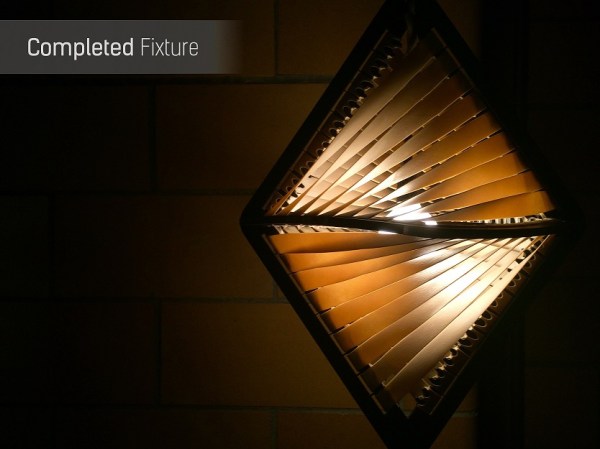
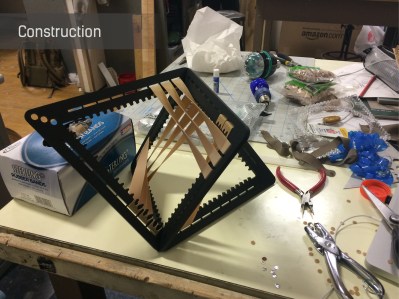
Having access to a laser cutter made the job much easier than it could have been and allowed [Matt] to go through many designs for the lamp frame. The two main pieces were cut from acrylic and include mounting pegs for the elastic bands. The two plastic pieces are designed to slot together, forming a sort of diamond shape.

The final version of the lamp required that the elastic bands had holes punched in them for mounting. The holes were placed over the small pegs to keep the bands in place. [Matt] used 3/4″ industrial elastic bands for this project. He then used a 120V 15W candelabra light bulb to illuminate the lamp. The final design is not only beautiful, but it can be flat packed and manufactured inexpensively.

If you want more inspiration for artistically designed lamps check out this one that uses the corrugation in cardboards as a shade pattern.

[via reddit]