Taking “Movies” Of Light In Flight

This one isn’t clickbait, but it is cheating. [Brian Haidet], the guy behind Alpha Phoenix, has managed to assemble movie footage of a laser beam crossing his garage, using a rig he put together for just a few hundred dollars. How, you ask? Well, for the long version, you’re going to want to watch the video, also embedded below. But we’ll give you the short version here.

Light travels about a foot in a nanosecond. What have you got that measures signals on a nanosecond scale pretty reliably? Of course, it’s your oscilloscope. The rest of [Brian]’s setup includes a laser that can pull off nanosecond pulses, a sensor with a nanosecond-ish rise time, and optics that collect the light over a very small field of view.

He then scans the effective “pinhole” across his garage, emitting a laser pulse and recording the brightness over time on the oscilloscope for each position. Repeating this many thousands of times and putting them all together relative to the beginning of each laser pulse results in a composite movie with the brightness at each location resolved accurately enough to watch the light beam fly. Or to watch different time-slices of thousands of beams fly, but as long as they’re all the same, there’s no real difference.

Of course, this isn’t simple. The laser driver needs to push many amps to get a fast enough rise time, and the only sensor that’s fast enough to not smear the signal is a photomultiplier tube. But persistence pays off, and the results are pretty incredible for something that you could actually do in your garage.

Photomultiplier tubes are pretty damn cool, and can not only detect very short light events, but also very weak ones, down to a single photon. Indeed, they’re cool enough that if you get yourself a few hundred thousand of them and put them in a dark place, you’re on your way to a neutrino detector.  Continue reading “Taking “Movies” Of Light In Flight”

Building An Automotive Load Dump Tester

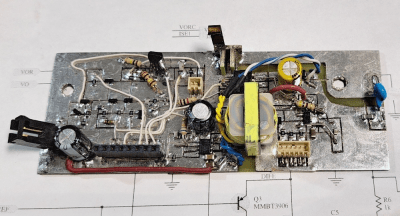
For those who have not dealt with the automotive side of electronics before, it comes as somewhat of a shock when you find out just how much extra you have to think about and how tough the testing and acceptance standards are. One particular test requirement is known as the “load dump” test. [Tim Williams] needed to build a device (first article of three) to apply such test conditions and wanted to do it as an exercise using scrap and spares. Following is a proper demonstration of follow-through from an analytical look at the testing specs to some interesting hand construction.

Manhattan-style layout

The load dump test simulates the effect of a spinning automotive alternator in a sudden no-load scenario, such as a loose battery terminal. The sudden reduction in load (since the battery no longer takes charging current) coupled with the inductance of the alternator windings causes a sudden huge voltage spike. The automotive standard ISO 7637-2:2011 dictates how this pulse should be designed and what load the testing device must drive.

The first article covers the required pulse shape and two possible driving techniques. It then dives deep into a case study of the Linear Tech DC1950A load dump tester, which is a tricky circuit to understand, so [Tim] breaks it down into a spice model based around a virtual transistor driving an RC network to emulate the pulse shape and power characteristics and help pin down the specs of the parts needed. The second article deals with analysing and designing a hysteric controller based around a simple current regulator, which controls the current through a power inductor. Roughly speaking, this circuit operates a bit like a buck converter with a catch diode circulating current in a tank LC circuit. A sense resistor in the output path is used to feedback a voltage, which is then used to control the driving pulses to the power MOSFET stage. [Tim] does a good job modeling and explaining some of the details that need to be considered with such a circuit.

Continue reading “Building An Automotive Load Dump Tester”

This Air Particulate Sensor Can Also Check Your Pulse Rate

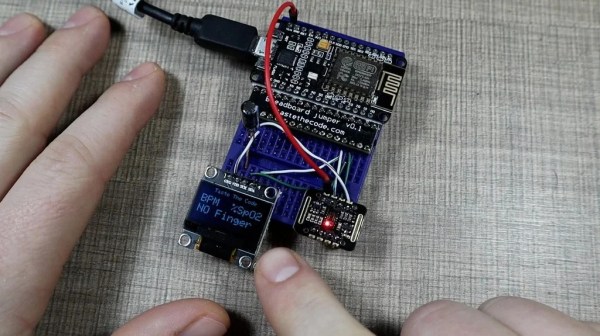
The MAX30105 is an optical sensor capable of a great many things. It can sense particulate matter in the air, or pick up the blinking of an eye. Or, you can use it as a rudimentary way to measure your heart rate and blood oxygen levels. It’s by no means a medical grade tool, but this build from [Taste The Code] is still quite impressive.

The MAX30105 contains red, green, and infrared LEDs, and a very sensitive light detector. The way it works is by turning on its different LEDs, and then carefully measuring what gets reflected back. In this way it can measure particles in the air,  such as smoke, which is actually what it was designed for originally. Or, if you press your finger up against it, it can measure the light coming back from your blood and determine its oxygenation level. By detecting the variation in the light over time, it’s possible to pick up your pulse, too.

Getting this data out of the sensor is remarkably easy. One need only hook it up to a suitable microcontroller like the ESP8266 and use the MAX3010X library to talk to it. [Taste The Code] did exactly that, and also hooked up a screen for displaying the captured data. Alternatively, if you want the raw data from the sensor, you can get that too.

It should be noted that this build was done for educational purposes only. You shouldn’t rely on a simple DIY device for gathering useful medical data; there are reasons the real gear is so expensive, after all. We’ve looked at this sensor before, too, not long after it first hit the market. Continue reading “This Air Particulate Sensor Can Also Check Your Pulse Rate”

Tattoo-Removal Laser Brought Out Of Retirement For A Megawatt Of Fun

We’ve got to say that [Les Wright] has the most fun on the internet, at least in terms of megawatts per dollar. Just look at his new video where he turns a $30 eBay tattoo-removal laser into a benchtop beast.

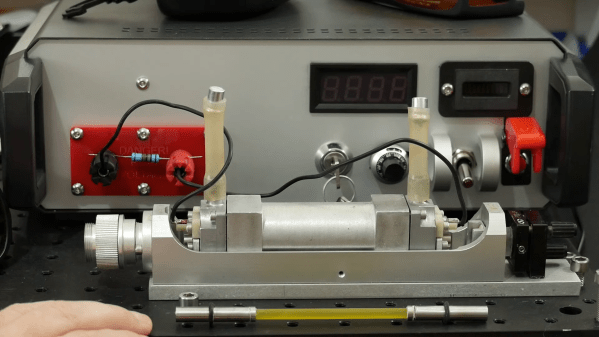
The junk laser in question is a neodymium:YAG pulse laser that clearly has seen better days, both externally and internally. The original pistol-grip enclosure was essentially falling apart, but was superfluous to [Les]’ plans for the laser. Things were better inside the business end of the gun, at least in terms of having all the pieces in place, but the teardown still revealed issues. Chief among these was the gunk and grunge that had accumulated on the laser rod and the flash tube — [Les] blamed this on the previous owner’s use of tap water for cooling rather than deionized water. It was nothing a little elbow grease couldn’t take care of, though. Especially since the rest of the laser bits seemed in good shape, including the chromium:YAG Q-switch, which allows the lasing medium to build up a huge pulse of photons before releasing them in one gigantic pulse.

Cleaned up and with a few special modifications of his own, including a custom high-voltage power supply, [Les]’ laser was ready for tests. The results are impressive; peak optical power is just over a megawatt, which is enough power to have some real fun. We’ll be keen to see what he does with this laser — maybe blasting apart a CCD camera?

Continue reading “Tattoo-Removal Laser Brought Out Of Retirement For A Megawatt Of Fun”

Truthsayer Uses Facial Recognition To See If You’re Telling The Truth

It’s hard to watch [Mark Zuckerberg]’s 2018 Congressional testimony and not come to the conclusion that he is, at a minimum, quite a bit different than the average person. Of course, having built a multibillion-dollar company that drastically changed everything about the way people communicate is pretty solid evidence of that, but the footage at least made a fun test case for this AI truth-detecting algorithm.

Now, we’re not saying that anyone in these videos was lying, and neither is [Fletcher Heisler]. His algorithm, which analyzes video of a person and uses machine vision to pick up cues that might be associated with the stress of untruthfulness, is far from perfect. But as the first video below shows, it is a lot of fun to see it at work. The idea is to capture data like pulse rate, gaze direction, blink rate, mouth posture, and even hand position and use them as a proxy for lying. The second video, from [Fletcher]’s recent DEFCON talk, has much more detail.

The key to all this is finding human faces in a video — a task that seemed to fail suspiciously frequently when [Zuck] was on camera — using OpenCV and MediaPipe’s Face Mesh. The subject’s pulse is detected by watching for subtle changes in the color of a subject’s cheeks as blood flows through them, which we’ve heard about plenty of times but never before seen presented so clearly and executed so simply. Gaze direction, blinking, and lip compression are fairly easy to detect too. [Fletcher] also threw in the FER library for facial expression recognition, to get an idea of the subject’s mood. Together, these cues form a rough estimate of the subject’s truthiness, which [Fletcher] is quick to point out is just for entertainment purposes and totally shouldn’t be used on your colleagues on the next Zoom call.

Does [Fletcher]’s facial mesh look familiar? It should, since we once watched him twitch his way through a coding interview.

Continue reading “Truthsayer Uses Facial Recognition To See If You’re Telling The Truth”

Dead Simple Time-Domain Reflectometry With Just A Battery And An Oscilloscope

“Time-domain reflectometry” sure sounds like something that needs racks of expensive equipment to accomplish. In reality, TDR is just measuring the time between injecting a pulse into a cable and receiving its echo, either from the other end of the cable or from some fault or defect along the way. It’s a useful technique, and as [Allen Wolke (W2AEW)] shows us, it can be accomplished with little more than a battery, a resistor, and an oscilloscope. And a little math, of course.

There are, of course, dedicated time-domain reflectometers, but all of them are really just elaborations of the basic principles [W2AEW] demonstrates with his simple setup. The oscilloscope is set up with a tee connector on one channel; one side of the tee is connected to the cable under test, while the shield conductor of the other side is connected to the negative terminal of a 9V battery. A resistor connected to the center conductor is used to complete the circuit, which sends a brief pulse down the test cable. The scope is set up to capture the outgoing pulse as well as the return pulse, allowing the time between the two to be measured. Some simple math gives the length of the cable, the distance to a fault, or with a little rearrangement, the velocity factor of the cable.

The video below shows the simple method at work on coax and Cat 5e Ethernet cable. It even worked on a roll of zip cable, which was a little surprising. If this technique is too simple, you can always elaborate a bit and roll your own TDR tester. Googly eyes optional, of course, but recommended.

Continue reading “Dead Simple Time-Domain Reflectometry With Just A Battery And An Oscilloscope”

Pulse Generator Does The Job With An STM8

When working with hardware, whether a repair or a fresh build, it’s often necessary to test something. Depending on what you’re working with, this can be easy or a total pain if you can’t get the right signal to the right place. To eliminate this frustrating problem, [WilkoL] built a useful pulse generator for use in the lab.

[WilkoL] notes that historically, the job of generating pulses of varying length and frequency would be achieved with a smattering of 555 timers. While this is a perfectly cromulent way to do so, it was desired to take a different approach for the added flexibility modern hardware can offer. The pulse generator is instead built around an STM8 microcontroller; an unusual choice in this era, to be sure. [WilkoL] specified the part for its incredibly low cost, and highly capable timer hardware – perfect for the job.

Combined with an ST7735 TFT LCD screen, and programmed in bare metal for efficiency’s sake, the final project is installed in a project box with controls for frequency and pulse length – no more, no less. Capable of pulse lengths from 250 ns to 90 s, and frequencies from 10 mHz to 2 MHz, it’s a tool that should be comfortable testing everything from servos to mechanical counters.

Of course, if you need to get down to picosecond timescales, an avalanche pulse generator might be more your speed. Video after the break.

Continue reading “Pulse Generator Does The Job With An STM8”