‘Boy, I wish the Raspberry Pi had a SATA port’. This is the plea that echoes through the Internet, and for once, the Internet is not wrong. A SATA port — or any connector to a big, dumb spinny disk — would be a great addition to the Raspberry Pi ecosystem.
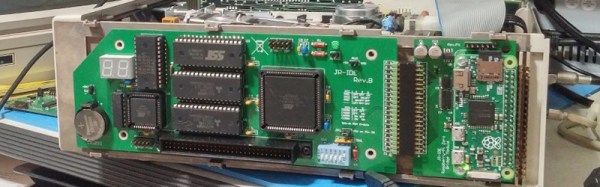
[AlanH]’s entry to the Hackaday Prize is the exact opposite of what everyone wants. The NetPi-IDE is a Parallel ATA IDE disk emulator that turns an inexpensive Raspi Zero into a big, dumb, unspinny hard drive. Drop this machine in your Windows 98 Starcraft battlestation, and you have a hard drive that you can ssh into.
As with any build involving a lot of data, bandwidth is important. The highest bandwidth interface on the Pi’s GPIO ports is the SPI interface. [AlanH] is hanging a Lattice MachXO2 FPGA off the SPI port and using that to emulate a disk. In the future, he’s going to move to the much more open Lattice iCE40HX, compatable with the Open Source IceStorm synthesis chain.
The feature set for this project includes proper IDE disk emulation with sizes ranging from 10 Megabytes to 8 Gigabytes tested so far. If you need anything bigger, you don’t need an IDE drive. A DOS redirector allows mounting any arbitrary directory to a DOS drive letter, a virtual network interface turns this project into The Cloud™, and a serial console is mapped to unused IDE registers, allowing any host system to login to the Pi without any external cables.
While it’s not what everyone wants in a Pi, this is an exceptionally cool project. PATA drives are getting old, and the systems supporting them are too. If you want to keep those retrocomputers running, we have to start planning now, and there’s no better way to do that than with cheap hardware and Open Source toolchains.


![Does [Eben] carry a silver marker with him, laptops for the signing of?](https://hackaday.com/wp-content/uploads/2017/03/archie-with-laptop.jpg)