Ten years ago the concept of having on our desks an affordable 3D printer knocking out high quality reproducible prints, with sub-mm accuracy, in a wide range of colours and material properties would be the would be just a dream. But now, it is reality. The machines that are now so ubiquitous for us hackers, are largely operating with the FDM principle of shooting molten plastic out of a moving nozzle, but they’re not the only game in town. A technique that has also being around for donkeys’ years is SLS or Selective Laser Sintering, but machines of this type are big, heavy and expensive. However, getting one of those in your own ‘shop now is looking a little less like a dream and more of a reality, with the SLS4All project by [Tomas Starek] over on hackaday.io.
[Tomas] has been busy over the past year, working on the design of his machine and is now almost done with the building and testing of the hardware side. SLS printing works by using a roller to transfer a layer of powdered material over the print surface, and then steering a medium-power laser beam over the surface in order to heat and bond the powder grains into a solid mass. Then, the bed is lowered a little, and the process repeats. Heating of the bed, powder and surrounding air is critical, as is moisture control, plus keeping that laser beam shape consistent over the full bed area is a bit tricky as well. These are all hurdles [Tomas] has to overcome, but the test machine is completed and is in a good place to start this process control optimisation fun. Continue reading “DIY SLS 3D Printer Getting Ready To Print”→
Back in grad school, we biology students were talking shop at lunch one day. We “lab rats” were talking about the tools of the trade, which for most of us included things like gel electrophoresis, restriction endonucleases, and polymerase chain reaction. Not to be left out, a fellow who studied fire ants chimed in that his main tool was a lawn chair, which he set up by a Dumpster in a convenience store parking lot to watch a fire ant colony. Such is the glamor of field biology.
Ants on the march. Tough luck for the crickets, though.
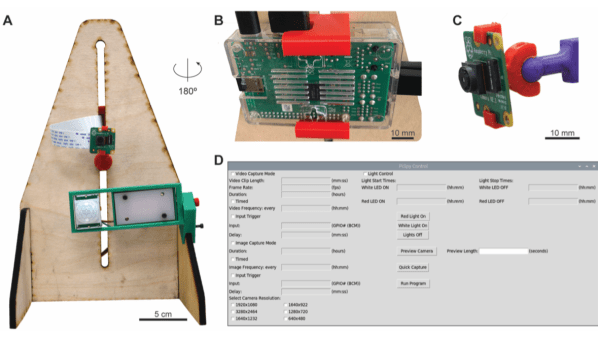
What our colleague [Mike] wouldn’t have given for something like PiSpy, the automated observation tool for organismal biology by [Greg Pask] of Middlebury College, et al. As discussed in the preprint abstract, an automated imaging platform can be key to accurate observations of some organisms, whose behavior might be influenced by the presence of a human observer, or even a grad student in a lawn chair. Plus, PiSpy offers all the usual benefits of automation — it doesn’t get tired, it doesn’t need to take bathroom breaks, and it can even work around the clock. PiSpy is based on commonly available components, like laser-cut plywood and a Raspberry Pi and camera, so it has the added advantage of being cheap and easy to produce — or at least it will be when the Pi supply picks back up again. PiSpy takes advantage of the Pi’s GPIO pins to enable triggering based on external events, or controlling peripherals like lights or servos.
While built for biological research, there are probably dozens of uses for something like PiSpy. It could be handy for monitoring mechanical testing setups, or perhaps for capturing UI changes during embedded device development. Or you could just use it to watch birds at a feeder. The source is all open-sourced, so whatever you make of PiSpy is up to you — even if it’s not for watching fire ants.
The retrocomputing community are experts at keeping vintage Apple iron running, but if you’re looking for a simpler way to pay homage to the original Mac, check out this Raspberry Pi powered ‘desk accessory’ by [John Calhoun], fittingly called ‘SystemSix’.
Housed inside a delightfully Mac-shaped piece of laser-cut acrylic, SystemSix is powered by as Raspberry Pi 3, with the graphics displayed on a sizeable 5.83″ e-ink panel. While it resembles a kind of retro-futuristic take on the ‘classic’ Macintosh, SystemSix is the illusion of a fully interactive computer. While non-interactive, the fake desktop is every bit as charming as a real Macintosh display, albeit scaled down. The desktop updates automatically with new information, and presently includes a calendar, dithered lunar phase graphic, and a local weather report.
Clearly calling it a ‘desk accessory’ is a neat play on words. The original Macintosh implemented simple desk accessory programs, such as the calculator and alarm clock, that could run alongside the main application in memory. This was the only way to run more than one application on the Macintosh, before MultiFinder added rudimentary cooperative multitasking in 1987. As such, SystemSix is a functional, stylish and quite literal ‘desk accessory’.
[John] has the full project write-up over on GitHub, and goes into great detail about maintaining the Macintosh aesthetic. For example, the lunar phase graphic uses ‘Atkinson’ dithering. This technique was pioneered by Apple programmer Bill Atkinson, the author of MacPaint and the QuickDraw toolbox on the original Macintosh (and later, Hypercard).
And in case you were wondering – yes, this is the [John Calhoun], who programmed Glider for Macintosh. Now recently retired from Apple, we’re really excited to see what other Macintosh-inspired creations he comes up with. Maybe he will come back around to his Mac-powered MAME cabinets that we covered all the way back in 2005. Or perhaps a sleeper battlestation, like the iMac G4 lampshade that was upgraded with an M1 processor.
Well, that de-escalated quickly! It was less than a week ago that the city of Shenzhen, China was put on lockdown due to a resurgence of COVID-19 in the world’s electronics manufacturing epicenter. This obviously caused no small amount of alarm up and down the electronics supply chain, promising to once again upset manufacturers seeking everything from PCBs to components to complete electronic assemblies. But just a few days later, the Chinese government announced that the Shenzhen lockdown was over. At least partially, that is — factories and public transportation have been reopened in five of the city’s districts, with iPhone maker Foxconn, one of the bigger players in Shenzhen, given the green light to partially reopen. What does this mean for hobbyists’ ability to get cheap PCBs made quickly? That’s hard to say, at least at this point. Please feel free to share your experiences with any supply chain disruptions in the comments below.
Better news from a million miles away, as NASA announced that the James Webb Space Telescope finished the first part of its complex mirror alignment procedure. The process, which uses the complex actuators built into each of the 18 hexagonal mirror segments, slightly moves each mirror to align them all into one virtual optical surface. The result is not only the stunning “selfie” images we’ve been seeing, but also a beautiful picture of the star Webb has been focusing on as a target. The video below explains the process in some detail, along with sharing that the next step is to move the mirrors in and out, or “piston” them, so that the 18 separate wavefronts all align to send light to the instruments in perfect phase. Talk about precision!
Is a bog-standard Raspberry Pi just not tough enough for your application? Do you need to run DOOM on a platform that can take a few g of vibration and still keep working? Sick of your Pi-based weather station breaking own when it gets a little wet or too hot? Then you’ll want to take a look at the DuraCOR Pi, a ruggedized chassis containing a Pi CM4 that’s built for extreme environments. The machine is in a tiny IP67-rated case and built to MIL-STD specs with regard to vibration, temperature, humidity, and EMI conditions. This doesn’t really seem like something aimed at the hobbyist market — it’s marketed by Curtiss-Wright Defense Solutions, a defense contractor that traces its roots all the way back to a couple of bicycle mechanics from Ohio that learned how to fly. So this Pi is probably more like something you’d spec if you were building a UAV or something like that. Still, it’s cool to know such things are out there.
BrainLubeOnline has a fun collection of X-rays. With the exception of a mouse — the other kind — everything is either electronic or mechanical, which makes for really interesting pictures. Seeing the teeth on a gear or the threads on a screw, and seeing right through the object, shows the mechanical world in a whole new light — literally.
And finally, would you buy a car that prevents you from opening the hood? Most of us probably wouldn’t, but then again, most of us probably wouldn’t buy a Mercedes EQS 580 electric sedan. Sarah from Sarah -n- Tuned on YouTube somehow got a hold of one of these babies, which she aptly describes as a “German spaceship,” and took it for a test drive, including a “full beans” acceleration test. Just after that neck-snapping ride, at about the 7:20 mark in the video below, she asks the car’s built-in assistant to open the hood, a request the car refused by saying, “The hood may only be opened by a specialist workshop.” Sarah managed to get it open anyway, and it’s not a frunk — it’s home to one of the two motors that power the car, along with all kinds of other goodies.
Tales of Raspberry Pi SD card corruption are available online by the fistful, and are definitely a constant in Pi-adjacent communities. It’s apparent that some kind of problems tend to arise when a Raspberry Pi meets an SD card – which sounds quite ironic, since an SD card is the official and recommended way of booting a Pi. What is up with all of that?
I can start with a history lesson. Back when Raspberry Pi launched in 2012 – which is now 10 years ago – there were SD card controller driver problems, which makes sense given the wide variety of SD cards available out there. They were verifiably fixed one by one at some point in time, as debugging goes, their impact decreased and bugs with individual cards got smoothed over. This is how the “Pi SD card corruption” meme was originally born; however, if the problems were to end there, so would the meme. Yet, tales of broken SD cards plague us to this day – way less severe than they were in the beginning, but pronounced enough that you’ll see people encounter them every now and then.
Over the years, a devoted base of Pi SD card haters has grown. Their demand has been simple – Raspberry Pi has to get an ability to boot from something else, in large part because of corruption reasons, but also undeniably because of speed and capacity/cost limitations of SD cards. Thanks to their demands and work, we’ve seen a series of projects grow from unofficial efforts and hacks into officially supported Raspberry Pi abilities – USB boot being initially more of a workaround but now something you can enable out of the box, SSD-equipped Pi enclosures becoming more of a norm, and now, NVMe boot appearing on the horizon. Every few years, we get a new way to boot a Pi. Continue reading “Raspberry Pi And The Story Of SD Card Corruption”→
Let’s face it, we all need a little distraction sometimes, especially lately. And for our money, there’s no better way to put your brain in park than to start up a Minecraft world and get to digging. The simple graphics, the open world, and the lack of agenda other than to find resources and build things are all very soothing.
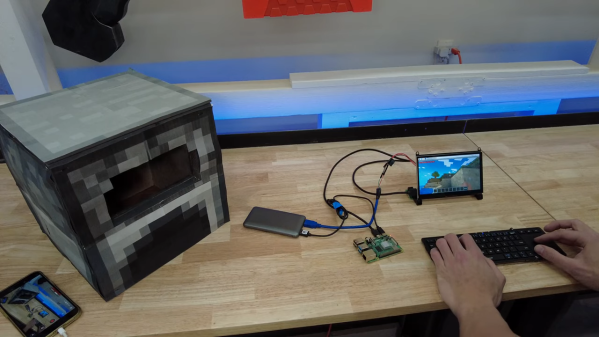
But play the game long enough and you’re bound to think about what it would be like if the game world crossed over into the real world. The ironically named [Michael Pick] did just that when he managed to craft a real Minecraft furnace that can actually power the game. Of course, there are some liberties taken with the in-game crafting recipe for a furnace, which is understandable for a game that allows you to punch trees with a bare fist to cut them down.
Rather than using eight blocks of cobblestone to build his furnace, [Michael] made a wooden shell for a commercial folding camp stove. Insulated from the shell by a little cement board, the furnace looks pretty true to the in-game item. To generate the electricity needed to run the game, he used a pair of thermoelectric camping generators. With the stove filled with wood — presumably un-punched — the generators put out enough juice to at least partially charge a battery bank, which was then used to power a Raspberry Pi and 7″ monitor. His goal was to get enough power from the furnace to do a speed run in the game and find three diamonds to build a diamond pickaxe. Honestly, we’re jealous — our first diamonds never come that easy.
We’ve seen other Minecraft-IRL crossovers before. Fancy a ride in a minecart? We’ve got that covered. Or maybe you’d rather control a desk lamp from within the game? That’s a thing, too.
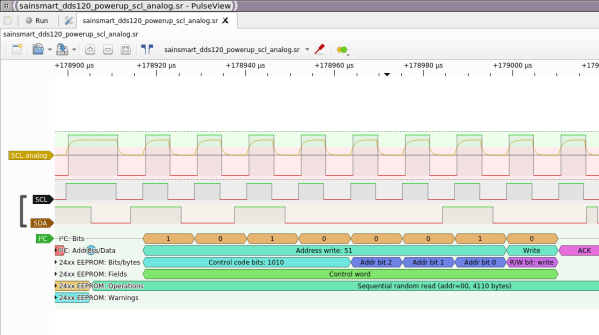
There’s a slew of hardware hacker problems that a logic analyzer is in a perfect position to solve. Whether you’re trying to understand why an SPI LCD screen doesn’t initialize, what’s up with your I2C bus, or determine the speed of an UART connection, you’ll really want to have a logic analyzer on hand. People have been using a Pi Pico as a logic analyzer in a pinch, and now [pico-coder] has shared a sigrok driver that adds proper support for a Pico to beloved tools like Pulseview.
The specs offered are impressive. Compared to the $10 “Saleae” clone analyzers we are so used to, this thing boasts 21 digital channels with up to 120 MHz capture speed, 3 ADC channels at up to 500 KHz, and hardware-based triggers. The GitHub repository linked above stores the driver files out-of-tree, but provides build instructions together with an easily flash-able uf2 firmware. It’s likely that you’ll soon see this driver in a stock Pulseview installation, however, given the submitter-friendly attitude we’ve witnessed on the sigrok mailing list. However, if you need a logic analyzer ASAP, you should follow the caringly offered quickstart guide.