These Micro Mice Have Macro Control

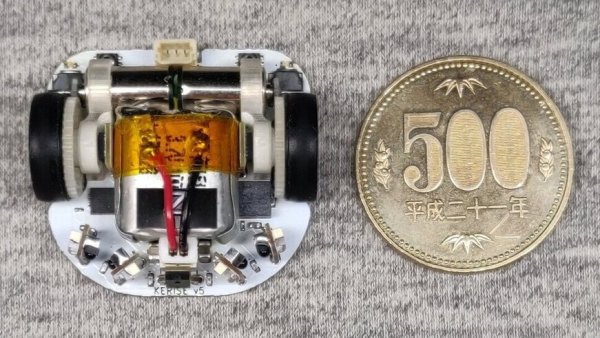
Few things fascinate a simple Hackaday writer as much as a tiny robot. We’ve been watching [Keri]’s utterly beguiling micromouse builds for a while now, but the fifth version of the KERISE series (machine translation) of ‘bots takes the design to new heights.
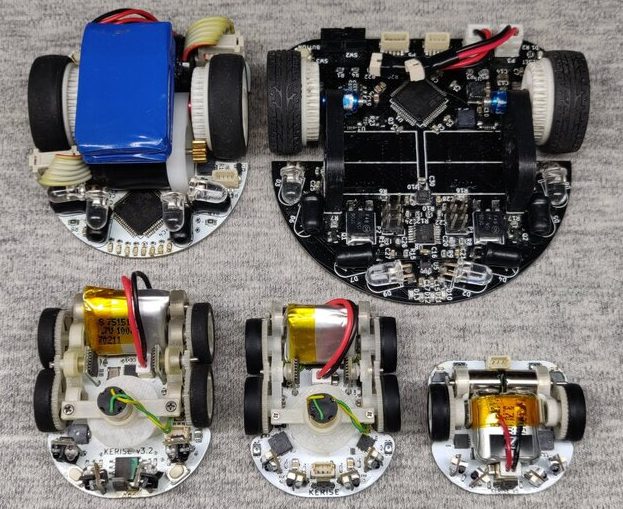
A family of mice v1 (largest) to v5 (smallest)

For context, micromouse is a competition where robots complete to solve mazes of varying pattern but standardized size by driving through them with no guidance or compute offboard of the robot itself. Historically the mazes were 3 meter squares composed of a 16 x 16 grid of cells, each 180mm on a side and 50mm tall, which puts bounds on the size of the robots involved.

What are the hallmarks of a [Keri] micromouse design? Well this is micromouse, so everything is pretty small. But [Keri]’s attention to detail in forming miniaturized mechanisms and 3D structures out of PCBs really stands out. They’ve been building micromouse robots since 2016, testing new design features with each iteration. Versions three and four had a wild suction fan to improve traction for faster maneuvering, but the KERISE v5 removes this to emphasize light weight and small size. The resulting vehicle is a shocking 30mm x 32mm! We’re following along through a translation to English, but we gather that [Keri] feels that there is still plenty of space on the main PCBA now that the fan is gone.
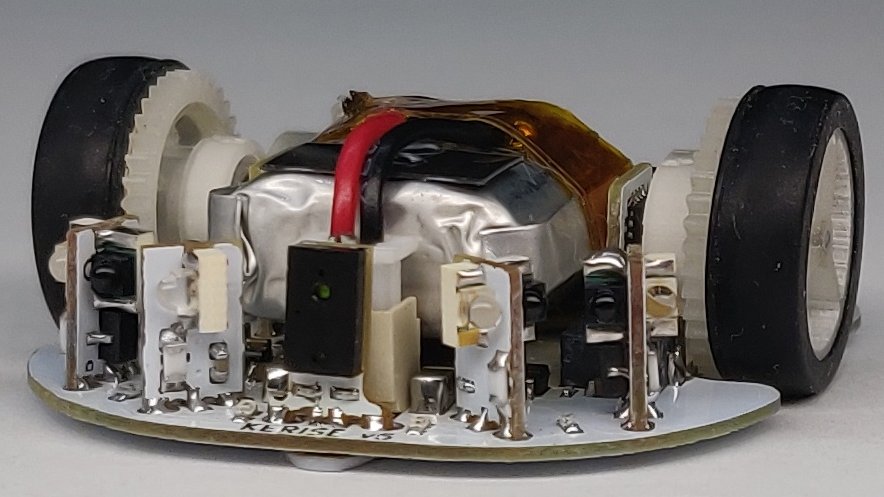
The KERISE v5 front end

The processor is a now familiar ESP32-PICO-D4, though the wireless radios are unused so far. As far as environmental sensing is concerned the v5 has an impressive compliment given its micro size. For position sensing there are custom magnetic encoders and a 3 DOF IMU. And for sensing the maze there are four side-looking IR emitter/receiver pairs and one forward-looking VL6180X laser rangefinder for measurements out to 100 or 150mm. Most of these sensors are mounted on little PCB ‘blades’ which are double sided (check out how the PCB shields the IR emitter from it’s receiver!) and soldered into slots perpendicular to the PCBA that makes up the main chassis. It goes without saying that the rest of the frame is built up of custom 3D printed parts and gearboxes.

If you’d like to build a KERISE yourself, [Keri] has what looks to be complete mechanical, electrical, and firmware sources for v1, v2, and v3 on their Github. To see the KERISE v5 dance on a spinning sheet of paper, check out the video after the break. You don’t want to miss it!

Continue reading “These Micro Mice Have Macro Control”

Building A UV Curing Station For Resin Prints

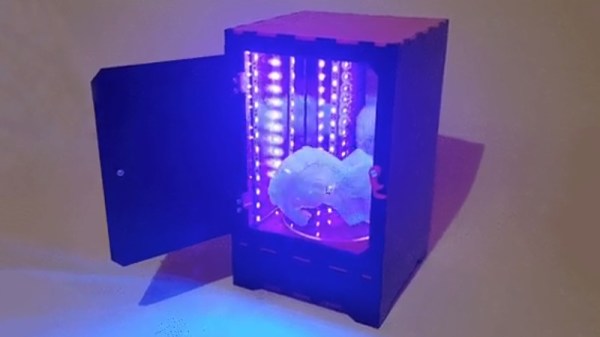
Resin printers have a lot going for them – particularly in regards to quality surface finishes and excellent reproduction of fine details. However, the vast majority rely on UV light to cure prints. [douwe1230] had been using a resin printer for a while, and grew tired of having to wait for sunny days to cure parts outside. Thus, it was time to build a compact UV curing station to get the job done.

The build consists of a series of laser-cut panels, assembled into a box one would presume is large enough to match the build volume of [douwe1230’s] printer.  UV LED strips are installed in the corners to provide plenty of light, and acrylic mirrors are placed on all the walls. The use of mirrors is key to evenly lighting the parts, helping to reduce the likelihood of any shadows or dead spots stopping part of the print from curing completely. In the base, a motor is installed with a turntable to slowly spin the part during curing.

[Douwe1230] notes that parts take around about 10 minutes to cure with this setup, and recommends a flip halfway through to make sure the part is cured nice and evenly. We’ve seen other similar DIY builds too, like this one created out of a device aimed at nail salons. If you’re struggling with curing outside, with the weather starting to turn, this might just be the time to get building!

Repurposed UV Curer Makes Your Prints Hard As Nails

The price of resin printers has dropped significantly in the last couple of years, and it’s down to the point where you can pick up a fairly decent DLP machine for less than $500. While this is great news, you still need several things beyond resin for successful prints, like a way to do post-process UV curing.

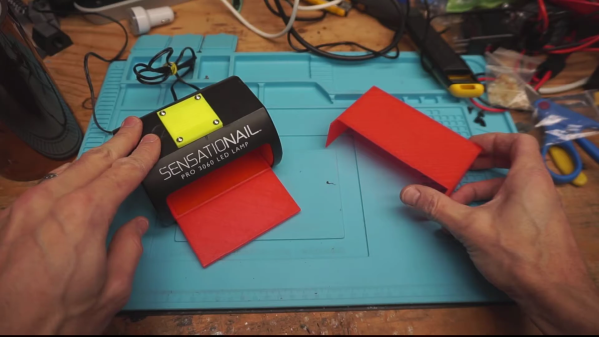
[Inhibit] picked up the formidably-priced Wanhao D7 awhile back. Rather than spending another printer’s worth of paper on a UV curing box, he rescued and repurposed a small commercial curing device meant for gel-based nail polish. You stick your fingertips in, switch it on, and it runs for 60 seconds and then shuts off.

It’s a great idea, but unfortunately prints don’t cure as fast as fingernails. So the first order of business was to bypass the dual 555-based timing system by wiring the UV LEDs directly to power. The manufacturer never intended for the lights to run continuously, so to keep the board from melting, [Inhibit] added in a small 12 V computer fan for cooling. There’s even a little printed grille with angled fins to keep UV light from leaking out and burning nearby retinas.

[Inhibit] also designed and printed a tray for the prints to sit on, and a front enclosure piece to focus as much light on the parts as possible. Files for both parts are floating around the Thingiverse, and we’ve got the build video all cured queued up after the break.

These little commercial boxes don’t cost all that much, but you could always just build your own.

Continue reading “Repurposed UV Curer Makes Your Prints Hard As Nails”

DIY Monochrome LCD Hack Doesn’t Go As Planned

Manufacturers of low-cost 3D printers that use the masked stereolithography (MSLA) process are able to build their machines so cheaply because they’re using repurposed smartphone or tablet LCD panels to mask off the UV backlight. Considering the quality you get out of even the entry-level MSLA resin printers, we certainly aren’t complaining about this bit of thrift. But as [Jan Mrázek] explains in a recent blog post, there’s certainly room for improvement.

The problem is that those repurposed LCD panels are, as you’d expect, color displays. After all, even the bottom of the barrel mobile devices moved away from monochrome displays decades ago. But in this case, that’s not what you really want. Since the printer operates on a single wavelength of light, the color filters inside the LCD are actually absorbing light that could otherwise be curing the resin. So an MSLA printer with a monochrome screen would use less energy and print faster. There’s only one problem: it’s not very easy to find high-resolution monochrome displays in the year 2020.

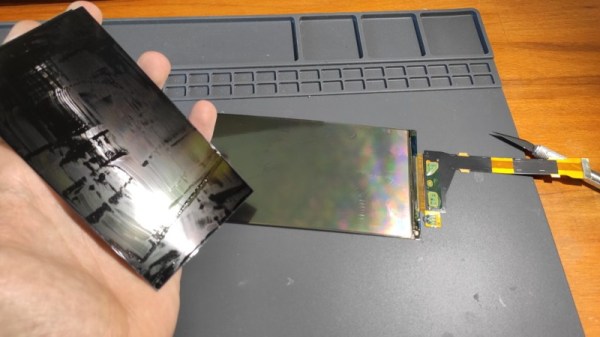
So [Jan] decided to see if he could take a replacement screen intended for his Elegoo Mars MSLA printer and convert it from color to monochrome by disassembling it and manually removing the color filters. If this sounds a bit crazy, that’s because it is. Turns out taking apart an LCD, modifying its internal layout, and putting it all back together in working order is just as difficult as you’d think.

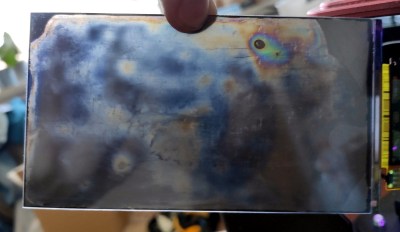
But it was still worth a try. [Jan] pulls the display apart, removes the liquid crystals, scrapes off the color filters, and then puts it all back together again. His first attempt got him a monochrome display that actually worked, but with debris trapped inside the screen, the image was too poor to be useful. He tried again, this time trying harder to keep foreign material out of the crystals. But when he got it back together a second time, he found it no longer functioned. He thinks it’s possible that his attempt to clean up the inside of the display was too aggressive, but really there are so many things that could go wrong here it’s hard to pin down just one.

Long story short, manually creating monochrome displays for low-cost MSLA printers might not be a viable option. Until a better solution comes along, you might be interested in seeing some slightly less invasive ways of improving your resin print quality.

The 3D Printers, Scanners, And Art Robots Of Maker Faire Rome

How is it possible that a robot can sketch both better and worse than I can at the same time, and yet turn out an incredible work of art? Has 3D-scanning really come so far that a simple camera and motorized jig can have insane resolution? These are the kinds of questions that were running through my mind, and being answered by the creators of these brilliant machines, at Maker Faire Rome.

There was a high concentration of robots creating art and 3D printing on display and the Faire, so I saved the best examples just for this article. But you’ll also find hacks from a few groups of clever students, and hardware that made me realize industrial controllers can be anything but boring. Let’s take a look!

Continue reading “The 3D Printers, Scanners, And Art Robots Of Maker Faire Rome”

Hackaday Links Column Banner

Hackaday Links: October 6, 2019

“If you or someone you love has been exposed to questionable quality electrolytic capacitors, you could be entitled to financial compensation.” Perhaps that’s not exactly the pitch behind this class action lawsuit against capacitor manufacturers, but it might as well be. The suit claims that the defendants, a group of capacitor manufacturers that includes Nichicon, Matsuo, ELNA, and Panasonic, “engaged in an unlawful conspiracy to fix, raise, maintain, or stabilize the prices of Capacitors.” Translation: if you bought capacitors between 2002 and 2014 from a distributor, you paid too much for them. The suit aims to recover a bunch of money from the defendants and divide it up between all the class members, so make sure you go back through all your receipts from Mouser and DigiKey over the last 17 years so you can file a claim that could be worth several dozen cents.

When are people going to learn that posting pictures of their illegal activities online is an Official Bad Idea? One SpaceX fan earned a night in jail after posting selfies he took with Starhopper, the SpaceX test article currently residing at Elon Musk’s would-be spaceport at Boca Chica, Texas. JB Wagoner, a SpaceX super-fan, made the pilgrimage from California to Texas — in his Tesla of course — to see the recent Starship Mark 1 unveiling, and decided to take a side trip to see the Starhopper. He parked at a beach, climbed a dune, and was able to walk right up to Starhopper and go selfie-crazy. After posting the pictures on Facebook, he was arrested, interviewed by Homeland Security, charged with criminal trespass, and thrown in a cell overnight. Wagoner has since been bonded out, but the charges might not stick, since Texas trespassing law requires clear signage or verbal notification of trespass, neither of which Wagoner encountered. SpaceX had even let the fence between the beach and the Starhopper collapse, so Wagoner seems to have had no way of knowing he was trespassing. Still, posting the pictures online was probably asking for trouble.

As satire and dark comedy, the 1987 cyberpunk classic RoboCop can’t be beat. But it also managed to accurately foreshadow a lot of what was to come in the world in terms of technology. No, we don’t have cyborg law enforcement — yet — but we do have something predicted by one throwaway scene: robotic realtors. In the movie, kiosks were set up around Murphy’s old house to extol the various virtues of living there, which ended up triggering the cyborg and starting the film’s climactic rampage. The real-life robotic realtor is a little more flexible, more like a telepresence robot — described aptly as “a Segway with an iPad on top.” The robotic realtor is not autonomous; it only lets a remote realtor interact with potential homebuyers without having to travel to multiple homes. It seems a little gimmicky to us, but the robots are reported to have made 25 sales in their first year on the job.

We’ve been seeing a lot of cheap resin printers these days, enough to make us want to jump into the market and start playing with them. But the cheap ones are all cheap for the same reason — they’re so dang small! They all use LCD screens from phones to mask off the UV light used to cure the resin, and the resulting print volume is tiny. Clem Mayer from MayerMakes has bigger ideas, though: he wants to make a giant resin printer using an LCD monitor as the mask. It’s not as simple as using a bigger screen, though; the film used between the screen and the resin, a fluoropolymer film called FEP, gets deformed when used on larger screens. So Clem is looking at a new built-plate interface that floats the resin on a layer of denser, immiscible liquid. It’s an interesting idea that is still clearly in the proof-of-concept phase, but we look forward to seeing what progress Clem makes.

Handheld LoRa Joystick For Long-Range Bots

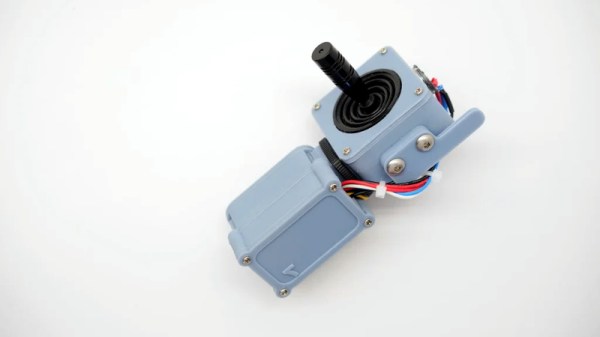
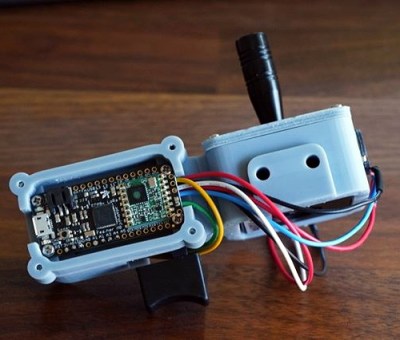
Wanting a simple tool to aid in the development of LoRa controlled robotic projects, [Jay Doscher] put together this very slick one-handed controller based on the 900 MHz Adafruit Feather M0. With a single trigger and a miniature analog joystick it’s a fairly simple input device, but should be just enough to test basic functionality of whatever moving gadget you might find yourself working on.

Wiring for this project is about as simple as you’d expect, with the trigger and joystick hanging off the Feather’s digital ports. The CircuitPython code is also very straightforward, though [Jay] says in the future he might expand on this a bit to support LoRaWAN. The controller was designed as a barebones diagnostic tool, but the hardware and software in its current form offers an excellent opportunity to layer additional functionality on a known good base.

Everything is held inside a very well designed 3D printed enclosure which [Jay] ran off on his ELEGOO Mars, one of the new breed of low-cost resin 3D printers. The machine might be pretty cheap, but the results speak for themselves. While resin printing certainly has its downsides, it’s hard not to be impressed by the finish quality of this enclosure.

While LoRa is generally used for transmitting small bits of information over long distances, such as from remote sensors, this isn’t the first time we’ve seen it used for direct control of a moving object. If you’re not up to speed on LoRa, check out this excellent talk from [Reinier van der Lee] that goes over the basics of the technology and how he used it to build a community sensor network.