Erasing EEPROMs Isn’t Always As Easy As It Seems

When is 14 volts not actually 14 volts? Given [Anders Nielsen]’s recent struggles with erasing an old-school EEPROM, it’s when you really need it that things tend to go pear-shaped.

A little background is perhaps in order. [Anders] is working on a scratch-built programmer for ROMs to complement his 65uino project, which puts a complete 6502 computer into the footprint of an Arduino Uno. He wisely started the ROM programmer project at the beginning, which was to generate the correct voltages for programming. This turned out to be not as easy as you might think thanks to the solderless breadboard’s parasitic effects on the MIC2288 switching boost regulator he chose.

The video below is a continuation of the programmer build, which ends up being just as fraught as the first part. Being able to generate the programming voltages is one thing; getting them onto the right pins at the right time using nothing but the 5-volt GPIOs on a microcontroller is another. In true retro fashion, [Anders] tackled that problem with a pair of small-signal transistors, which seemed to work once the resistor values were sorted, at least when applying a 12-volt signal intended to show the ROM’s hard-coded manufacturer ID on the data bus.

But erasing the ROM, which requires 14 volts while the chip enable line is held high for 100 ms, proved a little trickier. Despite multiple tries, the ROM wouldn’t erase thanks to the 14-volt rail being dragged down to around 9 volts. [Anders] fixed that with a new base resistor on the driver, to increase the current and keep the voltage up where it needs to be. Just goes to show you that the data sheets don’t always tell the whole story.

We’ve been enjoying the unfolding story of this programmer, and we’re looking forward to the next installment.

Continue reading “Erasing EEPROMs Isn’t Always As Easy As It Seems”

New Part Day: Flush-mount Touchscreen For Retro PC Build

I recently had the opportunity to purchase an early version of a new display, and it happened to be just the thing I needed to make a project work. That display is the Elecrow 11.6″ CrowVision touchscreen slated for release in 2024. Preorders are being accepted on Crowd Supply.

I had an idea for a retro-inspired PC build that was just waiting for a screen like this. I’ll talk about the display and what’s good about it, then showcase the build for which it was the missing piece. If you’ve got a project waiting for something similar, maybe this part will provide what you need or at least turn on some new ideas.

What Is It?

The CrowVision 11.6″ 1366 x 768 touchscreen has an HDMI input, USB output for touch data, and accepts 12 V DC. It’s made to interface easily with a Raspberry Pi or other SBC (single-board computer).

Personally I consider a display like this to be the minimum comfortable size for using desktop type applications in a windowed environment. Most displays in this space are smaller. But aside from that, what helps make it useful for embedding into a custom enclosure is the physical layout and design.

Since I was looking for the largest display that could be flush-mounted in an enclosure without a lot of extra space around the display’s sides, it was just what I needed. The integrated touchscreen is a nice bonus.

Continue reading “New Part Day: Flush-mount Touchscreen For Retro PC Build”

Absolutely Everything About The Coleco Adam, 8-bit Home Computer

[Thom Cherryhomes] shared with us an incredible resource for anyone curious about the Coleco Adam, one of the big might-have-been home computers of the 80s. There’s a monstrous 4-hour deep dive video (see the video description for a comprehensive chapter index) that makes a fantastic reference for anyone wanting to see the Coleco Adam and all of its features in action, in the context of 8-bit home computing in the 80s.

[Image by Akbkuku, CC BY 4.0]
The Adam aimed to be an all-in-one computer package, targeting a family audience for both education and gaming purposes, with a price target around $600, a pretty compelling pitch.

The video is a serious in-depth look at the Adam, providing practical demonstrations of everything in various scenarios. This includes showcasing commercials from the period, detailing the system’s specs and history, explaining the Adam’s appeal, discussing specific features, comparing advertisement promises to real costs, and giving a step-by-step tutorial on how to use the system. All of the talk notes are available as well, providing a great companion to the chapter index.

Manufactured by the same Coleco responsible for the ColecoVision gaming console, the Adam had great specs, a great price, and a compelling array of features. Sadly, it was let down badly at launch and Coleco never recovered. However, the Adam remains of interest in the retrocomputing scene and we’ve even seen more than one effort to convert the Adam’s keyboard to USB.

Continue reading “Absolutely Everything About The Coleco Adam, 8-bit Home Computer”

Bringing Back The CRT TV Experience In Software

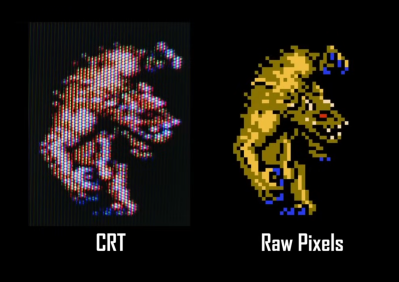
Cathode-Retro is a collection of shaders and sample C++ code for reliving the glorious days when graphics were composite video signals displayed on a CRT screen. How? By faking it in software and providing more configuration options than any authentic setup ever had.

Love it or don’t, there’s nothing quite like it.

Not satisfied with creating CRT-style color images with optional scanlines and TV picture controls like tint and saturation, Cathode-Retro can emulate more nuanced elements as well.

The tool includes the ability to imitate things like the slight distortion of a period-correct curved screen, the subtle effects of different methods CRT displays used to actually work (such as shadow mask vs aperture grille), and even taking into account the slight distortion of light refracting imperfectly through the glass face of the CRT. There’s even options for adding noise and ghosting, which may spark some artistic ideas.

If all you need is software to recreate an old-school CRT terminal, we have you covered. But if your needs are a bit more low-level, Cathode-Retro might be what you’re missing.

Reliving The Authentic 90s Linux Experience

Installing Linux on a modern PC has never been easier. There are tons of tools available that will nearly-automatically download your Linux distribution of choice, image a USB drive, and make it bootable so you can finally ditch your bloated, privacy-violating operating system and get the free performance boost that comes along with it. This wasn’t always the case, though. In the 90s you had to take a trip to a store (or library) and buy (or borrow) a boxed copy of some variety of Linux on floppy disk or CDs, and then install it on your own, often without the help of the Internet. [Action Retro] demonstrates this process for us so we don’t have to relive the pain ourselves.

Complete with a 90s-era Pentium machine enclosed in a beige case, this is really the full 90s experience. He’s found a boxed version of Red Hat version 5.2 with everything needed to get it up and running and, after a brief issue with the installer crashing because it couldn’t figure out the ZIP disk drive, had another era-appropriate experience by erasing the existing Windows 98 installation. This was before automatic partitioning tools were widely available, so it was a real risk for beginner Linux enthusiasts if they were trying to dual boot.

With the installation complete, the X window system still needed to be set up, as well as making sure the settings for the old CRT monitor were correct. With everything finalized, the system can really be explored. It includes out-of-the-box some software plenty of us would recognize today such as GIMP and some other software we might not, like Netscape Communicator. It’s a real time machine experience to get this operating system running on period-appropriate hardware, and a lot of features of modern Linux systems can still be seen especially if your modern distribution of choice still requires a lot of manual configuration during installation. Old operating systems aside, this machine might be capable of running a modern Linux distribution as well, provided it has something slightly newer than a 486.

Continue reading “Reliving The Authentic 90s Linux Experience”

Noble Graphs: Displaying Data With Neon Like Its 1972

In the days before every piece of equipment was an internet-connected box with an OLED display, engineers had to be a bit more creative with how they chose to communicate information to the user. Indicator lights, analog meters, and even Nixie tubes are just a few of the many methods employed, and are still in use today. There are, however, some more obscure (and arguably way cooler) indicators that have been lost to time.

[Aart Schipper] unearthed one such device while rummaging around in his father’s shed: a pair of Burroughs Bar Graph Glow-Transfer Displays. These marvelous glowing rectangles each have two bars (think the left and right signals on an audio meter, which is incidentally what they were often used for), each with 201 neon segments. Why 201, you may ask? The first segment on each bar is always illuminated, acting as a “pilot light” of sorts. This leaves 200 controllable segments per channel. Each segment is used to “ignite” its neighboring segment, something the manufacturer refers to as the “Glow-Transfer Principle.” By clever use of a three-phase clock and some comparators, each bar is controlled by one analog signal, keeping the wire count reasonably low.

Don’t get us wrong, the warm, comforting glow of Nixie tubes will always have a special place in our hearts, but neon bar graphs are just hard to beat. The two do have a similar aesthetic though, so here’s hoping we see them used together in a project soon.

Thanks to [Jan] for the tip!

Preserving Floppy Disks

Time is almost up for magnetic storage from the 80s and 90s. Various physical limitations in storage methods from this era are conspiring to slowly degrade the data stored on things like tape, floppy disks, and hard disk drives, and after several decades data may not be recoverable anymore. It’s always worth trying to back it up, though, especially if you have something on your hands like critical evidence or court records on a nearly 50-year-old floppy disk last written to in 1993 using a DEC PDP-11.

This project all started when an investigation unit in Maryland approached the Bloop Museum with a request to use their antique computer resources to decode the information on a 5.25″ floppy disk. Even finding a floppy disk drive of this size is a difficult task, but this was further compounded not just by the age of the disk but that the data wasn’t encoded in the expected format. Using a GreaseWeazle controlled by a Raspberry Pi, they generated an audio file from the data on the disk to capture all available data, and then used that to work backwards to get to the usable information.

After some more trials with converting the analog information to digital and a clue that the data on the disk was not fragmented, they realized they were looking at data from a digital stenography machine and were finally able to decode it into something useful. Of course, stenography machines are dark magic in their own right so just getting this record still requires a stenographer to make much sense out of it.