Down The Rabbit Hole And Back Out Again: Serial Over Headphone Jack

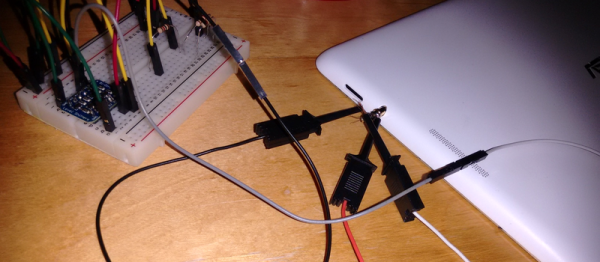
[ttsiodras] tells an epic tale of getting a custom Debian kernel installed on an Asus MemoPAD (ME103K) tablet. Skipping to the end of the saga, he discovers what looks like serial data coming out on the headphone jack when the system boots, but the signal was so distorted that he couldn’t simply interpret it. The solution turns out to be attaching a level-converter chip.

waw6j_rotated_thumbnail

A level converter is a non-inverting amplifier, usually with a Schmitt trigger for immunity against noise. In this case, it acts like a “binarizer” — outputting a high voltage when the input rises above a threshold, and a low when it drops below. It’s the right part when you need to clean up a messy digital signal, and in this case works just fine because the capacitive distortion effects slow down both the leading and trailing edges of the signal, keeping the serial data’s timing intact.

That was the spoiler. If you want to read up on putting a custom Linux on an Android device, check out [ttsiodras]’s first post where he backs the machine up, and the second where he gets his custom kernel up and running. If you’re ever faced with an Android tablet that hasn’t been owned yet, or if you just have a DIY streak, this should help you get started.

Using the audio jack for serial is actually not uncommon, and discovering a serial terminal that listens at boot time is our favorite way to wedge a Linux OS into odd devices. So when you see a funny, distorted signal coming out at 115,200 baud, take a moment to clean its edges up and see what you’ve got.

Wink Hub Connects To SmartThings

As home automation grows more and more popular by the day, the free market is taking notice and working to supply the demand. The Wink Hub is a part of this current trend. It’s a device that allows many of your wireless devices to talk to one another. Things like lights, thermostats, door locks, garage doors…and many other devices can all connect to the hub. Typically, you use a program on your phone or tablet to control these devices. But because this is a closed source gadget, it can’t connect to everything, until now. A hacker was not only able to root the device, but he also gained the ability to connect to devices it was never designed to connect to.

[Michael] was able to get root and take control of some of the devices used with one of Wink’s main competitors – SmartThings. The process is not for the faint of heart and requires at least a yellow belt in Linux-Fu. [Michael] points out that you should use a Wink Hub that you don’t care about as the possibility of bricking it is there if something goes wrong.

We’ve seen a few instances of rooting the Wink and are happy to see these hacks maturing. It’s a shame the thing is locked down since the multiple radios make the hardware capable of being a great cross-platform hub. For legacy and better user experience, cross-platform operation is paramount. The industry isn’t moving in that direction… Phillips recently removed support for devices outside the Hue family. But the community wants this functionality and their push back led to a hasty reversal of Phillips’ changes. Hackers like [Michael] are showing what your home could be like if connected devices were free to interact with one another.

Want A Low-cost ARM Platform? Grab A Prepaid Android Phone!

What would you pay for a 1.2Ghz dual-core ARM computer with 1GB RAM, 4GB onboard flash, 800×600 display, and 5 megapixel camera? Did we mention it also has WiFi, Bluetooth, and is a low power design, including a lithium battery which will run it for hours? Does $15 sound low enough? That’s what you can pay these days for an Android cell phone. The relentless march of economies of scale has finally given us cheap phones with great specs. These are prepaid “burner” phones, sold by carriers as a loss leader. Costs are recouped in the cellular plan, but that only happens if the buyer activates said plan. Unlike regular cell phones, you aren’t bound by a contract to activate the phone. That means you get all those features for $15-$20, depending on where you buy it.

android-logo-transparent-backgroundThe specs I’m quoting come from the LG Optimus Exceed 2, which is currently available from Amazon in the USA for $20. The same package has been available for as little as $10 from retail stores in recent weeks. The Exceed 2 is just one of several low-cost Android prepaid phones on the market now, and undoubtedly the list will change. How to keep up with the current deals? We found an unlikely place. Perk farmers. Perk is one of those “We pay you to watch advertisements” companies. We’re sure some people actually watch the ads, but most set up “farms” of drone phones which churn through the videos. The drones earn the farmer points which can be converted to cash. How does this all help us? In order to handle streaming video, Perk farmers want the most powerful phones they can get for the lowest investment. Subreddits like /r/perktv have weekly “best deals” posts covering prepaid phones. There are also tutorials on rooting and debloating current popular phones like the Whirl 2 and the Exceed 2.
Continue reading “Want A Low-cost ARM Platform? Grab A Prepaid Android Phone!”

Hard Drive Rootkit Is Frighteningly Persistent

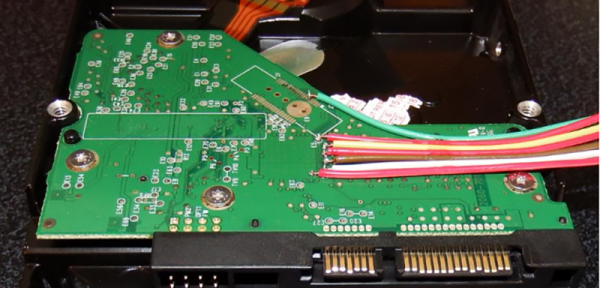
There are a lot of malware programs in the wild today, but luckily we have methods of detecting and removing them. Antivirus is an old standby, and if that fails you can always just reformat the hard drive and wipe it clean. That is unless the malware installs itself in your hard drive firmware. [MalwareTech] has written his own frightening proof of concept malware that does exactly this.

The core firmware rootkit needs to be very small in order to fit in the limited memory space on the hard drive’s memory chips. It’s only a few KB in size, but that doesn’t stop it from packing a punch. The rootkit can intercept any IO to and from the disk or the disk’s firmware. It uses this to its advantage by modifying data being sent back to the host computer. When the computer requests data from a sector on the disk, that data is first loaded into the disk’s cache. The firmware can modify the data sitting in the cache before notifying the host computer that the data is ready. This allows the firmware to trick the host system into executing arbitrary code.

[MalwareTech] uses this ability to load his own custom Windows XP bootkit called TinyXPB. All of this software is small enough to fit on the hard drive’s firmware. This means that traditional antivirus cannot detect its presence. If the owner of the system does get suspicious and completely reformats the hard drive, the malware will remain unharmed. The owner cannot even re-flash the firmware using traditional methods since the rootkit can detect this and save itself. The only way to properly re-flash the firmware would be to use an SPI programmer, which would be too technical for most users.

There are many more features and details to this project. If you are interested in malware, the PDF presentation is certainly worth a read. It goes much more in-depth into how the malware actually works and includes more details about how [MalwareTech] was able to actually reverse engineer the original firmware. If you’re worried about this malicious firmware getting out into the wild, [MalwareTech] assures us that he does not intend to release the actual code to the public.

Thin Client Hack

Hacking A Thin Client To Gain Root Access

[Roberto] recently discovered a clever way to gain root access to an HP t520 thin client computer. These computers run HP’s ThinPro operating system. The OS is based on Linux and is basically just a lightweight system designed to boot into a virtual desktop image loaded from a server. [Roberto’s] discovery works on systems that are running in “kiosk mode”.

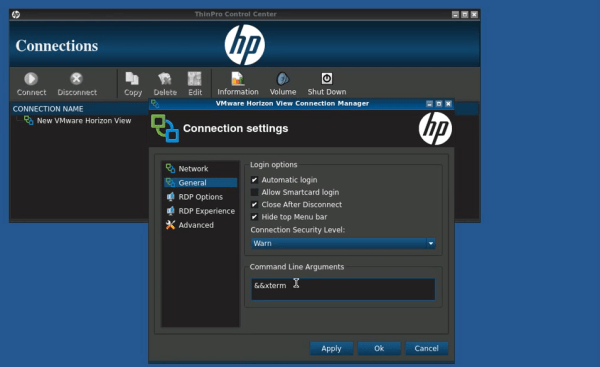
The setup for the attack is incredibly simple. The attacker first stops the virtual desktop image from loading. Then, the connection settings are edited. The host field is filled with garbage, which will prevent the connection from actually working properly. The real trick is in the “command line arguments” field. The attacker simply needs to add the argument “&& xterm”. When the connection is launched, it will first fail and then launch the xterm program. This gives the attacker a command shell running under the context of whichever user the original software is running as.

The next step is to escalate privileges to root. [Roberto] discovered a special command that the default user can run as root using sudo. The “”hpobl” command launches the HP Easy Setup Wizard. Once the wizard is opened, the attacker clicks on the “Thank You” link, which will then load up the HP website in a version of Firefox. The final step is to edit Firefox’s default email program association to xterm. Now when the attacker visits an address like “mailto:test@test.com”, Firefox (running as root) launches xterm with full root privileges. These types of attacks are nothing new, but it’s interesting to see that they still persist even in newer software.

EddiePlus, The Edison Based Balancing Robot

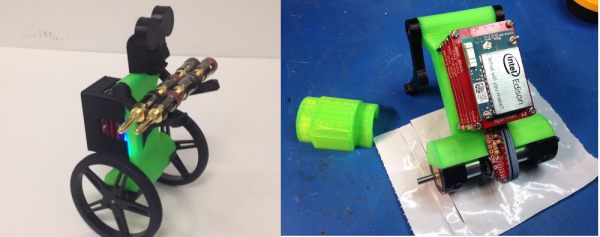
[Renee] dropped a tip to let us know about EddiePlus, her balancing robot creation. As its name might imply, EddiePlus is controlled by an Intel Edison processor. More specifically, [Renee] is using several of Sparkfun’s Edison Blocks to create Eddie’s brain. EddiePlus’ body is 3D printed, while his movement comes from two Pololu DC motors with wheels and encoders. The full build instructions are available as a PDF from [Renee’s] Google drive.

Eddie is able to balance and drive around on two wheels, much like a Segway. Sensor data for balance comes from Sparkfun’s LSM9DS0 based Inertial Measurement Unit (IMU) block. In this new “plus” version of Eddie, [Renee] has added encoders to the robot’s wheels. This makes it easier for him to adapt to changing loads – such as pumping iron (or banana plugs as the case may be). The encoders also help with varying terrain, as [Renee] demonstrates by tilting a board as Eddie drives on it. Eddie’s code is written in C, and available on Github.  Controlling Eddie is as easy as sending simple commands via UDP.

As you might imagine, the Intel Edison still has plenty of cycles left over after computing Eddie’s balance. [Renee] uses some of these with a webcam based teleoperation mode.

Click past the break to see Eddie in action!

Continue reading “EddiePlus, The Edison Based Balancing Robot”

Kindle Hack

Unlock Your Demo Kindle Paperwhite

If you’ve been holding off on upgrading your kindle, this project might inspire you to finally bite the bullet. [WarriorRocker] recently saved quite a few dollars on his Kindle upgrade by using a demo unit. Of course, it’s not as simple as just finding a demo unit and booting it up. There’s some hacking involved.

[WarriorRocker] found his Kindle Paperwhite demo unit on an online auction site for just $20. Kindles are great for reading but also make popular displays for your own projects. This used display model was much less expensive than a new unit, which makes sense considering it had probably received its share of abuse from the consumers of some retail store. The problem with a demo unit is that the firmware that comes with it is very limited, and can’t be used to sync up with your Amazon account. That’s where the hacking comes in.

pwdu-01The first step was to crack open the case and locate the serial port. [WarriorRocker] soldered a small three pin header to the pads to make it easier to work on his device as needed. He then connected the Kindle to his PC using a small serial to USB adapter. Pulling up the command prompt was as simple as running Putty and connecting to the correct COM port. If the wires are hooked up correctly, then it just takes a press of the enter key to pull up the login prompt.

The next step requires root access. The root password for each unit is related to the unit’s serial number. [WarriorRocker] obtained the serial number by rebooting the Kindle while the Serial connection was still open. The boot sequence will spit out the number. This number can then be entered in to an online tool to generate possible root passwords. The tool is available on [WarriorRocker’s] project page linked above.

Next, the Kindle needs to be rebooted into diagnostic mode. This is because root logins are not allowed while the device is booted to the system partition. To enter diagnostic mode, [WarriorRocker] had to press enter over and over during the boot sequence in order to kill the automatic boot process. Then he checked some environment variables to locate the memory address where the diagnostic mode is stored. One more command tells the system to boot to that address and into diagnostic mode.

The last step of the process begins by mounting the Kindle as a USB storage device and copying over the stock Kindle firmware image. Next [WarriorRocker] had to exit the diagnostic menu and return to a root command prompt. Finally, he used the dd command to copy the image to the Kindle’s partition bit by bit. Fifteen minutes and one reboot later and the Kindle was working just as it should. [WarriorRocker] even notes that the 3G connection still works. Not bad for $20 and an hour or two of work.