Reinventing Rotary Switches With Stepper Motors

When you need to make very tiny measurements, even noise in closed relays can throw you off. [Marco] was able to observe this effect and wanted to build a switch that didn’t have this problem. He found a technical paper that used rotary switches operated by stepper motors instead of relays. So he decided to try making his own version. The video below shows how it turned out.

The first part of the video talks about why relays sometimes inject a tiny voltage into a closed circuit. He then looks at costly switches that would work. However, since he needed many switches, he decided to roll his own.

Continue reading “Reinventing Rotary Switches With Stepper Motors”

Don’t Slack Off On Updating Your Status

Displaying an accurate status in Slack (or whatever other employer-provided collaboration program you may be forced to run) is crucial in 2020. If you need to make a sandwich or take the dog out real quick, but you don’t update your status to show yourself as away, you might come back to a string of increasingly concerned or frustrated messages with lots of annoying question marks and the occasional interrobang.

[Becky Stern] decided that a physical interface would be a far more fun way to keep tabs on her status, and an excellent visual reminder to actually do it. We totally agree. Inside the box is a NodeMCU which is using [Brian Lough]’s Slack API library for Arduino. This made it easy for [Becky] to create a switch/case selector of statuses, and in each of these she can set the presence token as auto or away, and show a custom message with an appropriate emoji. These of course match the emoji semi-circling the selector, which is a rotary switch with a really nice knob.

While we’re on the subject of Slack notifiers, how about a companion cat to wave when you’ve been mentioned?

Continue reading “Don’t Slack Off On Updating Your Status”

Minivac 601 Replica Gets A Custom Motorized Rotary Switch

One of the joys of electronics as a hobby is how easy it is to get parts. Literally millions of parts are available from thousands of suppliers and hundreds of distributors, and everyone competes with each other to make it as easy as possible to put together an order from a BoM. If you need it, somebody probably has it.

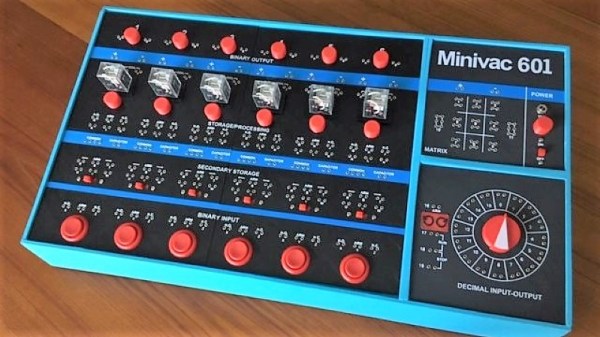
But what do you do when you need a part that doesn’t exist anymore, and even when it did was only produced in small numbers? Easy – you create it yourself. That’s just what [Mike Gardi] did with this unique motorized rotary switch he needed to complete his replica of a 1960s computer trainer. We covered his build of the Minivac 601, a trainer from the early computer age that let experimenters learn the ropes of basic digital logic. It used mostly relays, lamps, and switches connected by jumpers, but it had one critical component – a rotary control that was used for input and, with the help of a motor, as an output indicator.

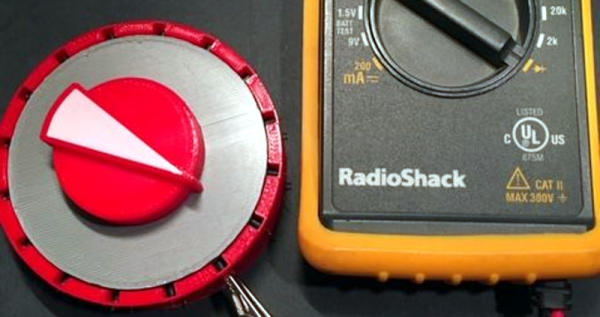
[Mike]’s version of the switch is as faithful to the original as possible, at least in terms of looks. The parts are mostly 3D-printed, with 16 reed switches embedded in the walls and magnets placed in the rotor. The motor to operate the rotor is a simple gear motor mounted to a hinged bracket; when the rotor needs to move, a solenoid pulls the motor’s friction drive wheel up against the rotor.

The unique control slots right into the Minivac replica and really completes the look and feel. Hats off to [Mike] for a delightful replica of a lost bit of computer history and the dedication to see it through to completion.

Continue reading “Minivac 601 Replica Gets A Custom Motorized Rotary Switch”

Custom Rotary Switch Takes A Motor

There are certain challenges we all will have to face sooner or later. Changing a flat tire in the rain, trying to put on a shirt that doesn’t quite fit, or producing a 16 position rotary switch for a replica computer front panel. There was a time when something like this would be a major undertaking, but with the help of a 3D printer [Mike Gardi] was able to build good looking switches that were big enough to be motor driven.

Switches of course are old tech, and there are plenty of ways to make contacts. [Mike] settled on using 16 small magnets and reed switches. This works, but you probably wouldn’t want to use it where the switch might get close to an external magnet. It does however make for a neat assembly without a lot of mechanical work. It also resists wear compared to a brush type arrangement.

The switch is a little large, but it could probably be made smaller with proper contacts. However, you still need at least some magnets to provide the detents without making mechanical changes.

We couldn’t help but think of the homemade rotary switches from the do it yourself computer that used sewing thread spools, wires, and paper clips. It would be fun to revisit that computer with an eye to making things using a 3D printer. We liked the knob, but if you only need a reproduction knob, there are other ways to go.

Dumb Down Your Xiaomi Smart Lamp With A Custom Firmware

Undoubtedly, the ESP8266’s biggest selling point is its WiFi capability for a ridiculously low price. Paranoid folks probably await the day its closed-source firmware bits will turn against humanity in a giant botnet, but until then, hobbyists and commercial vendors alike will proceed putting them in their IoT projects and devices. One of those devices is the Yeelight desk lamp that lets you set its color temperature and brightness via mobile app.

[fvollmer] acquired such a lamp, and while he appreciated its design and general concept, he wasn’t happy that it communicates with external servers. So he did the only reasonable thing and wrote his own firmware that resembles the original functionality, but leaves out the WiFi part. After all, the ESP8266 has still a lot to offer in its core essence: a full-blown 32-bit microcontroller with support for the most common, hobbyist-friendly SDKs.

The lamp’s color temperature and brightness are set with a rotary encoder / push button combo switch, and the LEDs themselves are controlled via PWM. All things considered, it’s a rather straightforward endeavour, for which [fvollmer] chose the standalone C SDK. And in the end, it’s not like he’s unreasonably cautious to keep some control over his household items.

Light Bulb Efficiency Exhibit Updated With LED Bulb Option

It seems like tinkerers are always being tapped to build or repair exhibit hardware. This time around it’s [Dino’s] turn. He’s been asked to alter a light bulb efficiency demo so that it includes an LED option.

The idea here is that you crank a generator to power different types of light bulbs. There’s an ammeter built in, but possibly the best feedback is knowing how hard you have to crank to illuminate the most inefficient choice. As it stands there is a toggle switch to choose between incandescent and CFL bulbs. [Dino’s] solution is to use a three-position rotary switch. He removes the toggle switch and replaces it with a socket for the LED bulb. A new location for the rotary switch is chosen and he does a bit of work to get it mounted securely. If you haven’t worked with this type of switch before he takes the time in the video after the break to explain how they work.

Continue reading “Light Bulb Efficiency Exhibit Updated With LED Bulb Option”

Interfacing A Digital Rotary Switch

digital_rotary_switch

[hw640] has put together a well written and detail packed explanation of how to interface with a digital rotary switch. These digital opto encoders have just two outputs with four possible logic levels (00, 10, 11, 01). The relative position of the switch is insignificant but the direction of rotation is what matters.

The short and dirty: Each of the switch’s 2 output pins is attached to a pin change interrupt on the microcontroller. Every time the switch moves it generates either a rising edge or a falling edge on one of the two pins; both edges cause an interrupt. By checking which pin caused the interrupt, then comparing the logic levels of the two pins after that interrupt, we can determine the direction the switch was rotated.

Although this explanation uses a PIC and code written in PicBasic Pro the concepts are discussed in the abstract and would easily be adapted to an AVR or another microcontroller of your choice.