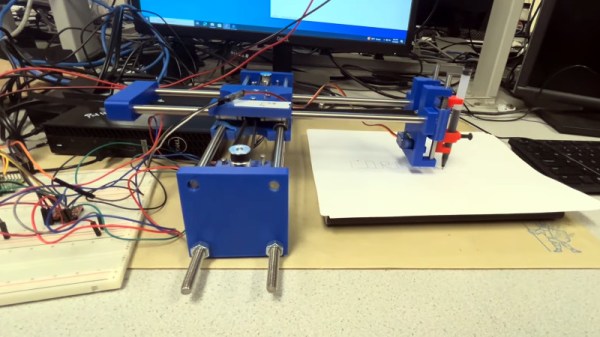
RP2040 Emulator Brings The Voice Of The 80s Back To Life

You may not have heard, but there’s a chip shortage out there. And it’s not just the fancy new chips that are in short supply; the chips that were fancy and new back when you could still buy them from Radio Shack are getting hard to come by, too. For different reasons, of course, but it does pose a problem that requires a little hacking to fix.

The chip in question here is the General Instrument SP0256, a 1980s-era speech synthesizer chip that [Andrew Menadue] relies on. The LSI chip stored 59 unique allophones, or basic sounds the vocal tract is capable of, and synthesized speech by rapidly concatenating these sounds. The chip and its descendants made regular appearances in computers and games throughout the 80s, so chances are good you’ve heard it. If not, think WarGames (yes, we know that wasn’t actually a computerized voice) or [Stephen Hawking] and you’ll be pretty close.

[Andrew]’s need for such a chip stems from his attempts to give voice to his collection of Psion Organisers, another 80s relic that was one of the first pocket computers. Some time ago he built a speech board for the Psion based on the SP0256-AL2, but had to resort to building an emulator for the chip since none were to be had. The emulator uses an RP2040 and lives on a PCB that has the same footprint as the original chip, so it can just plug right in. He dug up WAV files of the allophones and translated those to sequences of bytes, allowing the RP2040 to output the correct sounds as they’re called for. Speaker problems notwithstanding, it sounds pretty good in the video below.

We’ve featured a fair number of SP0256 projects before, on everything from Amstrad to Z80. We’ve also shown off a few of [Andrew]’s builds before, including this exploration of the voltage tolerance of the RP2040.

Continue reading “RP2040 Emulator Brings The Voice Of The 80s Back To Life”

Accurate Cycle Counting On RP2040 MicroPython

The RP2040 is a gorgeous little chip with a well-defined datasheet and a fantastic price tag. Two SDKs are even offered: one based on C and the other MicroPython. More experienced MCU wranglers will likely reach for the C variant, but Python does bring a certain speed when banging out a quick project or proof of concept. Perhaps that’s why [Jeremy Bentham] ported his RP2040-based vehicle speedometer to MicroPython.

The two things that make that difficult are that MicroPython tries to be pretty generic, which means some hackery is needed to talk to the low-level hardware, and that MicroPython doesn’t have a reputation for accurate cycle counting. In this case, the low-level hardware is the PWM peripheral. He details the underlying mechanism in more detail in the C version. On the RP2040, the PWM module can count pulse edges on an input. However, you must start and stop it accurately to calculate the amount of time captured. From there, it’s just edges divided by time. For this, the DMA system is pulled in. A DMA request can be triggered once the PWM counter rolls over. The other PWM channel acts as a timer, and when the timer expires, the DMA request turns off the counter. This works great for fast signals but is inaccurate for slow signals (below 1kHz). So, a reciprocal or time-interval system is included, where the time between edges is captured instead of counting the number of edges in a period,

What’s interesting here is how the hardware details are wrapped neatly into pico_devices.py. The uctypes module from MicroPython allows access to MMIO devices such as DMA and PWM. The code is available on GitHub. Of course, [Jeremy] is no stranger to hacking around on the RP2040, as he has previously rolled his own WiFi driver for the Pico W.

RPDot: The RP2040 Dev Board Barely Bigger Than The Chip

Is [William Herr]’s RPDot actually the world’s smallest RP2040 dev board? We can’t say for sure, but at 10 mm on a side, we’d say it has a pretty good shot at the record.

Not that it really matters, mind you — the technical feat of building a fully functional dev board that’s only 3 mm longer on each side than the main chip is the kind of stuff we love to see. [William] says he took inspiration from the [SolderParty] RP2040 Stamp, which at one inch (25.4 mm) on a side is gigantic compared to the RPDot. Getting the RP2040 and all the support components, which include an 8MB QSPI Flash chip, a 3V3 LDO, a handful of 0201 passives, and even a pair of pushbuttons, required quite a lot of design tweaking. He started his PCB design as a four-layer board; while six layers would have made things easier, the budget wouldn’t allow such extravagance for a prototype. Still, he somehow managed to stuff everything in the allotted space and send the designs off — only to get back defective boards.

After reordering from a different vendor, the real fun began. Most of the components went on the front side of the board and were reflowed using a hot plate. The RP2040 itself needed to go on the back side, which required gentle hot air reflow so as not to disrupt the other side of the board. The results look pretty good, although those castellated edges look a little worse for the wear. Still, for someone who only ever worked with 0402 components before, it’s pretty impressive.

[William] says he’s going to open-source the designs as well as make some available for sale. We’ll be looking out for those and other developments, but for now, it’s just pretty cool to see such SMD heroics.

Adding MMIO RAM On The RP2040

[Dmitry Grinberg] is an adept tinkerer who wanted a much larger RAM space on his Raspberry Pi 2040 (RP2040) than the measly 264kb on-board SRAM. The chip does support 16MB of off-flash memory via a QSPI bus, but this must be accessed explicitly rather than being memory mapped. With clever trickery involving XIP (Execute in Place), Dmitry mapped 8MB of external QSPI RAM into the address space.

XIP mode allows the chip to fetch data on-demand from an external chip and place it into RP2040 caches mapped at 0x10xxxxxx. The RP2040, although incredibly versatile, has a limitation – it can only perform read and execute operations in its XIP mode. The first step to solving this was to get data from persistent storage to RAM on boot. Armed with a dual-OR gate IC, an inverter, and two resistors, [Dmitry] can toggle the nCS pin that selects between flash and RAM. A first-stage bootloader copies the program from flash to RAM, then sets up XIP mode and launches into a second-stage loader.

Continue reading “Adding MMIO RAM On The RP2040”

GrblHAL CNC Controller Based On RP2040 Pico

[Phil Barrett] designed a new CNC controller breakout board called the PicoCNC which uses the Raspberry Pi Pico RP2040 module and grblHAL. It packs a bunch of features typical of these controllers, and if you use the Pico W, you get WiFi connectivity along with USB. And if you don’t want connectivity, you can execute G-code directly from a micro SD card. The board is available in kit form, and schematics are posted on the GitHub repository above. Some of the features include four axes of motion, spindle control, limit switches, relay drivers, expansion headers, and opto-isolation.

This isn’t [Phil]’s first controller board. He also designed the grblHAL-based Teensy CNC controller breakout board, a step up from the usual Arduino-based modules at the time and boasting Ethernet support as well. According to the grblHAL site, nine different processors are now supported. There are well over a dozen CNC controller breakout boards listed as well. And don’t forget [bdring]’s 6-Pack grbl-ESP32 controller, a modular breakout board we covered a few years back. So pick your favorite board or roll your own and get moving.

Running DOOM In A Keycap Takes Careful Work

Shoehorning DOOM into different hardware is a classic hacker’s exercise, and [TheKeebProject] managed to squeeze the 1993 classic into a custom keycap with the help of a Raspberry Pi RP2040, a custom PCB, and a clear resin enclosure. It even has a speaker for sound!

All processing is done inside the keycap, which is a clever feat. There is a USB connection, but it’s only for power and keyboard controls, so it’s completely playable without needing a whole lot of external support. The custom PCB and code are based off an earlier RP2040 DOOM project, and [TheKeebProject] has certainly made it their own by managing to get everything so tightly integrated. There’s a quick video mashup embedded below. There’s still a bit of work to do, but the code and design files are all on GitHub should you wish for a closer look.

Making DOOM physically smaller is a good challenge, but we’d like to remind fans that we’ve also seen DOOM shrink in terms of power consumption, all the way down to 1 mW.

Continue reading “Running DOOM In A Keycap Takes Careful Work”

A Game Boy Camera, Without The Game Boy

We all know the Nintendo Game Boy camera peripheral, and we’ve seen plenty of hacks for it on these pages over the years. We like [Raphael Boichot]’s camera then, as instead of including a Game Boy or emulating one, it talks directly to the sensor from an RP2040. The result is a standalone camera with slightly better quality than the original, and with near-limitless storage and easy retrieval of pictures.

For us the interesting revelation from this project comes in the light it sheds on the sensor module, the Mitsubishi M64282FP, but it’s no slouch as a camera beside that. There are motion sensor and timelapse modes, as well the ability to take high dynamic range pictures, and as if that’s not enough it also has all the tweakable things you’d expect from a “proper” camera. The oldest adage in photography is that the best camera in the world is the one in your hand, and we’d say that this one’s better than a real Game Boy Camera should the once-in-a-lifetime picture come while you’re holding it.

Of course, a better Game Boy camera needs a better lens, right?