How Researchers Used Salt To Give Masks An Edge Against Pathogens

Masks are proven tools against airborne diseases, but pathogens — like the COVID-19 virus — can collect in a mask and survive which complicates handling and disposal. [Ilaria Rubino], a researcher at the University of Alberta, recently received an award for her work showing how treating a mask’s main filtration layer with a solution of mostly salt and water (plus a surfactant to help the wetting process) can help a mask inactivate pathogens on contact, thereby making masks potentially re-usable. Such masks are usually intended as single-use, and in clinical settings used masks are handled and disposed of as biohazard waste, because they can contain active pathogens. This salt treatment gives a mask a kind of self-cleaning ability.
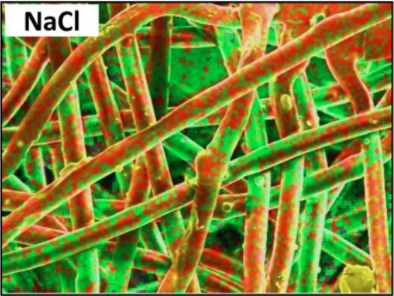
Analysis showing homogenous salt coating (red and green) on the surface of fibers. NaCl is shown here, but other salts work as well.

How exactly does salt help? The very fine salt coating deposited on the fibers of a mask’s filtration layer first dissolves on contact with airborne pathogens, then undergoes evaporation-induced recrystallization. Pathogens caught in the filter are therefore exposed to an increasingly-high concentration saline solution and are then physically damaged. There is a bit of a trick to getting the salt deposited evenly on the polypropylene filter fibers, since the synthetic fibers are naturally hydrophobic, but a wetting process takes care of that.

The salt coating on the fibers is very fine, doesn’t affect breathability of the mask, and has been shown to be effective even in harsh environments. The research paper states that “salt coatings retained the pathogen inactivation capability at harsh environmental conditions (37 °C and a relative humidity of 70%, 80% and 90%).”

Again, the salt treatment doesn’t affect the mask’s ability to filter pathogens, but it does inactivate trapped pathogens, giving masks a kind of self-cleaning ability. Interested in the nuts and bolts of how researchers created the salt-treated filters? The Methods section of the paper linked at the head of this post (as well as the Methods section in this earlier paper on the same topic) has all the ingredients, part numbers, and measurements. While you’re at it, maybe brush up on commercially-available masks and what’s inside them.


Take This 3D-Print Post-Processing Method With A Grain Of Salt

There’s a lot of folklore around post-processing of prints from FDM printers. Proponents swear by their methods, which are generally intended to either strengthen the part or to improve its appearance, or both. But do they actually work?

Knowing that a collection of anecdotes is no substitute for actual data, [Stefan] from CNC Kitchen has again performed some valuable experiments, this time testing the strength of parts that have been annealed in salt. This was a follow-up to his recent experiments with baking prints after entombing them in plaster, which yielded mixed results in terms of strength gains. Viewers commented that common salt makes a good medium for annealing prints, so he set about finding the right kind of salt. It turns out that the finer the grain, the better — powdery salt packs tighter and leaves little space for the softened plastic to flow — but that powdery salt is not easier to find. He ended up making his own by pulverizing table salt in a blender. He also had to play around with temperatures and times until coming up with a good process.

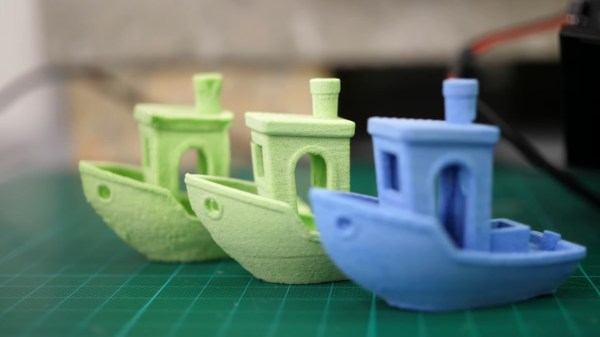
The results are impressive. PETG, ABS, and two varieties of PLA prints tested with force applied perpendicular to the print layers all showed marked increase in strength after breaking, to the point of nearly matching the strength of parts printed with the layers parallel to the stress. As with the plaster, parts were printed at 100% infill; a Benchy printed at 20% was notably unseaworthy after annealing. Surface finish on the annealed parts is an interesting combination of pitting with white residue — not unattractive but still a bit weird.

Salt annealing might be a bit cumbersome, but it’s a neat method to add to all the other post-processing tricks that people have come up with for their 3D prints. Continue reading “Take This 3D-Print Post-Processing Method With A Grain Of Salt”

Reforming 3D Prints With Salt And Heat

The biggest problem with fused deposition 3D prints is that while the layers should stick together, they aren’t the same as a solid piece of plastic you would get from, say, injection molding. You can anneal plastic using moderate heat, but it is likely to cause the part to deform or change size. [Free Spirit 1] has a solution for this. Using a powdered salt, the part is packed on the inside and out and put in an oven. The results in the video below look really impressive.

In addition to making the part look solid and — we assume — adding strength, the resulting prints are also water- and gas-tight which was the purpose of the effort. That alone would make the technique worthwhile.

The only thing we noticed is that the part has to have access to hold the salt. Anything not supported would be subject to deformation. However, the ground-up salt is so fine that it should be relatively easy to fill in most parts and, of course, print with 100% infill to avoid hollow internal areas.

[Free spirit 1] used a coffee grinder to get the salt powder, but apparently you can buy “flour salt.” We wondered if other powders might work well, too. Apparently, sand didn’t work out, perhaps because the salt dissolves out in water, so whatever you use, it should probably dissolve in something that won’t attack your plastic.

Annealing isn’t a new idea, and we’d love to see some objective tests on this new method.

Continue reading “Reforming 3D Prints With Salt And Heat”

Digital Dining With Charged Chopsticks

You step out of the audience onto a stage, and a hypnotist hands you a potato chip. The chip is salty and crunchy and you are convinced the chip is genuine. Now, replace the ordinary potato chip with a low-sodium version and replace the hypnotist with an Arduino. [Nimesha Ranasinghe] at the University of Maine’s Multisensory Interactive Media Lab wants to trick people into eating food with less salt by telling our tongues that we taste more salt than the recipe calls for with the help of electrical pulses controlled by everyone’s (least) favorite microcontroller.

Eating Cheetos with chopsticks is a famous lifehack but eating unsalted popcorn could join the list if these chopsticks take hold and people want to reduce their blood pressure. Salt is a flavor enhancer, so in a way, this approach can supplement any savory dish.

Smelling is another popular machine hack in the kitchen, and naturally, touch is popular beyond phone screens. You have probably heard some good audio hacks here, and we are always seeing fascination stuff with video.

Etching Your Own Metal

It’s been said that with enough soap, one could blow up just about anything. A more modern interpretation of this thought is that with enough knowledge of chemistry, anything is possible. To that end, [Peter] has certainly been doing a good job of putting his knowledge to good use. He recently worked out a relatively inexpensive and easy way to etch metals using some chemistry skill and a little bit of electricity.

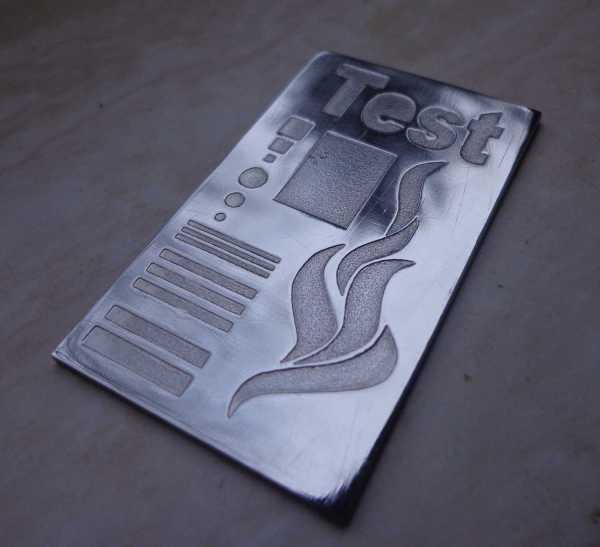
After preparing a set of stencils and cleaning the metal work surface, [Peter] sets his work piece in a salt solution. A metal bar is inserted in the other end of the bath, and both it and the work piece are connected to electrodes. The flow of electricity removes some metal from the exposed work surfaces, producing whatever patterns [Peter] wants.

One interesting thing that [Peter] found is that the voltage must stay under 6 volts. This is probably part of the reason it’s relatively easy to etch with even a wall wort. Above that, the iron work piece produces a different ion which can clog the work surface and create undesirable effects. Additionally, since his first experiments with this process he has upgraded the salt bath with magnetic stirrers. He also gets the best results in a very cold environment.

There are many other uses for etching metals, too. Creating your own printed circuit boards comes to mind, but there are plenty of other uses as well. What will you do with this technique?

Water Purification Uses Home-built Electrolysis Rig

If you plan ahead a little bit you could have your own system of water purification to use in emergencies. Everyone needs clean drinking water and this gadget will let your produce your own purification drops quite easily.

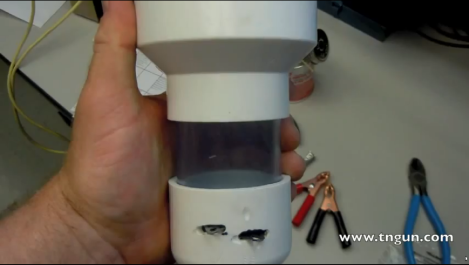
The solution contains chlorine, which is created through electrolysis. The PVC cap seen near the bottom of the image has two electrodes sticking out of it. These are titanium plated mesh plates separated by a rubber ring. The cap has a small hole in it to keep the flow rate low and the fitting at the top acts as a funnel. When you pour in a salt water mixture it passes through the energized plates and a chemical reaction splits the sodium from the chlorine.

A twelve volt power source is necessary for this to work. But since the electrolytic process takes just a minute or two you could easily source the power from batteries charged with solar cells. Check out a full build walk through and demonstration video after the break.

Continue reading “Water Purification Uses Home-built Electrolysis Rig”

Etching PCBs With Vinegar

When we hear about etching PCBs at home we assume that either Ferric Chloride or Cupric Chloride were used to eat away unmasked copper from the boards. But [Quinn Dunki] just wrote up her PCB etching guide and she doesn’t use either of those. Instead, she combines vinegar, hydrogen peroxide, and salt. It’s easier to find vinegar than muriatic acid (Cupric Chloride is made using this, peroxide, and adding the copper) so this is something to keep in mind if you’re in a pinch (or a Macgyver situation).

The rest of the process is what we’re used to. She’s using photoresistant boards which can be masked with a sheet of transparency instead of using the toner-transfer method. Once they take a bath in the developer solution she puts them in a shallow dish of vinegar and hydrogen peroxide along with a teaspoon of salt. She wipes the surface with a foam brush every minute or so, and inspects them every ten minutes to see if they’re done.

She does discuss disposal. Seems that she throws the solution in the garbage after each use. The liquid will contain copper salts which are bad for wildlife. We’ve heard that you should neutralize the acid and make a block of concrete using the liquid, then throw it in the garbage. Does anyone have a well-researched, ethical, and environmentally friendly way of getting rid of this stuff?