Dozens Of Servos Flip The Segments Of This 3D-Printed Digital Clock

A digital clock based on seven-segment displays? Not exciting. A digital clock with seven-segment displays that’s really big and can be read across a football field? That’s a little more interesting. A large format digital clock that uses electromechanical seven-segment displays? Now that’s something to check out.

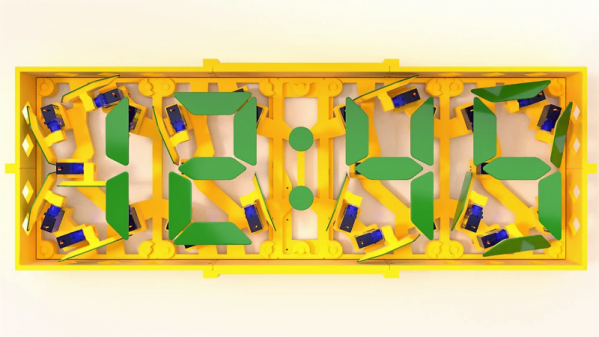
This clock comes to us by way of [Otvinta] and is a nice example of what you can do with 3D-printing and a little imagination. Each segment of the display is connected to a small hobby servo which can flip it 90°. Mounted in a printed plastic frame, the segments are flipped in and out of view as needed to compose the numerals needed to display the time. The 28 servos need two Pololu controller boards, which talk to a Raspberry Pi running Windows IoT, an interesting design choice that we don’t often see. You’d think that 28 servos clattering back and forth might be intolerable, but the video below shows that the display is actually pretty quiet. We’d love to see this printed all in black with white segment faces, or even a fluorescent plastic; how cool would that look under UV light?

We’re not saying this is the only seven-segment servo clock we’ve seen, but it is a pretty slick build. And of course there’s more than one way to use servos to tell the time.

Continue reading “Dozens Of Servos Flip The Segments Of This 3D-Printed Digital Clock”

Old LED Light Bulbs Give Up Filaments For Spider Web Clock

We love it when something common gets put to a new and unusual use, especially when it’s one of those, “Why didn’t I think of that?” situations. This digital clock with a suspended display is just such a thing.

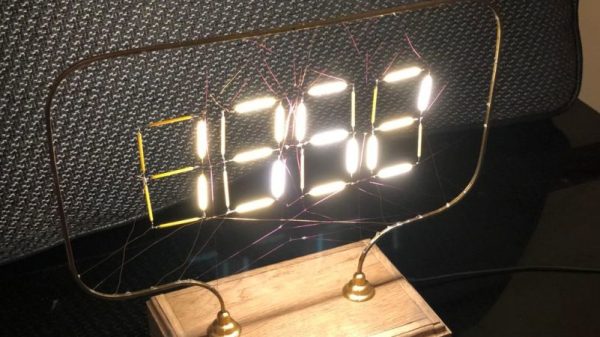
The common items in this case were “filaments” from LED light bulbs, those meant to mimic the look of clear-glass incandescent light bulbs. [Andypugh] had been looking at them with interest for a while, and realized they were perfect as the segments for a large digital clock. The frame of the clock was formed from bent brass U-channel and mounted to an oak base via turned stanchions. The seven-segment displays were laid out in the frame and the common anodes of the LED filaments were connected together, with the cathode for each connected to a very fine wire. Each wire was directed through a random hole in the frame and channeled down into the base, to be hooked to one of the four DS8880 VFD driver chips. The anode wires form a lacy filigree behind the segments, which catch the light and make then look a little like a spider’s web. It looks great, but nicht für der gefingerpoken – the frame is at 80 VDC to drive the LED segments. The clock is synced to the UK atomic clock with a 60-kHz radio link; see the long, painful sync process in the video below.

We like the open frame look, which we’ve seen before with an equally dangerous sculptural nixie clock. And this gives us some ideas for what to do with those filament LEDs other than turning them back into a light bulb. And if [Andy] sounds familiar, it could be because he’s appeared here before. First of all resurrecting the parts bin for an entire classic motorcycle marque, and then as the designer of SMIDSY, a robot competitor in the first incarnation of the UK Robot Wars series.

Continue reading “Old LED Light Bulbs Give Up Filaments For Spider Web Clock”

This Big, Bright Seven-Segment Display Is 3D-Printable

Seven-segment LED displays have been around forever, it seems, and the design is pretty optimized by now. Off-the-shelf units are readily available in all sorts of sizes and colors, but if you want a really big display, you might have to roll your own. Scaling up the size doesn’t necessarily mean you have to scale up the complexity, though, if this light-pipeless jumbo seven-segment LED display is any indication.

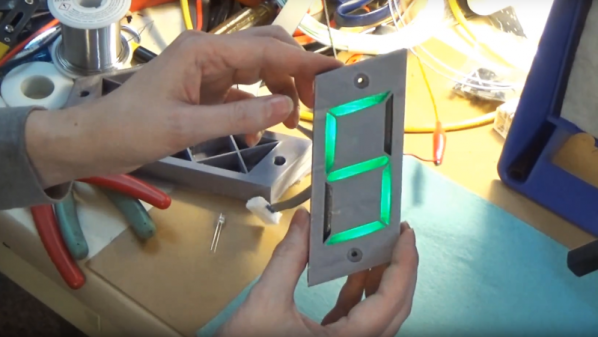
It’s clear that [Fran Blanche] has a thing for collecting and building oddball numeric displays, like this cathode ray tube Nixie knockoff or her Apollo DSKY electroluminescent display. Her plus-size seven-segment display is far less complicated than either of those, and that’s by design; [Fran] wanted something that was 3D-printable as a single part, rather than an assembly with light pipes and diffusers. To that end, the display is just a pair of X-shaped dividers stacked on top of each other behind the display’s face. They dividers form six triangular compartments and a diamond shaped one, with each compartment opening into a segment-shaped window. One LED goes in each triangular compartment, while the double-sized diamond space gets two. That’s it — the LEDs light up the inside of each compartment to turn on the appropriate segments. Watch it in action below.

The display still needs some tweaking, but it’s big and bright and has a large acceptance angle. What’s more, it’s scalable — imagine a display the size of a sheet of plywood using LED light bulbs. We’re looking forward to [Fran]’s improvements and her next display project, which appears to use hot glue as a light pipe.

Continue reading “This Big, Bright Seven-Segment Display Is 3D-Printable”

Start Your Apollo Collection With An Open Source DSKY

Given that there have been only six manned moon landings, and that almost all of the hardware that started on the launch pad was discarded along the way, getting your hands on flown hardware is not generally the business of mere mortals. Such artifacts are mostly in museums or in the hands of very rich private collectors. Enthusiasts have to settle for replicas like this open source Apollo Guidance Computer DSKY.

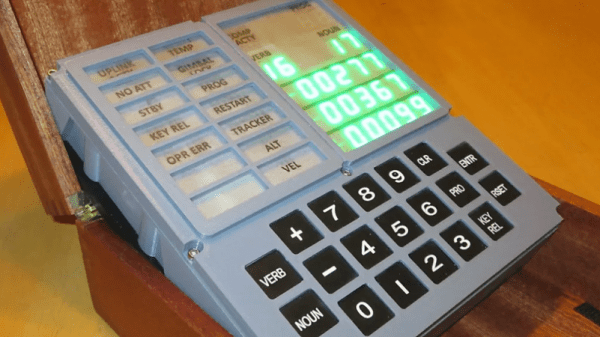
The DSKY, or Display and Keyboard, was the user interface for the Apollo Guidance Computer, that marvel of 1960s computer engineering that was purpose-built to control the guidance and navigation of the Command and Lunar Excursion modules. [ST-Geotronics] has made a decent replica of the DSKY using 3D-printed parts for the housing and bezel. There’s a custom PCB inside that houses a matrix of Neopixels for the indicator light panel and seven-segment LEDs for the numeric displays. Sadly but understandably, the original electroluminescent display could not be reproduced, but luckily [Fran Blanche] is working on just that project these days. The three-segment displays for the plus and minus signs in the numeric displays proved impossible to source commercially, so the team had to roll their own for that authentic look. With laser cut and engraved overlays for the displays and keycaps, the look is very realistic, and the software even implements a few AGC-like functions.

We like this a lot, although we could do without the sound clips, inspirational though Kennedy’s speech was. Everything is open source so you can roll your own, or you can buy parts or even a complete kit too.

Continue reading “Start Your Apollo Collection With An Open Source DSKY”

The Noisiest Seven-Segment Display Ever

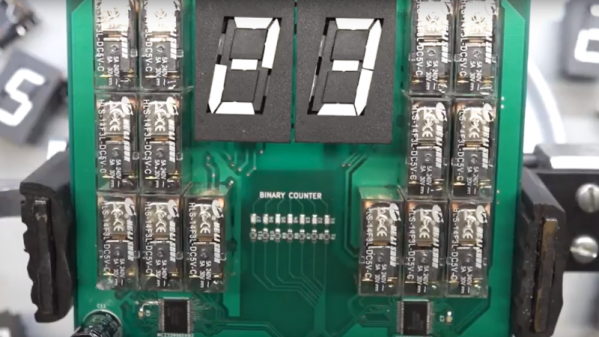
Few mechanical clocks are silent, and many find the sounds they make pleasant. But the stately ticking of an old grandfather clock or the soothing sound of a wind-up alarm clock on the nightstand are nothing compared to the clattering cacophony that awaits [ProtoG] when he finishes the clock that this electromechanical decimal to binary to hex converter and display will be part of.

Undertaken as proof of concept before committing to a full six digit clock build, we’d say [ProtoG] is hitting the mark. Yes, it’s loud, but the sound is glorious. The video below shows the display being put through its paces, and when the clock rate ramps up, the rhythmic pulsations of the relays driving the seven-segment flip displays is hypnotizing. The relays, one per segment of the Alfa Zeta flip displays, have DPDT contacts wired to flip a segment by reversing polarity. As a work in progress, [ProtoG] hasn’t shared many more details yet, but he promises to keep us up to date on the converter aspect of the circuit. Right now it just seems like a simple but noisy driver. We’ll be following this one with interest.

If you prefer your clocks quieter but still like funky displays, check out this mixed media circus-themed clock.

Continue reading “The Noisiest Seven-Segment Display Ever”

Quick And Dirty Driver Tips For Surplus VFDs

Sometimes it seems like eBay is the world’s junk bin, and we mean that in the best possible way. The variety of parts available for a pittance boggles the mind sometimes, especially when the parts were once ordered in massive quantities but have since gone obsolete. The urge to order parts like these in bulk can be overwhelming, and sooner or later, you’ll find yourself with a fistful of old stuff but no idea how to put it to use.

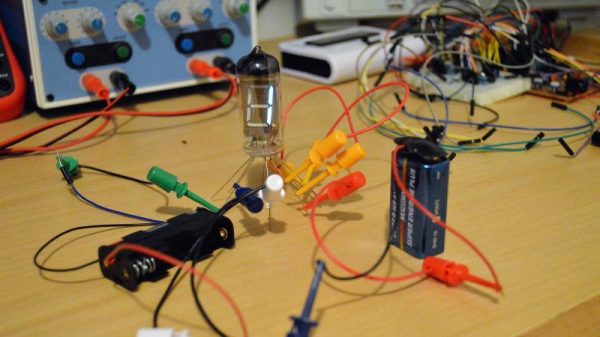
Case in point: the box of Russian surplus seven-segment vacuum fluorescent displays (VFDs) that [w_k_fay] had to figure out how to use. The result is a tutorial on quick and dirty VFD drivers that looks pretty handy. [w_k_fay] takes pains to point out that these are practical tips for putting surplus VFDs to work, as opposed to engineered solutions. He starts with tips on characterizing your surplus tubes in case you don’t have a pinout. A 1.5 V battery will suffice for the hot cathode, while a 9 V battery will turn on the segments. The VFDs can be treated much like a common cathode LED display, and a simple circuit driving the tube with a 4026 decade counter can be seen below. He also covers the challenges of driving VFDs from microcontrollers, and promises a full build of a frequency counter wherein the mysteries of multiplexing will be addressed.

Sounds like it’s time to stock up on those surplus VFDs and put them to work. For inspiration, take a look at this minimalist VFD clock, or perhaps mix VFDs with Nixies to satisfy your urge for all things glowy.

Continue reading “Quick And Dirty Driver Tips For Surplus VFDs”

Towards DIY Flip Digit Clocks

Seven segment displays and Nixies are one thing, but the king of all antique display technologies must be electromechanical flip dots. These displays, usually found in train stations or rarely on old bus lines, are an array of physical disks, black on one side, light on the other, that ‘flip’ back and forth with the help of an electromagnet. They’re expensive and impressive, driving them is a pain, but oh man do they look awesome.

While flip dot displays can be bought new if you know where to look, [sjm4306] had the idea to build his own out of inexpensive materials. It might just be a prototype, but we’re saying he’s succeeded. He has the workings of a seven flip-segment display, and the techniques he’s using mean it shouldn’t be too expensive to build your own.

Instead of building a matrix of flip dots, [sjm] is building a mechanical seven-segment display. Each of the segments are 3D printed in black PLA, and mounted to a piece of cardboard via a thin wire ‘axel’ going through the length of the segment. Where normal flip dots use an electromagnet to change each dot from one state to another, [sjm] mounted a very small vibrating pager motor to one end of the segment. When one half of a tact switch h-bridge is activated, the segment flips to the front. When the other half of the h-bridge is activated, the segment flips back.

Right now, this hardware is in the ‘extreme prototype’ stage, but results so far are encouraging. [sjm] has already designed a single-segment ‘module’. Plans for the electronics include optocouplers for two microcontroller pins for each segment and reed relays for each individual digit. For a four-digit display, these flip digits will only require 18 I/O pins.

You can check out [sjm4306]’s video for this project below. It’s a little bit long, but watch those things flip!

Continue reading “Towards DIY Flip Digit Clocks”