Close up of Zenit 19 camera

Behind The Lens: Tearing Down A Rare Soviet Zenit 19

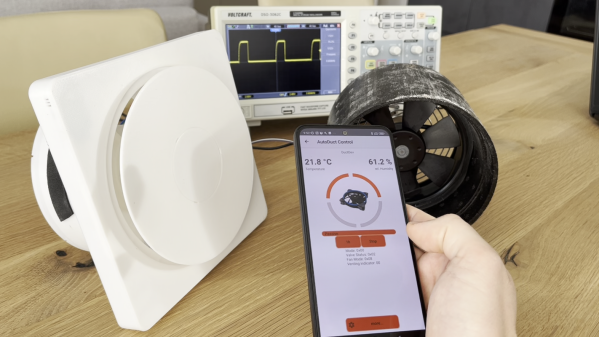
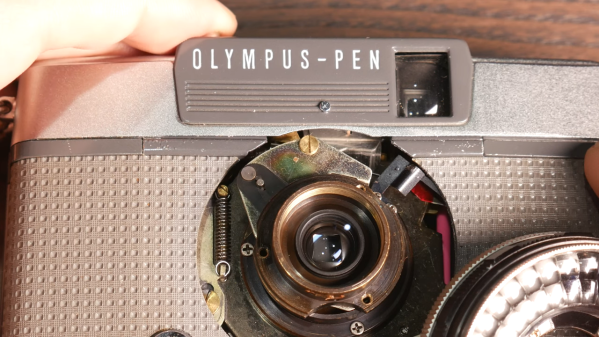
If you’re into Soviet-era gear with a techy twist, you’ll love this teardown of a rare Zenit 19 camera courtesy of [msylvain59]. Found broken on eBay (for a steal!), this 1982 made-in-USSR single-lens reflex camera isn’t the average Zenit. It features, for example, electronically controlled shutter timing – quite the upgrade from its manual siblings.

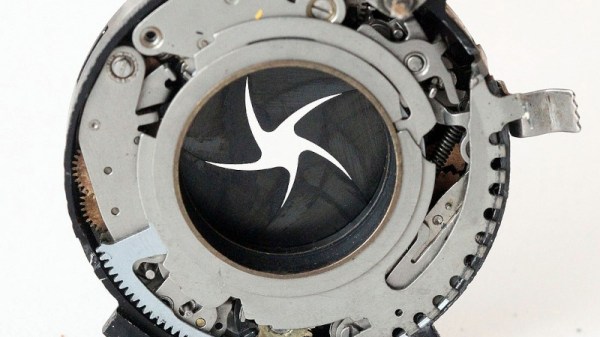
The not-so-minor issue that made this Zenit 19 come for cheap was a missing shutter blade. You’d say – one blade gone rogue! Is it lost in the camera’s guts, or snapped clean off? Add to that some oxidized battery contacts and a cracked viewfinder, and you’ve got proper fixer-upper material. But that’s where it gets intriguing: the camera houses a rare hybrid electronic module (PAPO 074), complete with epoxy-covered resistors. The shutter speed dial directly adjusts a set of resistors, sending precise signals to the shutter assembly: a neat blend of old-school mechanics and early electronics.

Now will it shutter, or stutter? With its vertical metal shutter – uncommon in Zenits – and separate light metering circuitry, this teardown offers a rare glimpse into Soviet engineering flair. Hungry for more? We’ve covered a Soviet-era computer and a radio in the past. If you’re more into analog camera teardowns, you might like this analog Pi upgrade attempt, or this bare minimum analog camera project.

Continue reading “Behind The Lens: Tearing Down A Rare Soviet Zenit 19”

Hackaday Prize 2023: AutoDuct Smart Air Duct

Modern building techniques are relying more and more on passive elements to improve heating and cooling efficiencies, from placing windows in ways to either absorb sunlight or shade it out to using high R-value insulation to completely sealing the living space to prevent airflow in or out of the structure. One downside of sealing the space in this fashion, though, is the new problem of venting the space to provide fresh air to the occupants. This 3D printed vent system looks to improve things.

Known as the AutoDuct, the shutter and fan combination is designed to help vent apartments with decentralized systems. It can automatically control airflow and also reduces external noise passing through the system using a printed shutter mechanism which is also designed to keep out cold air on windy days.

A control system enables features like scheduling and automatic humidity control. A mobile app is available for more direct control if needed. The system itself can also integrate into various home automation systems like Apple’s HomeKit.

A 100% passive house that’s also as energy-efficient as possible might be an unobtainable ideal, but the closer we can get, the better. Some other projects we’ve seen lately to help climate control systems include this heat pump control system and this automatic HVAC duct booster fan system.

A Shutter Speed Tester With Frickin’ Lasers!

Buying old cameras is one of the best ways yet found to part a geek from their money, but if you don’t mind finding a few duds along the way it’s still possible to pick up something nice without paying the excessive scene tax of an Etsy seller or an online store. The trouble is, in the many decades during which your purchase went from being pride and joy to forgotten in a drawer to lying on the shelf of a thrift store, its performance may have degraded a little. Does the shutter still operate as it should? How long is a split second anyway? You need a shutter speed tester, and luckily for us, [Stuart Brown] has one.

There are no sharks involved in this build, but it does rely on laser diodes as a light source. There are three of them as well as three sensors, packaged photodiodes with a Schmidt trigger. These feed an Arduino which is hooked up to a TFT display, and the software measures how long each diode receives the light. We’re told it can also measure the raise time on curtain shutters, another important metric.

There’s little in the way of usage examples, but we’re guessing it requires positioning the camera between lasers and photodiodes. We’re curious as to how such an instrument would perform on a camera with a fixed lens, or whether it’s only suitable for those with access to the shutter itself. If this subject interests you, it’s not the first shutter speed tester we’ve shown you.

Header image: Runner1616, CC BY-SA 4.0.

A Vintage Polaroid Camera Goes Manual

There once was a time when all but the most basic of fixed focus and aperture cameras gave the photographer full control over both shutter speed and f-stop. This allowed plenty of opportunity to tinker but was confusing and fiddly for non-experts, so by the 1960s and ’70s many cameras gained automatic control of those functions using the then quite newly-developed solid state electronics. Here in 2023 though, the experts are back and want control. [Jim Skelton] has a vintage Polaroid pack film camera he’s using with photographic paper as the film, and wanted a manual exposure control.

Where a modern camera would have a sensor in the main lens light path and a microcontroller to optimize the shot, back then they had to make do with a CdS cell sensing ambient light, and a simple analog circuit. He considered adding a microcontroller to do the job, but realized that it would be much simpler to replace the CdS cell with a potentiometer or a resistor array. A 12-position switch with some carefully chosen resistor values was added, and placed in the camera’s original battery compartment. The final mod brought out the resistors and switch to a plug-in dongle allowing easy switching between auto and switched modes. Result – a variable shutter speed Polaroid pack camera!

Sadly the film for the older Polaroid cameras remains out of production, though the Impossible Project in the Netherlands — now the heirs to the Polaroid name — brought back some later versions and have been manufacturing them since 2010. Hackers haven’t been deterred though and have produced conversions using Fuji Instax film and camera components, as with this Polaroid portrait camera, and [Jim]’s own two-camera-hybrid conversion.

A Solar-Powered Point-and-Shoot, Circa 1961

Try to put yourself in the place of an engineer tasked with building a camera in 1961. Your specs include making it easy to operate, giving it automatic exposure control, and, oh yeah — you can’t use batteries. How on Earth do you accomplish that? With a very clever mechanism powered by light, as it turns out.

This one comes to us from [Alec Watson] over at Technology Connections on YouTube, which is a channel you really need to check out if you enjoy diving into the minutiae of the mundane. The camera in question is an Olympus Pen EES-2, which was the Japanese company’s attempt at making a mass-market 35-mm camera. To say that the camera is “solar-powered” is a bit of a stretch, as [Alec] admits — the film advance and shutter mechanism are strictly mechanical, relying on springs and things to power them. It’s all pretty standard camera stuff.

But the exposure controls are where this camera gets interesting. The lens is surrounded by a ring-shaped selenium photocell, the voltage output of which depends on the amount of light in the scene you’re photographing. That voltage drives a moving-coil meter, which waggles a needle back and forth. A series of levers and cams reads the position of the needle, which determines how far the lens aperture is allowed to open. A clever two-step cam allows the camera to use two different shutter speeds, and there’s even a mechanism to prevent exposure if there’s just not enough light. And what about that cool split-frame exposure system?

For a camera with no electronics per se, it does an impressive job of automating nearly everything. And [Alec] does a great job of making it interesting, too, as he has in the past with a deep-dive into toasters, copy protection circa 1980, and his take on jukebox heroics.

Continue reading “A Solar-Powered Point-and-Shoot, Circa 1961”

Extensive Modification Of DSLR Includes High Quality Audio

Modern DSLR cameras are incredible pieces of technology that can take excellent high-quality photos as well as record video and audio. However, as they become jacks of all trades they risk being masters of none, and the audio quality in modern DSLRs certainly reflects that old cliche. To get true high-quality audio while recording with a camera like this Canon 80d, you’ll either need a secondary audio recording device or you’ll need to interface one directly into the camera itself.

This build from [Tony] aka [Carnivore] goes into the inner workings of the camera to add an audio mixer to the camera’s audio input, allowing for multiple audio streams to be recorded at once. First, he removed the plastic around the microphone port and attached a wire to it that extends out of the camera to a 1/8″ plug. While he had the case open he also wired a second shutter, added a record button to a custom location on the front of the camera, and bypassed a switch which prevents the camera from operating if the battery door isn’t closed.

With those modifications in place, he removed the internal flash from the camera before closing the body. A custom 3D printed mount was placed in the vacant space which now houses the audio mixer, a SR-AX100 from Saramonic. This plugs in to the new microphone wire from earlier in the build, allowing the camera to have an expanded capacity for recording audio.

While [Tony] has a fairly unique use case for all of these modifications to an already $1000 camera, getting into the inner workings of DSLRs isn’t something to shy away from if you need something similar done. We’ve even seen modifications to cameras like these to allow for watercooling during video recording.

Continue reading “Extensive Modification Of DSLR Includes High Quality Audio”

Whirling Shutters On This Field Mill Measure Electrostatic Charges At Distance

Hardly a person hasn’t experienced the sudden, sharp discharge of static electricity, especially on a crisp winter’s day. It usually requires a touch, though, the classic example being a spark from finger to doorknob after scuffing across the carpet. But how would one measure the electrostatic charge of an object without touching it? Something like this field mill, which is capable of measuring electrostatic charge over a range of several meters, will do the trick.

We confess to not having heard of field mills before, and found [Leo Fernekes]’ video documenting his build to be very instructive. Field mills have applications in meteorology, being used to measure the electrostatic state of the atmosphere from the ground. They’ve also played a role in many a scrubbing of rocket launches, to prevent the missile from getting zapped during launch.

[Leo]’s mill works much like the commercial units: a grounded shutter rotates in front of two disc-shaped electrodes, modulating the capacitance of the system relative to the outside world. The two electrodes are fed into a series of transimpedance amplifiers, which boost the AC signal coming from them. A Hall sensor on the shutter allows sampling of the signal to be synchronized to the rotation of the shutter; this not only generates the interrupts needed to sample the sine wave output of the amplifier at its peaks and troughs, but it also measures whether the electrostatic field is positive or negative. Check out the video below for a great explanation and a good looking build with a junk-bin vibe to it.

Meteorological uses aside, we’d love to see this turned toward any of the dozens of Tesla coil builds we’ve seen. From the tiny to the absurd, this field mill should be able to easily measure any Tesla coil’s output with ease.

Continue reading “Whirling Shutters On This Field Mill Measure Electrostatic Charges At Distance”