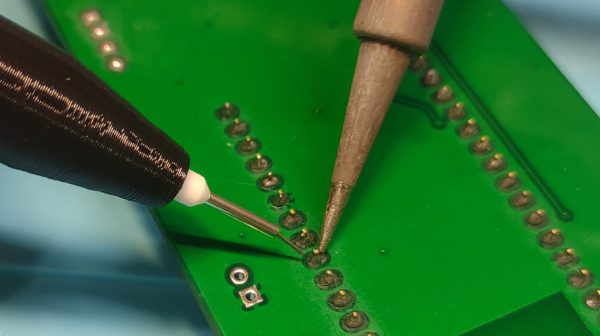
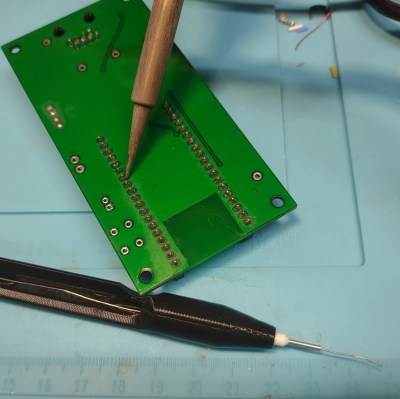
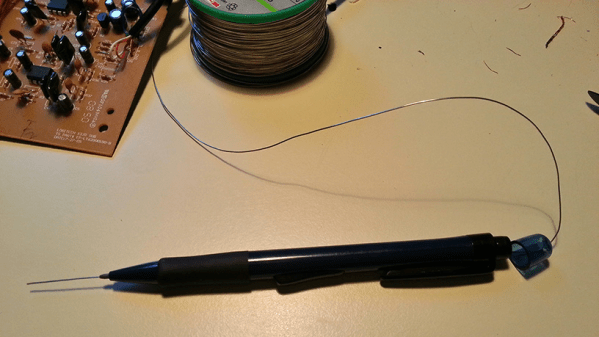
How To Solder To Aluminum, Easily

[Ted Yapo] shared a method of easily and conveniently soldering to aluminum, which depends on a little prep work to end up only slightly more complex than soldering to copper. A typical way to make a reliable electrical connection to aluminum is to use a screw and a wire, but [Ted] shows that it can also be done with the help of an abrasive and mineral oil.

Aluminum doesn’t solder well, and that’s because of the oxide layer that rapidly forms on the surface. [Ted]’s solution is to scour the aluminum with some mineral oil. The goal is to scrape away the oxide layer on the aluminum’s surface, while the mineral oil’s coating action prevents a new oxide layer from immediately re-forming.

After this prep, [Ted] uses a hot soldering iron and a blob of solder, heating it until it sticks. A fair bit of heat is usually needed, because aluminum is a great heat conductor and tends to be lot thicker than a typical copper ground plane. But once the aluminum is successfully tinned, just about anything can be soldered to it in a familiar way.

[Ted] does caution that mineral oil can ignite around 260 °C (500 °F), so a plan should be in place when using this method, just in case the small amount of oil catches fire.

This looks like a simple technique worth remembering, and it seems easier than soldering by chemically depositing copper onto aluminum.

Acid-Damaged Game Boy Restored

The original Game Boy was the greatest selling handheld video game system of all time, only to be surpassed by one of its successors. It still retains the #2 position by a wide margin, but even so, they’re getting along in years now and finding one in perfect working condition might be harder than you think. What’s more likely is you find one that’s missing components, has a malfunctioning screen, or has had its electronics corroded by the battery acid from a decades-old set of AAs.

That latter situation is where [Taylor] found himself and decided on performing a full restoration on this classic. To get started, he removed all of the components from the damaged area so he could see the paths of the traces. After doing some cleaning of the damage and removing the solder mask, he used 30 gauge wire to bridge the damaged parts of the PCB before repopulating all of the parts back to their rightful locations. A few needed to be replaced, but in the end the Game Boy was restored to its former 90s glory.

This build is an excellent example of what can be done with a finely tipped soldering iron while also being a reminder not to leave AA batteries in any devices for extended periods of time. The AA battery was always a weak point for the original Game Boys, so if you decide you want to get rid of batteries of any kind you can build one that does just that.

Continue reading “Acid-Damaged Game Boy Restored”

Solder Paste Dispenser Without Giant Compressor

We have certainly all had our moments with solder paste. Some of us hate it; it’s sticky and gooey, and it gets everywhere. That is, unless you have a solder paste dispenser. The trouble with these is that they typically require the use of an air compressor, which can be cumbersome to haul around in certain situations. If you need a solder paste dispenser that fits conveniently where air compressors won’t, take a look at this small one from [Nuri Engineer] called the solderocket.

This design foregoes the traditional compressor in favor of pressurized carbon dioxide canisters. These are common enough and used for things like rapidly inflating bicycle tires, but for this more delicate procedure the pressurized gas needs to be handled more daintily. A rotary knob is attached to the canister to regulate pressure, and a second knob attached to a microcontroller adjusts the amount of time the air pressure is applied to the solder paste. With this small compact setup, any type of paste can be delivered to a PCB without needing to use messy stencils or needing larger hardware like a compressor.

This could be just the tool that you need if you regularly work with surface-mount components. Of course there are other methods of dispensing solder paste that don’t require any compressed gas of any kind, but as long as something is around that gets the job done, we can’t really argue with either method.

Solder Bridges Aid Desoldering

As our own Elliot Williams laid out, many people think that soldering is a key skill for electronics, but we don’t as often think about desoldering. Even if you are perfect in your technique, there’s always the chance you’ll put in a bad part or have a part fail later and it will need replacement. [Robert] has a short video showing his method for removing through-hole components and you can see it below.

This isn’t the first time we’ve seen it, of course. In fact, it is very much like using hot air, although it doesn’t require hot air, just extra solder and a regular iron. Of course, if we knew that connector was bad, we’d have been tempted to cut each pin apart and remove them one at a time. Heating a joint and then slamming your hand on the bench can work wonders.

We always think desoldering pumps are a good idea, but the electric ones tend to be anemic. The ones with the springs are usually better, but still have limitations. In the end, we’ll stick with using hot air, but if all you have is an iron, this method is worth checking out. You might also be interested in the needle method.

Continue reading “Solder Bridges Aid Desoldering”

Make Your Desoldering Easier By Minding Your Own Bismuth

Any video that starts with a phase diagram has instantly earned our attention. Admittedly, we have a pretty low bar for that kind of stuff, but eye candy aside, [Robin Debreuil]’s quick outline of his technique for desoldering with the help of bismuth is worth watching.

Aside from its use in those pink gloopy solutions one takes for an upset stomach, bismuth has a lot of commercial applications. For the purposes of desoldering, though, its tendency to lower the melting point of tin and tin alloys like solder is what makes it a valuable addition to the toolkit. [Robin] starts with a demonstration of just how far a little bismuth depresses the melting point of tin solder — to about 135°. That allows plenty of time to work, and freeing leads from pads becomes a snap. He demonstrates this with some large QFP chips, which practically jump off the board. He also demonstrates a neat technique for cleaning the bismuth-tin mix off the leads, using a length of desoldering braid clamped at an angle to the vertical with some helping-hands clips. The braid wicks the bismuth-tin mix away from the leads along one side of the chip, while gravity pulls it down the braid to pool safely on the bench. Pretty slick.

Lest leaded solder fans fret, [Robin] ensures us this works well for lead-tin solder too. You won’t have to worry about breaking the bank, either; bismuth is pretty cheap and easily sourced. And as a bonus, it’s pretty non-toxic, at least as far as heavy metals go. But alas — it apparently doesn’t machine very well.

Continue reading “Make Your Desoldering Easier By Minding Your Own Bismuth”

Adding In-Game Reset To Classic Playstations

The first Playstation is quickly approaching three decades since its release, and while this might make some of us who were around for that event feel a little aged, the hardware inside these machines isn’t getting any younger either. Plenty of people are replacing the optical drive in the original hardware with an optical drive emulator as they begin to fail, and with that comes the option for several other modifications to the hardware like this in-game reset mod.

In-game reset is a function that allows a console to be reset via a controller button combination rather than pressing the console’s reset button directly. Especially for devices modified with either the XStation or PSIO drive emulators, this can be a handy feature to have as this method can more easily take the user back to the emulator menu as well as physically reset the device. The modification is a small PCB which attaches to the controller port and, unlike previous versions, only requires a single pin to be soldered to the Playstation’s control board.

If you’re someone who enjoys playing games on original hardware rather than a patchwork of emulators, this could be an excellent addition to your PS1 that still allows most of the original feel and experience the PS1 offered. The drive emulator can greatly expand the range of the hardware as well, much like this NES cartridge which similarly expands the capabilities of that much older system.

Send Old-Fashioned Pager Messages With New-Fashioned Hardware

In a world of always-connected devices and 24/7 access to email and various social media and messaging platforms, it’s sometimes a good idea to take a step away from the hustle and bustle for peace of mind. But not too big of a step. After all, we sometimes need some limited contact with other humans, so that’s what [EverestX] set out to do with his modern, pocket-sized communication device based on pager technology from days of yore.

The device uses the POCSAG communications protocol, a current standard for pager communications that allows for an SMS-like experience for those still who still need (or want) to use pagers. [EverestX] was able to adapt some preexisting code and port it to an Atmel 32u4 microcontroller. With a custom PCB, small battery, an antenna, and some incredibly refined soldering skills, he was able to put together this build with an incredibly small footprint, slightly larger than a bottle cap.

Once added to a custom case, [EverestX] has an excellent platform for sending pager messages to all of his friends and can avoid any dreaded voice conversations. Pager hacks have been a favorite around these parts for years, and are still a viable option for modern communications needs despite also being a nostalgic relic of decades past. As an added bonus, the 32u4 microcontroller has some interesting non-pager features that you might want to check out as well.

Thanks to [ch0l0man] for the tip!