Repair Job Fixes Compressor, Gets It Online

We’ll never cease to be amazed at the things people try to put on the Internet of Things. Some are no-brainers, like thermostats, security cameras, and garage door openers. Others, like washing machines and refrigerators, are a little on the iffy side, but you can still make a case for them. But an IoT air compressor? What’s the justification for such a thing?

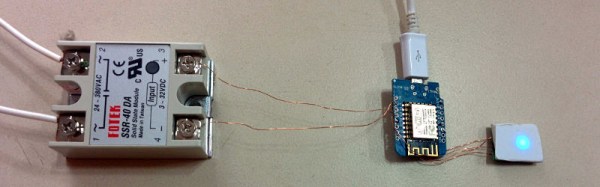
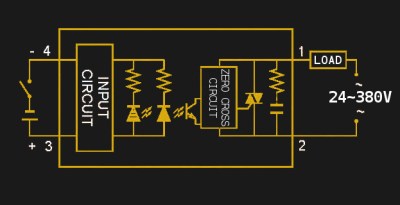
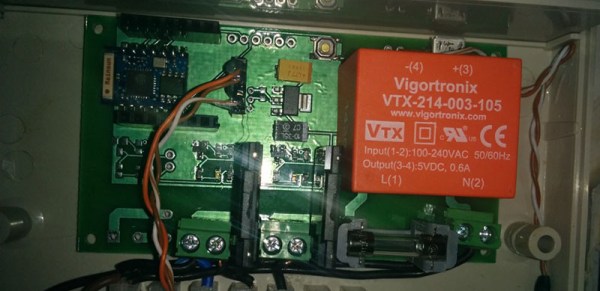
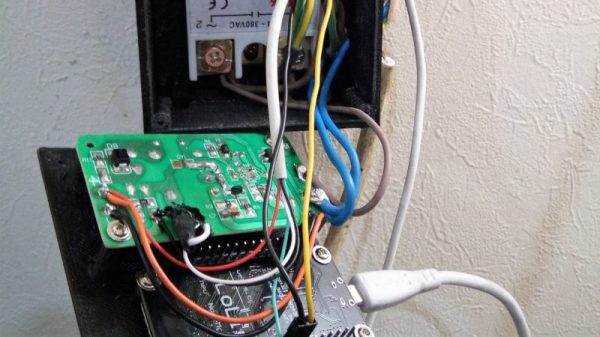
As it turns out, [Boris van Galvin] had a pretty decent reason for his compressor hacks, and it appears that the IoT aspect was one of those “why not?” things. Having suffered the second failure of his compressor’s mechanical pressure switch in a year, and unwilling to throw good money after the $120 that went into replacing the first contactor, [Boris] looked for a cheaper and more interesting way to control the compressor. An ESP8266 dev board made interfacing the analog pressure sensor a snap, and while he was at it, [Boris] added a web interface with a nice graphical air pressure gauge and some on-off controls. Now he can set the pressure using his phone and switch it off in the middle of the night without going outside. That’s an IoT win right there.

No air compressor? No worries — build your own from an old fridge. The non-IoT kind, preferably.

An Introduction To Solid State Relays

When we think of relays, we tend to think of those big mechanical things that make a satisfying ‘click’ when activated. As nice as they are for relay-based computers, there are times when you don’t want to deal with noise or the unreliability of moving parts. This is where solid-state relays (SSRs) are worth considering. They switch faster, silently, without bouncing or arcing, last longer, and don’t contain a big inductor.

Source Fotek SSR Specifications Sheet

An SSR consists of two or three standard components packed into a module (you can even build one yourself). The first component is an optocoupler which isolates your control circuit from the mains power that you are controlling. Second, a triac, silicon controlled rectifier, or MOSFET that switches the mains power using the output from the optocoupler. Finally, there is usually (but not always) a ‘zero-crossing detection circuit’. This causes the relay to wait until the current it is controlling reaches zero before shutting off. Most SSRs will similarly wait until the mains voltage crosses zero volts before switching on.

If a mechanical relay turns on or off near the peak voltage when supplying AC, there is a sudden drop or rise in current. If you have an inductive load such as an electric motor, this can cause a large transient voltage spike when you turn off the relay, as the magnetic field surrounding the inductive load collapses. Switching a relay during a peak in the mains voltage also causes an electric arc between the relay terminals, wearing them down and contributing to the mechanical failure of the relay.

Continue reading “An Introduction To Solid State Relays”

Making Something Useful With The ESP8266

The ESP8266 is the latest and greatest way to get a project connected to the Internet, but so far we haven’t seen many projects that actually do something with this very cool chip. Yes, there are a few people pinging away with AT commands, and there is a thriving community building interpreters and flashing new code on this chip, but not much in the way of actual projects. [Martin] is the exception. He’s come up with two projects that use the ESP8266.

The first project is one that puts the readings from a DHT22 temperature/humidity sensor up on the Internet. Following the spirit of all the recent development of the ESP8266, [Martin] isn’t using an external microcontroller. Instead, he’s using the SDK to run an HTTP daemon using [Sprite_TM]’s code. This web server provides an interface to turn an LED on and off, and reports the temperature and humidity readings from the DHT22. It’s simple, but it’s easy to see how this tiny chip could become the basis for a smart thermostat.

If lighting up LEDs isn’t enough, [Martin] has another project that includes three solid state relays. This one is a bit more complex with MQTT support, a fancy jQuery interface, and support for network time. [Martin] isn’t quite ready to publish the complete code for this project, but that’s only because there are a few features he’d like to implement before making it public. These include dynamic DNS, scheduling functionality, and support for an I2C status display. Even without these fancy features, it’s still a great project that’s still extremely capable for an Internet of Things thing. You can check out [Martin]’s video demo of this board below.

Continue reading “Making Something Useful With The ESP8266”

Hackaday Links Column Banner

Hackaday Links: January 4, 2015

Chips as furniture is now a thing. It started off with a 555 footstool from Evil Mad Scientist and moved on to an EPROM coffee table. Now [msvm] over on the War Thunder forums has constructed a Nixie tube driver table. It’s based on the K155, and as a neat little addition, he’s included a real vintage chip under glass in the table.

Have some tongs, an anvil, and a blowtorch? Make some bottle openers out of framing nails. There’s a lot of variety here in the shapes of the bottle openers.

[Stephen] used a solid state relay he found on eBay to drive some Christmas lights. The SSR failed. That meant it was time to see inside of this relay looked like. The short answer is, ‘a lot of goop and epoxy’, but the traces look big enough to support the current it’s rated for.

Imagine a part of your 3D printer breaks. That’s alright, just print another…. oh, yeah. Well, I guess it’s time to make a bearing bracket out of wood.

The Electronica MK-54 and MK-61 (actually the Электроника МК-54) were incredibly popular Soviet programmable calculators. Now there’s an emulator for them.

[Rue Mohr] found a very cheap TFT display on an Arduino shield. The chip for the display was an SPF5408, a chip that isn’t supported by the most common libraries. He eventually got it to work after emailing the seller, getting some libraries, and renaming and moving a bunch of stuff. If you have one of these displays, [Rue] just saved you a bunch of time.

Push-Button Degaussing For An Arcade CRT

[Ed] was tasked with adding push-button degaussing to an arcade cabinet’s CRT console. The display can be rotated to portrait mode for games that require it, but each time this is done, the magnetic fields get out of whack.

Fortunately, the schematics arrived with the display. [Ed] found that the degauss coil is connected in series with a PTC fuse in an odd arrangement that he didn’t agree with. He decided to use an SSR to switch the coil, and after making lots of transistor-based designs on paper, grabbed a nearby Arduino.

[Ed] took off the PTC and soldered in two wires to its pads for the SSR. He added a wire to the power supply decoupling cap to power the new deguassing circuit and connected the SSR to the Arduino as an open collector input. There was just enough space available to mount the relay to the frame’s base and the Arduino on the side. [Ed] wrote a short method to trigger the SSR and reconnected the PTC fuse. Now it degausses at power up as well as on demand.

The Fridge Hacking Guide By BrewPi

brewpi-fridge-conversion-51

The team behind BrewPi are at it again! This time they have created an online guide showing how to convert a min-fridge into a Raspberry Pi & Arduino controlled fermentation chamber. In it, they describe 3 possible options:

  • Option 1: Make a simple switched power cord, without hacking into the fridge electronics.
  • Option 2: Make a switched power cord, but also override or remove the thermostat.
  • Option 3: Rip out the thermostat and fully integrate the SSRs into your fridge (which is what [Koen] and [Elco] did).

First things first though. They had to clean the fridge. And depending on where they got it or how long it has been unplugged for, the inside might have been pretty rank and disgusting from mold growing out of every corner. This took a good hour or so to clean properly lest the brewing process get infected with external grossness. This is all worth it because a well-controlled fermentation chamber results in a superior batch of beer.

They put their laser cut case on top of the fridge, holding an LCD, Raspberry Pi, Arduino and the BrewPi Arduino shield. The Arduino reads the temperature sensors inside the fridge, the beer and the ambient temperature. Then it controls the SSRs they added to switch the compressor and a heater. Then, the cables were routed through the fridge and take control of the compressor.

Continue reading “The Fridge Hacking Guide By BrewPi”

MIDI Melodies Make Moody Milieu

MIDI piano lights

In this beautiful, well-documented, cat-assisted hack, [capricorn1] adds visual dimension to his impressive piano skills by using his keyboard’s MIDI output to drive Edison bulbs.

He hung them from a rod of electrical conduit pipe and threaded the wires through it to a DB25 connector. The lights are controlled by an Arduino Mega plus a custom shield with an optocoupler to handle zero cross detection. He happened to already have a board with 12 SSRs on it from another project. All of the electronics are in a re-purposed switch box—the switches control four different modes: classic, velocity, scrolling, and automatic. You’ll see the scrolling mode in the video after the jump.

[capricorn1] used a small sampling of the Arduino MIDI Library, namely the note on/off functions and the control change function to handle his sustain pedal. He’s listed the full code for the project, which includes usage of the ipMIDI module for automation over WiFi.

If you don’t have a MIDI keyboard or any Edison bulbs, you could make a MIDI floor piano. You’re required to play both “Chopsticks” and “Heart and Soul” on it, though. Those are like the Hello, World for floor pianos.

Continue reading “MIDI Melodies Make Moody Milieu”