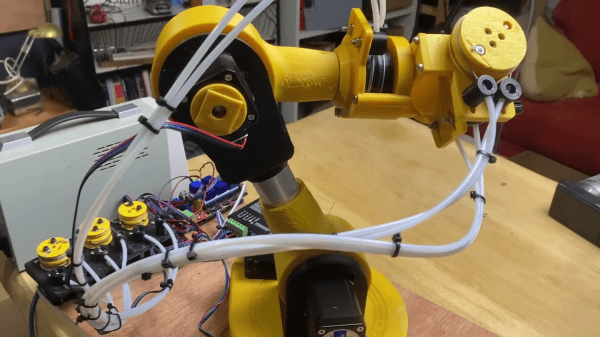
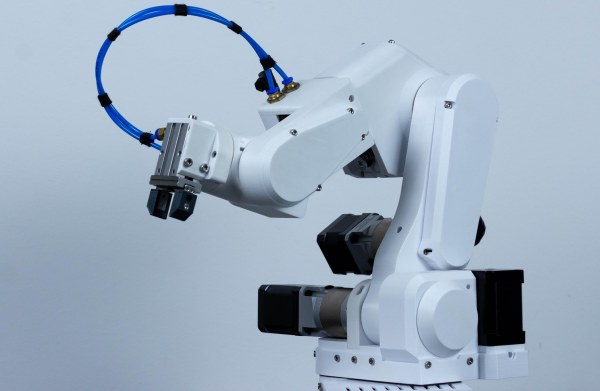
Stepper Killer Killer Killed, Repair Attempted

The low-cost servo motor in [Clough42]’s lathe’s electronic leadscrew bit the dust recently, and he did a great job documenting his repair attempts ( see video below the break ). When starting the project a few years ago, he studied a variety of candidate motors, including a ClearPath servo motor from Teknic’s “Stepper Killer” family. While that motor was well suited, [Clough42] picked a significantly lower-cost servo motor from China which he dubbed the “Stepper Killer Killer”.

He does a very thorough post-mortem of the motor’s integrated servo controller, checking the circuits and connections on the interface PCB first. Not finding any obvious problem, he proceeds to the main PCB which contains the microcontroller, motor driver transistors, and power supplies. There is no visible damage, but a check of the logic power supply shows 1.65V where 3.3V is expected. Looking at the board with a smart-phone mounted IR camera, he quickly finds the bad news — the microcontroller has shorted out.

Continue reading “Stepper Killer Killer Killed, Repair Attempted”

3-DOF Robot Arm Wrist Without The Motor Weight

A major challenge of robotic arms is the weight of the actuators, especially closer to the end of the arm. The long lever arm means more torque is required from the other actuators, and everything flexes a bit more. To get around this, [RoTechnic] moved the wrist stepper motors off the arms entirely.

He built a push-pull mechanism that uses braided fishing line to transfer motion to the robot arm’s wrist using Bowden tubes. The motors are mounted on the arm’s base, with a drum and two lengths of fishing line on the shafts. The lines pass through an adjustable tensioner before entering the Bowden tubes. This drum mechanism is also present on each of the three rotating axes of the wrist.

[RoTechnic] used an Arduino-powered RAMPS board as a controller, which is programmed to accept over the serial interface. He created a simple GUI and scripting interface in Jupyter Labs to generate and send command, which seems like an excellent solution for testing.

We can see this mechanism being a useful for a variety of motion applications, and definitely something to add to the idea toolbox. It is somewhat similar to some other cable-operated joints we’ve seen in humanoid robots and other 3D printed arms.

Continue reading “3-DOF Robot Arm Wrist Without The Motor Weight”

Flux: A Forty Foot Long Kinetic Art Piece

No office space is complete without some eye-catching art piece to gawp at whilst you mull over your latest problem. But LED-based displays are common enough to be boring these days. Kinetic art pieces are where it’s at, and this piece called Flux is a perfect example.

Commissioned for the Toronto office of a very popular e-commerce platform and constructed by [Nicholas Stedman], Flux consists of twenty identical planks on the ceiling, arranged in a line forty feet long. Each plank has a pair of rotating prisms, constructed from a stack of foam sheets, finished with metallic paint. The prisms are spun by individual stepper motors, each of which is driven by a TMC2160-based module, making them whisper-quiet.

A simple 3D printed bracket holds a small PCB holding an AMS AS5600 rotary magnetic encoder, onto the rear of the stepper motor. This allows for closed-loop feedback to the shared Arduino, which is very important for a sculpture such as this. Each Arduino is hooked up to a Raspberry Pi, running a simple application written in node.js which is responsible for coordinating movement, as well as uploading updated firmware images as required. A simple, but very effective build, we think!

Even more fun are kinetic art installations that are reactive to some data source, such as Adad, which visualizes lightning strike data. If these builds are just too big and complex, we’ve seen many examples of smaller desktop toys, such as this 3D printed tumbling chain demo for example.

Continue reading Flux: A Forty Foot Long Kinetic Art Piece”

Ethersweep: An Easy-To-Deploy Ethernet Connected Stepper Controller

[Neumi] over on Hackaday.IO wanted a simple-to-use way to drive stepper motors, which could be quickly deployed in a wide variety of applications yet to be determined. The solution is named Ethersweep, and is a small PCB stack that sits on the rear of the common NEMA17-format stepper motor. The only physical connectivity, beside the motor, are ethernet and a power supply via the user friendly XT30 connector. The system can be closed loop, with both an end-stop input as well as an on-board AMS AS5600 magnetic rotary encoder (which senses the rotating magnetic field on the rear side of the motor assembly – clever!) giving the necessary feedback. Leveraging the Trinamic TMC2208 stepper motor driver gives Ethersweep silky smooth and quiet motor control, which could be very important for some applications. A rear-facing OLED display shows some useful debug information as well as the all important IP address that was assigned to the unit.

Control is performed with the ubiquitous ATMega328 microcontroller, with the Arduino software stack deployed, making uploading firmware a breeze. To that end, a USB port is also provided, hooked up to the uC with the cheap CP2102 USB bridge chip as per most Arduino-like designs. The thing that makes this build a little unusual is the ethernet port. The hardware side of things is taken care of with the Wiznet W5500 ethernet chip, which implements the MAC and PHY in a single device, needing only a few passives and a magjack to operate. The chip also handles the whole TCP/IP stack internally, so only needs an external SPI interface to talk to the host device.

Continue reading “Ethersweep: An Easy-To-Deploy Ethernet Connected Stepper Controller”

Cute NFL Standings Tracker Uses Little Mini Helmets

If you’re a die-hard sports fan, there’s nothing you love more than staying abreast of developments in the league, from top to bottom. [Kiu] had a family member that was big into NFL, so set about building them a remarkably cool ladder tracker.

The tracker displays the NFL league table with a ten-minute delay, thanks to a paid live data feed from MySportsFeeds.com. When an update comes in, miniature helmets representing each team in the competition are moved into the correct order. The helmets sit on little plastic tags that make moving them easy, reliable, and repeatable. Built using parts familiar to the 3D printer world, this tracker relies on steppers and V-rails for linear movement, under the command of an Arduino Nano.

It’s a build that would look great in any games room, and we bet a scaled-up version would look the business in an upmarket sports bar. Let’s be honest – the league’s top quarterbacks will all be fighting to have one of these sooner rather than later. That’s not to say it won’t sting to come home to your team’s helmet scooting down the board after a painful loss!

We’ve seen some other interesting sports tracking projects over the years, too. Video after the break!
Continue reading “Cute NFL Standings Tracker Uses Little Mini Helmets”

Hackaday Prize 2022: DIY Brushless Hand Cranked Generator

A standard part of travel kit for the 2020s is now a battery pack — a hefty lithium-ion cell with onboard electronics for USB charging, that ensures all of our devices stay topped up while we’re out of range of a socket. But what happens when there is no handy mains supply to recharge it from? Step in [Chleba], with a hand cranked generator.

There are plenty of hand cranked generators to be found online, from tiny devices intended to top up a single phone to sturdy metal boxes intended for battery charging. This one differs from those in that most use a brushed DC motor as a cheap generator, while here that function comes from a stepper motor feeding a rectifier pack and thence a DC-to-DC converter. A step-up gearbox provides the necessary shaft speed, and a neat 3D-printed case rounds everything off.

The result is about as neat a generator as you could imagine, and would certainly be of use shoved into any off-grid backpack. Meanwhile it’s not the first we’ve shown you, we’ve even see one that could start a car.

What’s The Time? It’s Casino’clock!

As the saying goes, nothing can be said to be certain, except death, taxes, and the never-ending inventiveness of clock hacks. No matter how tried and proven a concept is, someone will always find a new twist for it. Case in point: notorious clock builder [Shinsaku Hiura] took the good old split-flap display approach, and mixed things up by using a deck of playing cards to actually represent the time.

Technically, the clock works just like a regular flip clock, except that only the upper half of the split-flap is used to display the digits, while the lower half is showing the cards’ backsides. Other than that, the mechanics are the same: a set of hinges holding the cards are arranged on a rotor that’s moved by a stepper motor until the correct digit is shown (STLs available on Thingiverse). Aces low, Jokers are zeroes, and the queen strikes at noon.

At the center of it is an ESP32 that controls each digit’s motor driver, and retrieves the time via WiFi, keeping the general component count conveniently low. Of course, one option is to arrange the cards in their order to keep rotations at a minimum, but let’s be real, the flapping sound is half the fun here. So instead, [Shinsaku Hiura] arranged the cards randomly and mapped it in the code accordingly. You can see it all in action, along with some additional design information, in the video after the break.

For some more of his clock creations, check out this different flip clock approach and the Hollow Clock. But if the future is of more interest to you than the present, here’s a matching Tarot deck.

Continue reading “What’s The Time? It’s Casino’clock!”