This Simple Light-Controlled Synth Has A Surprisingly Rich Sound

Audio synthesizers can range from vast racks of equipment with modules stitched together by a web of patch cords to a couple of 555s wired together in an Atari punk arrangement. This light-controlled synth comes in closer to the lower extreme of that range, but packs a sonic punch that belies its simplicity.

The project is the latest version of [lonesoulsurfer]’s “Moog Light Synthesizer,” which shares a lot of the circuitry found in his first version a couple of years ago. This one has a lot of bells and whistles, but it all starts with a PWM oscillator that contributes to the mean, growling quality of its sound. There’s also a low-pass filter that’s controlled by a couple of light-dependent resistors, which can be played by blocking them off with a fingertip. A couple of inverters form a drone oscillator that can be switched into the circuit, as well as a 555-based arpeggiator to chop things up a bit.

All those circuits, as well as support for a thirteen-key keyboard, live on one custom PCB. There’s also an off-the-shelf echo/reverb module that’s been significantly hacked to add to the richness of the sound. The custom wood and acrylic case make the whole thing look as good as it sounds.

We noted that [lonesoulsurfer]’s previous “Box of Beezz” drone synth seemed to evoke parts of the “THX Deep Note” at times; similarly, some of the sounds of this synth sound like they’d come from the soundtrack of a [Christopher Nolan] film  — check it out in the video below.

Continue reading “This Simple Light-Controlled Synth Has A Surprisingly Rich Sound”

Restoring $5 Busted Synthesizer Made Easy, Thanks To Thermal

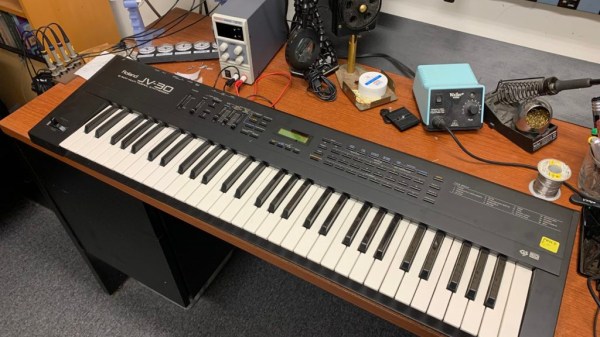
[D. Scott Williamson] paid $5 for a Roland JV-30 synthesizer at a garage sale. Score! There was only one catch: it didn’t work and didn’t include the power supply. Luckily, restoring it was made easier by breaking out a thermal camera.

As mentioned, the keyboard was missing a 9 VDC power supply (rated 800 mA) with a center-negative barrel connector. Slightly oddball, but nothing an enterprising hacker can’t deal with. After supplying power with a bench supply, not only did the keyboard not come to life, but the power supply clamped the current draw at 1.5 A! Something was definitely not right.

This shorted glass-bodied diode might look normal to the naked eye, but thermal imaging makes it clear something’s amiss.

Inside, there was no visible (or olfactory) sign of damage, but looking closer revealed that a little SMT capacitor by the power connector was cracked in two. Fixing that didn’t bring the keyboard to life, so it was time to break out the thermal imager. Something was soaking up all that current, and it’s a fair bet that something is getting hot in the process.

The culprit? The reverse polarity protection diode was shorted, probably as a result of damage by an inappropriate power supply or a surge of some kind. Replacing it resulted in a working keyboard! Not bad at all for $5, a diode, an SMT cap, and a little workbench time. The finishing touch was replacing a missing slider knob, which took some work in OpenSCAD and a 3D printer. Overall, not bad!

Thermal imaging used to be the stuff of staggering price tags, but it’s downright accessible these days, and makes it easy to spot things that are hot when they shouldn’t be. And if a thermal camera’s lens isn’t what you think it should be? It’s even possible for a sufficiently motivated and knowledgeable hacker to modify those.

Doodlestation Is Beautifully Musical Furniture

Whether you’re a modular synth enthusiast or simply love the idea of rad electronic jams, we can all get behind the idea of crazy electronic instruments with buttons, dials, and patch cables galore. The Doodlestation is a wonderful example of that, built by [Love Hulten].

There’s a custom 37-key keyboard that lets one input musical notes in the typical way, along with a hilarious animated MIDI visualizer with a man that uses his mouth to shoot rainbows. There’s a theremin built into the chassis, too, allowing your hands to control the sound via the magic of the æther. Even better, there’s a custom-built tape echo in the upright section, and you even get to see the mechanical parts working and the mag ribbon wiggling about. That’s fun.

The custom hardware is joined by a series of off-the-shelf devices that add their own functionality to the mix. It includes a Sequential OB-6 analog synthesizer, a Moog DFAM drum module, and a Hologram Microcosm loop & glitch box for more noodling possibilities.

We love a good musical project around these parts; we’ve featured some great other projects for live electronic jams before, too. Video after the break.

Continue reading “Doodlestation Is Beautifully Musical Furniture”

Abacus Synthesizer Really Adds Up

The abacus has been around since antiquity, and takes similar forms over the hundreds of cultures that have embraced it. It may be one of the first devices to be considered as having a “user interface” in the modern context — at least for simple arithmetic calculations. But using an abacus as the UI for a music synthesizer seems like something entirely new.

Part art concept project and part musical instrument, the “Abacusynth” by [Elias Jarzombek] is a way to bring a more visual and tactile experience to controlling a synth, as opposed to the usual knobs and switches. The control portion of the synth consists of four horizontal rods spanning two plywood uprights. Each rod corresponds to a voice of the polyphonic synth, and holds a lozenge-shaped spinner mounted on a low-friction bearing. Each spinner can be moved left and right on its rod, which controls the presence of that voice; spinning the slotted knob controls the modulation of the channel via photosensors in the uprights. Each rod has a knob on one side that activates an encoder to control each voice’s waveform and its harmonics.

In use, the synthesizer is a nice blend of electronic music and kinetic sculpture. The knobs seem to spin forever, so Abacusynth combines a little of the fidget spinner experience with the exploration of new sounds from the built-in speaker. The synth also has a MIDI interface, so it works and plays well with other instruments. The video below shows the hardware version of Abacusynth in action; there’s also a web-based emulation to try before you build.

Continue reading “Abacus Synthesizer Really Adds Up”

LMN-3: Putting The ‘OP’ In Open Source Synthesizers

Some projects you come across simply leave you in awe when you look at the thought and the resulting amount of work that went into it, not only for the actual implementation, but everything around it. Even more so when it’s a single-developer open source project. [Stone Preston]’s synth / sampler / sequencer / DAW-in-a-box LMN-3 absolutely fits the description here, and it seems like he has set his heart on making sure everyone can built one for themselves, by providing all the design files from case down to the keycaps.

The LMN-3 (LMN as in “lemon”, not “comes before the OP“) is intended as a standalone, portable digital audio workstation, and is built around a Raspberry Pi 4 with a HyperPixel display for the user interface. The UI itself, and with it the core part of the software, was created using the Tracktion Engine, which itself uses the JUCE framework and combines your typical synthesizer, sequencer, and sampler features with the DAW part to handle recording, editing, and mixing. The remaining hardware is a custom-designed PCB with a set of function and keyboard buttons, along with a pitch bend joystick and four rotary encoders with push buttons that serve as main input handlers. Oh yes, and a Teensy board.

The UI is actually entirely controlled via MIDI commands, and custom firmware on the Teensy is translating the input events from buttons, encoders, and joystick accordingly. This essentially decouples the hardware from the software, and using a cross-platform framework underneath, you can also run the UI standalone on your computer and use any 3rd-party MIDI controller you like. Or then, as [Stone] thought really about everything, use a hardware emulator he created in addition. You could even leave out the Raspberry Pi and software altogether and turn this into a pure MIDI controller. If that sounds tempting, but you’re looking for something with more knobs and sliders instead of buttons, check out the Traktorino. And if you actually prefer a mouse as input device, there’s always something running in a browser.

Continue reading “LMN-3: Putting The ‘OP’ In Open Source Synthesizers”

picture of finished mp3 player that uses a cartridge to select songs

An MP3 Player That Gives Off Nintendo Vibez

We’re definitely pretty fond of the DIY MP3 players here at Hackaday, but we don’t think we’ve seen one like CartridgeMP3 from [jpet26] before.

All the electrical components are what we’ve come to expect. [jpet26] uses the popular VS1053 decoder to read MP3 files stored on an SD card. He also includes a potentiometer for adjusting volume, a USB C port for power and programming, a headphone jack for the audio output, a general-purpose status LED, and an on/off switch.

But what really caught our attention is the form factor [jpet26] selected for his MP3 player. Though the MP3 files are stored on an SD card, he uses a cartridge interface, similar to that of a Nintendo 64 or Game Boy of yesteryear, to choose which MP3 to play from the SD card. The cartridge interface is tied to a few GPIO pins and by reading the status of each pin, the device determines which MP3 to select.

You could say that the cartridge is a little unnecessary, and we wouldn’t argue with you. The cartridge doesn’t actually store the MP3 files, the SD card does. It might make a bit more sense if the cartridge housed the SD card itself with a few select MP3s stored on the card. That would be a quirky way of sharing your favorite playlists with your friends. So, yeah some clumsy handshaking there, but who isn’t guilty of that from time to time? We like it and thought you might appreciate it as well.

Cool MP3 player, [jpet26]! May we suggest a speaker for V2? And maybe some flex cables.

Continue reading “An MP3 Player That Gives Off Nintendo Vibez”

Mini MIDI Synth Uses Minimum Number Of Parts

The 80s were the golden age of synthesizers in pop music. Hugely complicated setups that spared no expense were the norm, with synths capable of recreating anything from pianos and guitars to percussion, strings, and brass. These types of setups aren’t strictly necessary if you’re looking to make music, though, especially in the modern age of accessible microcontrollers. This synthesizer from [Folkert] with MIDI capabilities, for example, creates catchy tunes with only a handful of parts.

This tiny synth is built around an ESP32 and works by generating PWM signals normally meant for LEDs. In this case, the PWM signals are sent through a rudimentary amplifier and then on to an audio output device.  That could be a small speaker, an audio jack to another amplifier, or a capture device.

The synth’s eight channels use up most of the ESP32’s I/O and provide a sound that’s reminiscent of the eight-bit video game era. The total parts count for this build is shockingly small with only a handful of resistors, the ESP, an optocoupler, and a few jacks.

For those wishing to experiment with synthesizers, a build like this is attractive because it’s likely that all the parts needed are already sitting around in a drawer somewhere with possibly the exception of the 5 pin DIN jacks needed for MIDI capabilities. Either way, [Folkert] has made all of the schematics available on the project page along with some sample mp3 files. For those looking to use parts from old video game systems sitting in their parts drawer, though, take a look at this synthesizer built out of a Sega Genesis.