Lessons In Disposable Design From A Cheap Blinky Ball

Planned obsolescence, as annoying as it is when you’re its victim, still has to be admired. You can’t help but stand in awe of the designer who somehow managed to optimize a product to live one day longer than its warranty period. Seriously, why is it always the next day?

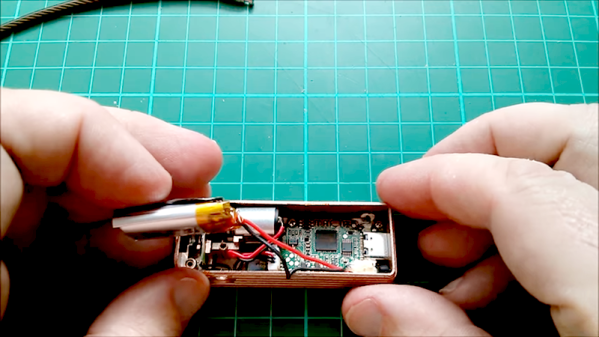
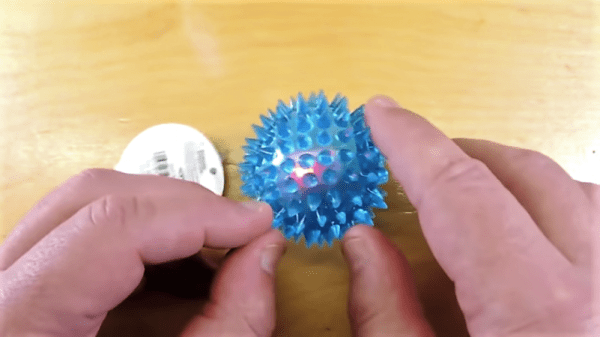
The design of products that are never intended to live long enough to go obsolete must be similarly challenging, and [electronupdate] did a teardown of a cheap LED blinky toy to see what’s involved. You’ve no doubt seen these seizure-triggering silicone balls before, mostly at checkout counters and the like where they’re sold at prices many hundreds of times what it took to make them. This particular device, which seems representative of the species, has two bright LEDs, a small controller chip, a trio of button cells for power, and a springy switch to activate it. All this is mounted to a cheap scrap of phenolic resin PCB, with the controller chip and one of the LEDs covered by a blob of clear epoxy.

This teardown one-ups most others, as [electronupdate] disrobes the chip and points a microscope at the die; the video below shows just how few transistors are employed and proposes a likely circuit. Everything about this ball just oozes cheapness, and it’s likely these things cost essentially nothing to build. Which makes sense for something destined for the landfill within a week or so.

Yes, this annoying blinky-thing is low-end garbage, but there are still design lessons to be learned from it. Anything that’s built for a broad market has to be built to a price point, and understanding those constraints is important to understanding how planned obsolescence works.

Continue reading “Lessons In Disposable Design From A Cheap Blinky Ball”

$3 Multimeter Teardown

[Diode Gone Wild] and his cat decided to see how a $3 meter worked inside. The meter was marked as a DT-830B and he already had an older one of the same model, and he wondered how they could afford to sell it — including shipping — for $3. You can see a video of his testing, teardown, and reverse engineering below.

What was odd is that despite having the same model number, the size of the meter was a bit different. When he opened the case to install a battery, he noticed the board didn’t look like it had fuses or components appropriate for the rated voltages. He decided the missing parts might be under the board and tested the meter.

Continue reading “$3 Multimeter Teardown”

Sony Aibo Teardown 2018

Teardown: Sony’s New Aibo Goes Under The Knife

In a complete surprise, Sony has moved to release the latest version of their robotic dog series, Aibo, in North America. The device is already out in Japan, where there are a number of owner’s clubs that would rival any dedicated kennel club. Thanks to the [Robot Start] team, we now have a glimpse of what goes into making the robotic equivalent of man’s best friend in their teardown of an Aibo ERS-1000.

Sony Aibo Battery Removal

According to Yoshihiro of Robot Start, Aibo looks to be using a proprietary battery reminiscent of the Handycam camcorders. Those three gold contacts are used for charging on the rug shaped power base that Aibo will periodically return to in order to take a”nap”. There are a couple of square OLED screens behind those puppy dog eyes. They are full-color OLEDs somewhere in the one-inch ballpark. Between the screens is a capacitive touch sensor that wraps around to the top of the head that are also pressure sensitive. Sony Aibo Teardown OLED Eyes 2018

According to Sony’s press release, the fish-eye camera housed in Aibo’s snout is used to identify faces as well as navigating spaces.

Laying out all the major parts out together certainly drives home the complexity of the latest Aibo. It’ll be interesting to see the progression of this device as all of them come equipped with 4G LTE and 802.11 b/g/n WiFi that connect to Sony’s servers for deep learning.

Sony Aibo Teardown Complete 2018

New behaviors are supposed to download automatically as long as the device is under the subscription plan. While Sony has no current plans to integrate with any voice-activated virtual assistant, we can still look forward to the possibility of some expanded functionality from the Hackaday community.


For the rest of the teardown photos make sure to head over to [Yoshihiro]’s write up on Robot Start. Also just in case anybody cared to see what happens when the first generation Aibo ERS-111 from 1999 meets the 2018 Aibo ERS-1000, you’ll find the answer in the video below:

Continue reading “Teardown: Sony’s New Aibo Goes Under The Knife”

Teardown: D50761 Aircraft Quick Access Recorder

Everyone’s heard of the “black box”. Officially known as the Flight Data Recorder (FDR), it’s a mandatory piece of equipment on commercial aircraft. The FDR is instrumental in investigating incidents or crashes, and is specifically designed to survive should the aircraft be destroyed. The search for the so-called “black box” often dominates the news cycle after the loss of a commercial aircraft; as finding it will almost certainly be necessary to determine the true cause of the accident. What you probably haven’t heard of is a Quick Access Recorder (QAR).

While it’s the best known, the FDR is not the only type of recording device used in aviation. The QAR could be thought of as the non-emergency alternative to the FDR. While retrieving data from the FDR usually means the worst has happened, the QAR is specifically designed to facilitate easy and regular access to flight data for research and maintenance purposes. Its data is stored on removable media and since the QAR is not expected to survive the loss of the aircraft it isn’t physically hardened. In fact, modern aircraft often use consumer-grade technology such as Compact Flash cards and USB flash drives as storage media in their QAR.

Through the wonders of eBay, I recently acquired a vintage Penny & Giles D50761 Quick Access Recorder. This was pulled out of an aircraft which had been in service with the now defunct airline, Air Toulouse International. Let’s crack open this relatively obscure piece of equipment and see just what goes into the hardware that airlines trust to help ensure their multi-million dollar aircraft are operating in peak condition.

Continue reading “Teardown: D50761 Aircraft Quick Access Recorder”

Seeing A Webcam’s PCBs In A Whole Different Light

When it comes to inspection of printed circuits, most of us rely on the Mark I eyeball to see how we did with the soldering iron or reflow oven. And even when we need the help of some kind of microscope, our inspections are still firmly in the visible part of the electromagnetic spectrum. Pushing the frequency up a few orders of magnitude and inspecting PCBs with X-rays is a thing, though, and can reveal so much more than what the eye can see.

Unlike most of us, [Tom Anderson] has access to X-ray inspection equipment in the course of his business, so it seemed natural to do an X-ray enhanced teardown and PCB inspection. The victim for this exercise was nothing special – just a cheap WiFi camera of the kind that seems intent on reporting back to China on a regular basis. The guts are pretty much what you’d expect: a processor board, a board for the camera, and an accessory board for a microphone and IR LEDs. In the optical part of the spectrum they look pretty decent, with just some extra flux and a few solder blobs left behind. But under X-ray, the same board showed more serious problems, like vias and through-holes with insufficient solder. Such defects would be difficult to pick up in optical inspection, and it’s fascinating to see the internal structure of both the board and the components, especially the BGA chips.

If you’re stuck doing your inspections the old-fashioned way, fear not – we have tips aplenty for optical inspection. But don’t let that stop you from trying X-ray inspection; start with this tiny DIY X-ray tube and work your way up from there.

Thanks for the tip, [Jarrett].

Teardown Of A Fingerprint Padlock

We wouldn’t mind tearing down a fingerprint scanner, but we hate to bust up our expensive laptop or cell phone. [Julian], however, got a hold of a fingerprint scanning padlock and was willing to tear it apart for our benefit. The video appears below.

The padlock is a simple enough little device with a cable lock instead of a solid metal shackle, although we have seen similar devices with traditional shackles. Initially, the lock’s fingerprint storage is empty and it will open for any fingerprint. The first task is to set an administrator fingerprint. You’ll need that fingerprint to set up other fingerprints or to reset the unit. Of course, what we are really interested in is what’s inside.

Continue reading “Teardown Of A Fingerprint Padlock”

What’s Inside A Scientology E-Meter?

This is something we’ve been waiting a very long time for. The Church of Scientology uses devices called E-Meters to measure Thetans in the body. We’re not going to discuss this further, because we don’t want to be murdered. In reality, the E-Meter is simply a device that costs five thousand dollars and only measures the resistance of the human body. It does this by having the subject hold two copper cylinders and a simple Wheatstone bridge. Why does the E-Meter cost five thousand dollars? As [Play With Junk] found out, it’s an exquisitely engineered piece of hardware.

[Play With Junk] acquired this E-Meter from eBay for something around $100, and from a system-level analysis, it’s really not anything special. There’s a fancy analog meter, yes, but most of this wouldn’t be out of place in any 90s-era piece of test equipment. There’s an 8051 microcontroller reading what are probably some fancy ADCs, and there’s an LCD driver on board. Slap it in a fancy injection-molded case, and you have an E-Meter.

What’s most impressive is the quality of the components that go into a machine that effectively only measures the resistance of the human body. The ‘trim’ pot is a Vishay wire-wound precision potentiometer that costs somewhere between $20 and $60. The power switch is an over-specced switch that probably costs $5. The control pots look and feel great, and the wiring is wrapped around chokes.

This is an exceptionally well-engineered device, and it shows. There’s an incredible amount of work that went into the electronics, and a massive amount of money that went into the fancy injection molded enclosure. If you’re looking for an example of a well-engineered tool, price be damned, you need only look at an E-Meter.

Check out the video below of the entire teardown.

Continue reading “What’s Inside A Scientology E-Meter?”