Control Tricks For Tailsitters

An RC VTOL aircraft always makes for a compelling project, but ensuring the transition between hover and forward flight can be quite challenging. In the video after the break, [Nicholas Rehm] demystifies of the flight control algorithm required for a VTOL tailsitter.

Tailsitters are one of the simplest VTOL arrangements, the testbed here being a simple foam KF airfoil wing with two motors and two servo-controlled elevons. As with almost all his projects [Nicholas], uses of his open-source dRehmFlight flight controller to demonstrate the practical implementation of the control algorithm.

Three major factors that need to be simultaneously taken into account when transitioning a tailsitter VTOL. First off, yaw becomes roll, and vice versa. This implies that in hover mode, elevons have to move in opposite directions to control yaw; however, this same action will make it roll in forward flight. The same applies for differential thrust from motors — it controls roll in hover and yaw in forward flight. Nevertheless, this change of control scheme only works if the flight controller also alters its reference frame for “level” flight (i.e., flips forward 90°). As [Nicholas] demonstrates, failing to do so results in a quick and chaotic encounter with the ground.

With these adjustments made, the aircraft can transition to forward flight but will oscillate pitch-wise as it overcorrects while trying to maintain stable flight; this is due to PID gains – 3rd factor. The deflection required by control surfaces is much more aggressive during hover mode; thus PID gains need to be reduced during forward flight. A final improvement involves adding a brief delay when switching modes for smoother rotation.

For more interesting VTOL configurations, check out [Tom Stanton]’s RC V-22 Osprey, and this solar recharging trimotor

Continue reading “Control Tricks For Tailsitters”

Visual Ear Demonstrates How The Cochlea Works

The cochlea is key to human hearing, and it plays an important role in our understanding of complex frequency content. The Visual Ear project aims to illustrate the cochlear mechanism as an educational tool.

The cochlea itself is the part of the ear that converts the pressure waves of sound into electrical signals for the brain. Different auditory frequencies excite different parts of the cochlea. The cells in the different parts of the cochlea then send signals to the brain corresponding to the sound it has picked up.

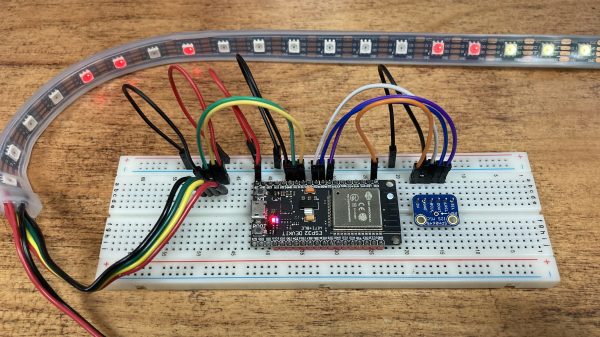
The Visual Ear demonstrates similar behavior on a strip of addressable LEDs. Lower LEDs coded in the red part of the color spectrum respond to low frequency audio. Higher LEDs step through yellow, green, and up to blue, and respond to the higher frequencies in turn. This is achieved at a high response rate with the use of a Teensy 4.0 running a Fast Fourier Transform on incoming audio, and then outputting signals to run a string of WS2812B LEDs. The result is a visual band display of 104 bands spanning 43 Hz up to 16,744 Hz, which covers most but not all of the human range of hearing.

It’s an impressive display, and one that makes a great music visualizer, too. When teaching the physics of human hearing and the cochlea, we can imagine such a tool would be quite useful.

Continue reading “Visual Ear Demonstrates How The Cochlea Works”

DIY equatorial mount

A DIY Equatorial Mount Using Harmonic Drives

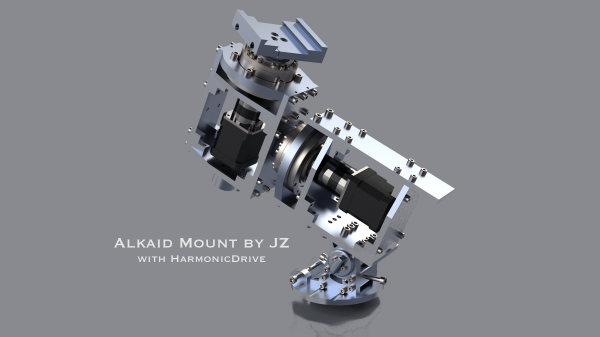
As an amateur astrophotographer will tell you, you just don’t get to capture the really interesting objects without spending a ton of money on some decent pieces of kit. Telescope aside, there really is a surprising amount of complexity, weight, and associated costs with the telescope mount alone, let alone one that is capable of any sort of programmable tracking. [Alan (Jialiang) Zhao] clearly wanted to up their game, and having suffered some of the shortcomings of their Sky-Watcher HEQ-5 pro Equatorial mount decided to go ahead and build an open-source mount, Alkaid, which hopefully works a bit better for them.

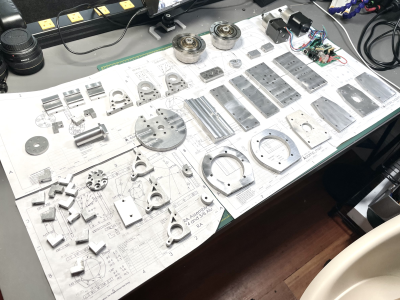
In simple terms, the difficulty of photographing an extremely dim, distant object (or one that is larger but diffuse) is that the camera sensor needs to spend a significant amount of time signal-averaging, to gather enough lightSheet of parts freshly water cut from aluminium plate for anything to be seen at all, through the noise. But, this ball of rock we sit on is rotating constantly, so the only solution is to track the object of interest, to compensate. This is referred to as equatorial tracking, and allows the rotation of the Earth to be compensated for during a long exposure.


The design of each of the two axes revolves (sorry!) around the use of a NEMA-17 stepper motor with a 27:1 planetary gearbox, driving into a harmonic reducer gearbox. Harmonic drives (aka strain wave drives) are pretty neat, working on the principle of a fixed, but circularly distorting ring gear that transmits torque from the inside surface to the outside, with almost no backlash. They are expensive parts, but for a super smooth movement, this is what you want. The huge output torque they allow, meant that [Alan] was able to build a mount for a heavy telescope without any counterbalances. Structurally, the whole thing is constructed from 10 mm thick aluminium plates that were cut with a waterjet and subsequently milled to finish. Continue reading “A DIY Equatorial Mount Using Harmonic Drives”

Big RGB LED Cube You Can Build Too

LED cubes are really nothing new, many of us consider the building of a good sized one almost an electronics rite of passage that not so many manage to find the time or have the skill to pull off. It’s our pleasure to draw your attention to a lovely build, showing all the processes involved, the problems and the solutions found along the way.

Building a small cube is somewhat of a trivial affair, especially without considering PWM colour mixing, however as simple maths will illustrate, as you increase the number of LEDs on each side, the total number will quickly get quite large. More LEDs need more power and increase control complexity considerably. A larger matrix like this 16 x 16 x 16 LED build, has a total of 4096. This would be a nightmare to drive with plain RGB LEDs, even with cunning multiplexing, but luckily you can buy indexable LEDs in a through-hole package similar to the ubiquitous WS2812-based SMT LEDs you see around. These are based on the PD9823 controller, which can be programmed as if they were a WS2812, at least according to this analysis. Now you can simply chain a column of LEDs, with the control signal passed from LED to nearest neighbour.

Early on in the video build log, you will note there are four power supply modules needed to feed this juice. If we assume each LED consumes 60 mA on full-white (the data for this product link shows a peak value of 100 mA) that is still a total of 246 A or around 1 kW of power. The video does shows a peak power measurement of around this figure, for the whole array on full white, so the maths seems about right.

Control is via a Teensy 4.0 using the FlexIO function of the IMXRT1060RM CPU, and a bunch of 74AHCT595 shift registers giving 32 channels of up to 1000 LEDs per channel if needed. Roughly speaking, using the DMA with FlexIO, the Teensy can drive up to 1 Million LED updates per second, which works out about 32 channels of 100 LEDs per channel updated at 330 frames/sec, so plenty of resource is available. All this is with almost no CPU intervention, freeing that up for handling the 2.4-inch LCD based UI and running the animations, which looks pretty darn slick if you ask us. You can checkout the description of the firmware in the firmware section of the GitHub project. 3D printed jigs allowed for bending and clipping the LEDs leads as well as fixing and aligning the LED column units, so there really is enough detail there to allow anyone so inclined reproduce this, so long as you can swallow the cost of all those LEDs.

For a different approach to LED cubes, checkout this sweet panel based approach, and here’s a really small 4x4x4 module for those with less space to spare.

Continue reading “Big RGB LED Cube You Can Build Too”

Foam F-35 Learns To Hover

With cheap RC hardware, powerful motors, and high-capacity battery packs, getting something to fly has never been easier. It also helps that, whether you’re into fixed-wing craft or multirotors, there’s plenty of information and prior art floating around online that you can use to jumpstart your own build. But when it comes to homebrew vertical take-off and landing (VTOL) planes, things are a bit trickier.

Luckily for us, [Nicholas Rehm] has made all the plans and information necessary to duplicate his incredible RC F-35 available for anyone who wants to experiment with these relatively niche fliers. Even if it was a standard park flier, the build would be worth a close look thanks to the vectored thrust motors that give it phenomenal maneuverability and a top speed in the neighboorhood of 120 KPH (80 MPH). But with the flick of a switch, the plane transitions into a tricopter-like flight mode that allows it to land and takeoff vertically.

How does it work? The downward facing motor just behind the “cockpit” lifts up the front of the foam flier and tilts left and right to provide yaw control, while the two motors on the back tilt down to lift up the rear of the aircraft. Aviation buffs in the audience may recognize this as being fairly close to how the actual F-35B hovers, although on the real jet fighter, downward thrust under the wings is generated by redirected turbine exhaust rather than dedicated motors, and yaw control is provided by swiveling the engine’s nozzle rather than the front lift fan.

Getting the plane to takeoff vertically was one thing, but being able to transition from a hover into forward flight was quite another. To make this aerial transformation possible [Nicholas] actually had to write his own flight controller software, which he calls dRehmFlight. The GPLv3 code runs on the Teensy 4.0 and uses the common GY-521 MPU6050 gyroscope/accelerometer, so you don’t need to get any custom boards spun up just to give it a test drive flight. In the video below he walks through configuring the software for VTOL operation by defining how each control surface and motor is to respond to control input given the currently selected flight mode.

It probably won’t surprise you to hear that this isn’t the first time [Nicholas] has experimented with unusual flying machines. Last year we covered his RC Starship, which managed to stick the “belly flop” landing even before SpaceX managed to get the real life version down in one piece.

Continue reading “Foam F-35 Learns To Hover”

MIT’s Knitted Keyboard Is Quite A Flexible MIDI Controller

There are only so many ways to make noise on standard instruments such as acoustic pianos. Their rigidity and inputs just don’t allow for a super-wide range of expression. On the other hand, if you knit your interface together, the possibilities are nearly endless. MIT’s new and improved knitted keyboard is an instrument like none other — it responds to touch, pressure, and continuous proximity, meaning that you can play it like a keyboard, a theremin, and something that is somewhere in between the two. Because it’s a MIDI interface, it can ultimately sound like any instrument you’ve got available in software.

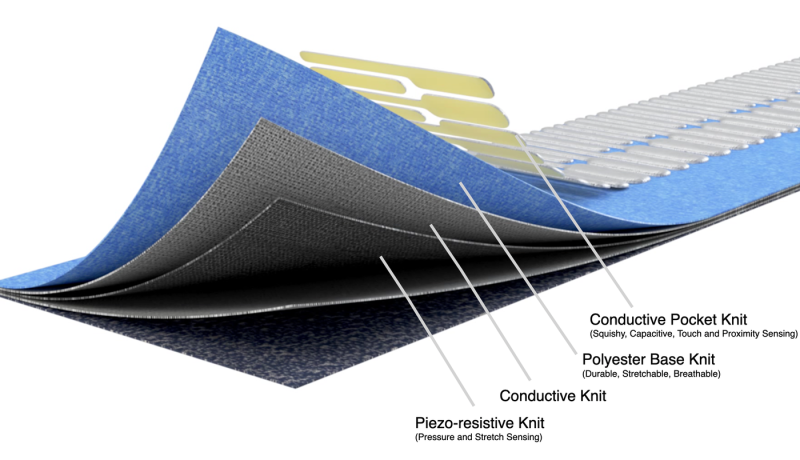
The silver keys of this five-octave interface are made of conductive yarn, and the blue background is regular polyester yarn. Underneath that is a conductive knit layer to complete the key circuits, and a piezo-resistive knit layer that responds to pressure and stretch. It runs on a Teensy 4.0 and uses five MPR121 proximity/touch controllers, one per octave.

The really exciting thing about this keyboard is its musical (and physical) versatility. As you might expect, the keyboard takes discrete inputs from keystrokes, but it also takes continuous input from hovering and waving via the proximity sensors, and goes even further by taking physical input from squeezing, pulling, stretching, and twisting the conductive yarns that make up the keys. This means it takes aftertouch (pressure applied after initial contact) into account —  something that isn’t possible with most regular instruments. And since this keyboard is mostly yarn and fabric, you can roll it up and take it anywhere, or wrap it around your neck for a varied soundscape.

If you’re looking for more detail, check out the paper for the previous version (PDF), which also used thermochromic yarn to show different colors for various modes of play using a heating element. With the new version, [Irmandy Wicaksono] and team sought to improve the sensing modalities, knitted aesthetics, and the overall tactility of the keyboard. We love both versions! Be sure to check it out after the break.

Want to play around with capacitive touch sensors without leaving the house for parts? Make your own from paper and aluminum foil.

Continue reading “MIT’s Knitted Keyboard Is Quite A Flexible MIDI Controller”

DRehmFlight: Customizable Flight Stabilisation For Your Weird Flying Contraptions

The availability of cheap and powerful RC motors and electronics has made it possible for almost anyone to build an RC flying machine. Software is usually the bigger challenge, which has led to the development of open-source packages like BetaFlight and Ardupilot. These packages are very powerful, but not easy to modify if you have unconventional requirements. [Nicholas Rehm] faced this challenge while doing his master’s degree, so he created dRehmFlight, a customizable flight controller for VTOL aircraft. Overview video after the break.

dRehmFlight runs on Teensy 4.0 with a MPU6050 or MPU9250 IMU

[Nicholas] has been building unique VTOL aircraft for close to a decade, and he specifically wanted flight stabilization software that is easy to modify and experiment with. Looking at the dRehmFlight code, we think he was successful. The main flight controller package is a single file of fewer than 1600 lines. It’s well commented and easy to figure out, even for an inexperienced programmer. A detailed PDF manual is also available, with full descriptions for all the functions and important variables, and a couple of tutorials to get you started. Libraries for interfacing with accelerometers and RC gear is also included. It runs on a 600 Mhz Teensy 4.0, and all the programming can be done from the Arduino IDE.

[Nicholas] has repeatedly demonstrated the capabilities of dRehmFlight with several unique aircraft, like the belly flopping RC Starship we covered a while ago, a VTOL quad rotor biplane, VTOL F35, and the cyclocopter seen in the header image. dRehmFlight might not have the racing drone performance of BetaFlight, or advanced autopilot features of Ardupilot, but it’s perfect for getting unconventional aircraft off the ground. Continue reading “DRehmFlight: Customizable Flight Stabilisation For Your Weird Flying Contraptions”