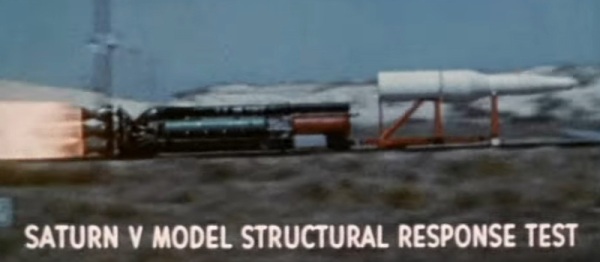
Design And Testing Of The Form 2

Formlabs makes a pretty dang good SLA printer by all accounts. Though a bit premium in the pricing when compared to the more humble impact of FDM printers on the wallet, there’s a bit more to an SLA printer. The reasoning becomes a bit more obvious when reading through this two part series on the design and testing of the Form 2.

It was interesting to see what tests they thought were necessary to ensure the reliable operation of the machine. For example the beam profile of every single laser that goes into a printer is tested to have the correctly shaped spot. We also thought the Talcum powder test was pretty crazy. They left a printer inside a sandblast cabinet and blasted it with Talcum powder to see if dust ingress could cause the printer to fail; it didn’t.

The prototyping section was a good read. Formlabs was praised early on for the professional appearance of their printers. It was interesting to see how they went from a sort of hacky looking monstrosity to the final look. They started by giving each engineer a Form 1 and telling them to modify it in whatever way they thought would produce a better layer separation mechanism. Once they settled on one they liked they figured out how much space they’d need to hold all the new mechanics and electronics. After that it was up to the industrial designer to come up with a look that worked.

They’re promising a third part of the series covering how the feedback from beta testing was directed back into the engineering process. All in all the Form 2 ended up being quite a good printer and the reviews have been positive. The resin from Formlab is a little expensive, but unlike others they still allow users to put the printer in open mode and use other resin if they’d like. It was cool to see their engineering process.

The Art Of Making A Nixie Tube

Three years ago we covered [Dalibor Farnby]’s adventures in making his own Nixie tubes. Back then it was just a hobby, a kind of exploration into the past. He didn’t stop, and it soon became his primary occupation. In this video he shows the striking process of making one of his Nixie tubes.

Each of his tubes get an astounding amount of love and attention. An evolution of the process he has been working on for five years now. The video starts with the cleaning process for the newly etched metal parts. Each one is washed and dried before being taken for storage inside a clean hood. The metal parts are carefully hand bent. Little ceramic pins are carefully glued and bonded. These are used to hold the numbers apart from each other. The assembly is spot welded together.

In a separate cut work begins on the glass. The first part to make is the bottom which holds the wire leads. These are joined and then annealed. Inspection is performed on a polariscope and a leak detector before they are set aside for assembly. Back to the workbench the leads are spot welded to the frame holding the numbers.

It continues with amazing attention to detail. So much effort goes into each step. In the end a very beautiful nixie tube sits on a test rack, working through enough cycles to be certified ready for sale. The numbers crisp, clear, and beautiful. Great work keeping this loved part of history alive in the modern age.

Continue reading “The Art Of Making A Nixie Tube”

Preparing Your Product For The FCC

At some point you’ve decided that you’re going to sell your wireless product (or any product with a clock that operates above 8kHz) in the United States. Good luck! You’re going to have to go through the FCC to get listed on the FCC OET EAS (Office of Engineering and Technology, Equipment Authorization System). Well… maybe.

As with everything FCC related, it’s very complicated, there are TLAs and confusing terms everywhere, and it will take you a lot longer than you’d like to figure out what it means for you. Whether you suffer through this, breeze by without a hitch, or never plan to subject yourself to this process, the FCC dance is an entertaining story so let’s dive in!

Continue reading “Preparing Your Product For The FCC”

A Trove Of 3D Printer Filament Test Data

We’re not sure what a typical weekend at [Walter]’s house is like, but we can probably safely assume that any activity taking place is at minimum accompanied by the hum of a 3D printer somewhere in the background.

Those of us who 3D print have had our experiences with bad rolls of filament. Anything from filament that warps when it shouldn’t to actual wood splinters mixed in somewhere in the manufacturing process clogging up our nozzles. There are lots of workarounds, but the best one is to not buy bad filament in the first place. To this end [Walter] has spent many hours cataloging the results of the different filaments that have made it through his shop.

We really enjoyed his comparison of twleve different yellow filaments printed side by side with the same settings on the same printer. You can really see the difference high dimensional tolerance, the right colorant mix, and good virgin plastic stock makes to the quality of the final print. Also, how transparent different brands of transparent actually are as well as the weight of spools from different brands (So you can weigh your spool to see how much is left).

The part we really liked was his list every filament he’s experienced in: PLA, ABS, PETG, Flexible, Nylon, Metal, Wood, and Other. This was a massive effort, and while his review is naturally subjective, it’s still nice to have someone else’s experience to rely on when figuring out where to spend your next thirty dollars.

Super In-Depth $15 Curve Tracer Project

[Jason Jones] has always wanted a curve tracer for his home shop. When he was starting out in electronics he fell in love with a machine called a Huntron Tracker 2000. This machine would feed a sine wave into a circuit on one side and plot a XY graph on the other.

[Jason] figured that with a modern microcontroller such a device could be build simply and cheaply for around $15 dollars. With that requirement in mind he set out to build it. He selected a PIC24F16KM202 for the brain and got to work.

The write-up is really great. It’s rare that someone puts every step of their development and design thinking into writing. Some have argued that this is the only true way to have an OSHW hardware project. The series covers everything from the initial requirements and parts selection to the software development and eventual testing of the device.

[Jason] managed to build a pretty capable little curve tracer in the end. We really enjoyed it when he used the tracer to debug the tracer.

HALT In The Name Of Testing

“Did I forget something?” It’s that nagging feeling every engineer has when their project is about to be deployed – it may be a product about to be ramped into production, a low volume product, or even a one off like a microsatellite. If you have the time and a few prototypes to spare though, there are ways to alleviate these worries. The key is a test method which has been used in aerospace, military, and other industries for years – Highly Accelerated Life Testing (HALT).

How to HALT

The idea behind HALT testing can be summed up in a couple of sentences:

  • Beat your product to death.
  • Figure out what broke.
  • Fix it, and fix the design.
  • Repeat.

Sounds barbaric, and in many cases it is. HALT testing is often associated with giant test chambers which are literally designed to torture anything inside them. Liquid nitrogen shock cools the chamber as low as -100°C. The Device Under Test (DUT) can soak at that temperature for hours. Powerful heaters then blast the chamber, causing temperature rises of up to 90°C per minute, topping off at up to 200°C. Pneumatic hammers beat on the chamber table causing vibrations at up to 90 Grms and 10 KHz. Corrosive sprays simulate years of rain and humidity. These chambers are literally hell on earth for any device unlucky enough to be placed inside them. It’s easy to see why this sort of testing is often referred to as “Shake and Bake”.

Continue reading “HALT In The Name Of Testing”

Is Your Cat 6 Ethernet Cable Cat 6? Probably Not.

Though we’ve never used their cables, [Blue Jeans Cable] out of Seattle, WA sure does seem to take the black art of cable manufacture seriously. When they read the Cat 6 specification, they knew they couldn’t just keep building the cables the way they used to. So they did some research and purchased a Fluke certification tester for a measly 12,000 US dollars. While they were purchasing the device, they ran across an interesting tidbit in the fluke knowledge base. Fluke said that 80% of the consumer Cat 6 cables they tested didn’t begin to meet the Cat 6 specification.

This is the part where [Blue Jeans Cable] earns our respect; like good scientists, they set out to replicate Fluke’s results. Sure enough, 80% of the Cat 6 cables they tested from big box stores etc. failed the specification. More surprising, many of them didn’t even pass the Cat 5e specification. [Blue Jeans Cable] asserts that this is possible because the Ethernet cable specification is policed via the honor system, allowing manufacturers to be fairly brazen about what they label as Cat 6.