In today’s episode of “AI Is Why We Can’t Have Nice Things,” we feature the Hertz Corporation and its new AI-powered rental car damage scanners. Gone are the days when an overworked human in a snappy windbreaker would give your rental return a once-over with the old Mark Ones to make sure you hadn’t messed the car up too badly. Instead, Hertz is fielding up to 100 of these “MRI scanners for cars.” The “damage discovery tool” uses cameras to capture images of the car and compares them to a model that’s apparently been trained on nothing but showroom cars. Redditors who’ve had the displeasure of being subjected to this thing report being charged egregiously high damage fees for non-existent damage. To add insult to injury, if renters want to appeal those charges, they have to argue with a chatbot first, one that offers no path to speaking with a human. While this is likely to be quite a tidy profit center for Hertz, their customers still have a vote here, and backlash will likely lead the company to adjust the model to be a bit more lenient, if not outright scrapping the system.
tig9 Articles
Hackaday Links: October 1, 2023
We’ve devoted a fair amount of virtual ink here to casting shade at self-driving vehicles, especially lately with all the robo-taxi fiascos that seem to keep cropping up in cities serving as testbeds. It’s hard not to, especially when an entire fleet of taxis seems to spontaneously congregate at a single point, or all it takes to create gridlock is a couple of traffic cones. We know that these are essentially beta tests whose whole point is to find and fix points of failure before widespread deployment, and that any failure is likely to be very public and very costly. But there’s someone else in the self-driving vehicle business with way, WAY more to lose if something goes wrong but still seems to be nailing it every day. Of course, we’re talking about NASA and the Perseverance rover, which just completed a record drive across Jezero crater on autopilot. The 759-meter jaunt was completely planned by the onboard AutoNav system, which used the rover’s cameras and sensors to pick its way through a boulder-strewn field. Of course, the trip took six sols to complete, which probably would result in negative reviews for a robo-taxi on Earth, and then there’s the whole thing about NASA having a much bigger pot of money to draw from than any start-up could ever dream of. Still, it’d be nice to see some of the tech on Perseverance filtering down to Earth.
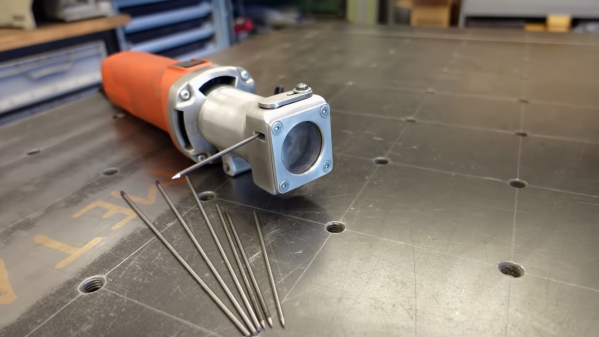
Put The Perfect Point On Your Tungstens With This Die Grinder Attachment
Aspiring TIG welders very quickly learn the importance of good tungsten electrode grinding skills. All it takes is a moment’s distraction or a tiny tremor in the torch hand to plunge the electrode into the weld pool, causing it to ball up and stop performing its vital function. Add to that the fussy nature of the job — tungstens must only be ground parallel to the long axis, never perpendicular, and at a consistent angle — and electrode maintenance can become a significant barrier to the TIG beginner.
A custom tungsten grinder like this one might be just the thing to flatten that learning curve. It comes to us by way of [The Metalist], who turned an electric die grinder into a pencil sharpener for tungsten electrodes. What we find fascinating about this build is the fabrication methods used, as well as the simplicity of the toolkit needed to accomplish it. The housing of the attachment is built up from scraps of aluminum tubing and sheet stock, welded together and then shaped into a smooth, unibody form that almost looks like a casting. Highlights include the mechanism for adjusting the angle of the grind as well as the clever way to slit the body of the attachment so it can be clamped to the nosepiece of the die grinder. We also thought the inclusion of a filter to capture tungsten dust was a nice touch; most TIG electrodes contain a small amount of lanthanum or thorium, so their slight radioactivity is probably best not inhaled.
We love builds like this that make a tedious but necessary job a little quicker and easier to bear, and anything that stands to make us a better welder — from simple purpose-built fixtures to large-scale rotary tables — is OK in our book.
Continue reading “Put The Perfect Point On Your Tungstens With This Die Grinder Attachment”
Put A Hardened Edge On Mild Steel With Just A Drill Bit. Sort Of.
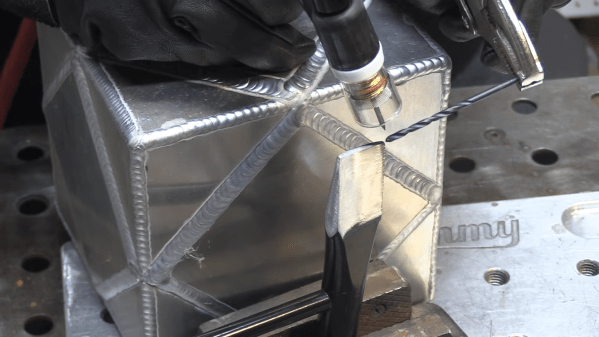
People have been working metal for so long that the list of tips and tricks is now nearly infinite. So it’s always a joy to pick up a new trick, especially one as simple as putting a hardened edge on mild steel using a drill bit as a filler rod.
This tip comes to us by way of [Jody], aka “The Weldmonger” on YouTube. Subscribing to his channel is a sure way to keep your welding ego in check; you may be good, but [Jody] is better, and he’s willing to share as much of his experience in video format as possible. For this tip, he starts with a cheap chipping hammer, the universal welder’s tool that helps remove the glass-like slag that forms during shielded-metal arc welding, or what’s commonly known as stick welding. The mild steel of the hammer makes it hard to keep an edge, so [Jody] pulled out his TIG welder and laid down a bead on the cutting edge using an old drill bit as a fill rod. The video below shows the process in all its simplicity.
The tool steel of the drill bit is far harder than the mild steel of the hammer, but still soft enough to take an edge, and the resulting tool is much improved. We’ve seen something similar to this before, when hard-facing filler rod was built up on the edge of a mild steel slug to make a cutter for internal weld seams. We liked that hack, but knowing the same thing can be done with something we’ve all likely got in abundance in the shop is a neat trick. Thanks, [Jody]!
Continue reading “Put A Hardened Edge On Mild Steel With Just A Drill Bit. Sort Of.”
Modified Tombstone Welder Contains A Host Of Hacks
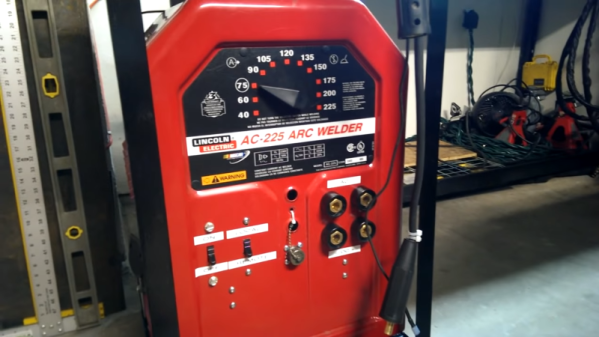
State-of-the-art welding machines aren’t cheap, and for good reason: pushing around that much current in a controlled way and doing it over an entire workday takes some heavy-duty parts. There are bargains to be found, though, especially in the most basic of machines: AC stick welders. The familiar and aptly named “tombstone” welders can do the business, and they’re a great tool to learn how to lay a bead.
Tombstones are not without their drawbacks, though, and while others might buy a different welder when bumping up against those limits, [Greg Hildstrom] decided to hack his AC stick welder into an AC/DC welder with TIG. He details the panoply of mods he made to the welder, from a new 50 A cordset made from three extension cords where all three 12 gauge wires in each cord are connected together to make much larger effective conductors, to adding rectifiers and a choke made from the frame of a microwave oven transformer to produce DC output at the full 225 A rating. By the end of the project the tombstone was chock full of hacks, including a homemade foot pedal for voltage control, new industry-standard connectors for everything, and with the help of a vintage Lincoln “Hi-Freq” controller, support for TIG, or tungsten inert gas welding. His blog post shows some of the many test beads he’s put down with the machine, and the video playlist linked below shows highlights of the build.
This isn’t [Greg]’s first foray into the world of hot metal. A few years back we covered his electric arc furnace build, powered by another, more capable welder.
Continue reading “Modified Tombstone Welder Contains A Host Of Hacks”
Punch Those Hole-Drilling Blues Away With A Homebrew Punching Tool
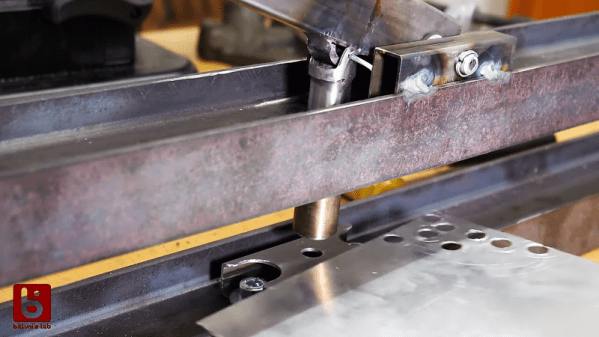
Four times the holes, four times the trouble. With the fate of repetitive motion injury looming due to the need to drill 1,200 holes, [bitluni] took matters into his own hands and built this nifty DIY hole punch for light-gauge sheet metal.
A little backstory will probably help understand why [bitluni] needs so many holes. Back in May, he built a ping pong ball LED video wall for Maker Faire Berlin. That had 300 LEDs and came out great, but at the cost of manually drilling 300 holes in sheet steel with a hand drill. Looking to expand his wall of balls to four times the original size, [bitluni] chose to spend a few days building a punch to make the job more appealing. The business end, with solid bar stock nested inside pieces of tubing, is a great example of how much you can get done without a lathe. The tool is quite complex, with a spring-loaded pilot to help guide the punching operation. When that proved impractical, [bitluni] changed the tool design and added an internal LED to project crosshairs from inside the tool.
The tool itself is mounted into a sturdy welded steel frame that allows him to cover the whole aluminum sheet that will form the panel of his LED wall. It’s pretty impressive metalwork, especially considering this isn’t exactly in his wheelhouse. And best of all, it works – nice, clean holes with no deformation, and it’s fast, too. We’re looking forward to seeing the mega-LED wall when it’s done.
Continue reading “Punch Those Hole-Drilling Blues Away With A Homebrew Punching Tool”
Shop-Made Fixture Turns Out Dream Welds
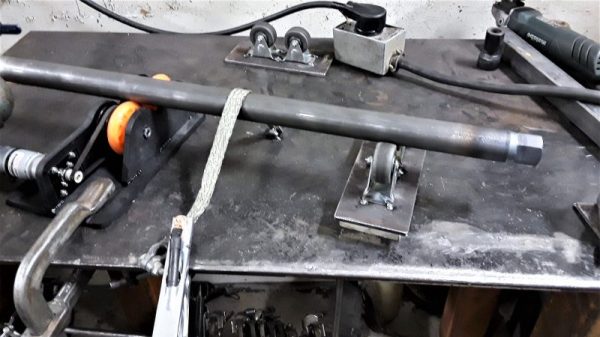
You can tell a lot about a person by the company they keep, and you can tell a lot about a craftsman by the tools and jigs he or she builds. Whether for one-off jobs or long-term use, these ad hoc tools, like this tubing rotator for a welding shop, help deliver results beyond the ordinary.
What we appreciate about [Delrin]’s tool is not how complex it is — with just a motor from an old satellite dish and a couple of scooter wheels, it’s anything but complicated. What we like is that to fabricate some steering links, each of which required three passes of TIG welding to attach a threaded bung to the end of a rod, [Delrin] took the time to build just the tool for the job. The tools slowly rotates the rod, letting the welder keep the torch in one position as the workpiece moves under it. The grounding method is also simple but clever — just a wide strap of braid draped over the rod. The result is some of the prettiest and most consistent welds we’ve seen in a while, and with an order for 28 steering links, it ought to be a huge time saver.
It may be time for a little more TIG welding love around here. Sure, we’ve covered the basics of oxy-acetylene welding, and even talked about brazing aluminum. Perhaps your humble Hackaday writer will take the plunge into a new TIG welder and report from a newbie’s perspective. You know, for science.
[via r/welding]


