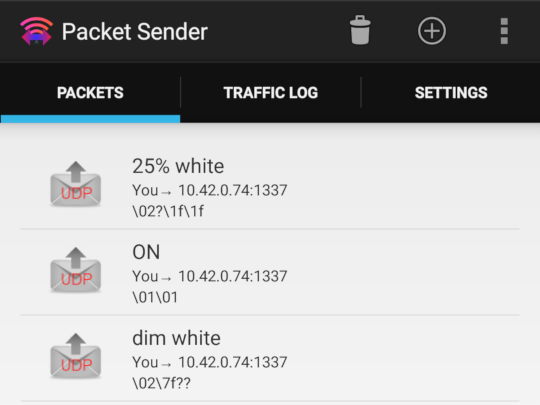
Secret Listening To Elevator Music

While we don’t think this qualifies as a “fail”, it’s certainly not a triumph. But that’s what happens when you notice something funny and start to investigate: if you’re lucky, it ends with “Eureka!”, but most of the time it’s just “oh”. Still, it’s good to record the “ohs”.

Gökberk [gkbrk] Yaltıraklı was staying in a hotel long enough that he got bored and started snooping around the network, like you do. Breaking out Wireshark, he noticed a lot of UDP traffic on a nonstandard port, so he thought he’d have a look.

Continue reading “Secret Listening To Elevator Music”

Digging HDMI Out Of UDP Packets

[Danman] was looking for a way to get the HDMI output from a camera to a PC so it could be streamed over the Internet. This is a task usually done with HDMI capture cards, either PCI or even more expensive USB 3.0 HDMI capture boxes. In his searches, [danman] sumbled across an HDMI extender that transmitted HDMI signals over standard Ethernet. Surely there must be a way to capture this data and turn it back.

The extender boxes [danman] found at everyone’s favorite chinese reseller were simple – just an Ethernet port, HDMI jack, and a power connector – and cheap – just $70 USD. After connecting the two boxes to his network and setting up his camera, [danman] listened in to the packets being set with Wireshark. The basic protocol was easy enough to grok, but thanks to the Chinese engineers and an IP header that was the wrong length, [danman] had to listen to the raw socket.

Once everything was figured out, [danman] was able to recover raw frames from the HDMI extenders, recover the audio, and stream everything to his PC with VLC. All the code is available, and if you’re looking for a way to stream HDMI to multiple locations on a network, you won’t find a better solution that’s this cheap.

How To Make Amazon Echo Control Fake WeMo Devices

[Chris] has been playing with the Amazon Echo. It’s sort of like having Siri or Google Now available as part of your home, but with built-in support for certain other home automation appliances like those from Belkin WeMo and Philips. The problem was [Chris] didn’t want to be limited to only those brands. He had other home automation gear that he felt should work with Amazon Echo, but didn’t. That’s when he came up with the clever idea to just emulate one of the supported platforms.

The WeMo devices use UPnP to perform certain functions over the network. [Chris] wanted to see how these communications actually worked, so he fired up his laptop and put his WiFi adapter into monitor mode. Then he used Wireshark to start collecting packets. He found that the device detection function starts out with the Echo searching for WeMo devices using UPnP. The device then responds to the Echo with the device’s URL using HTTP over UDP. The Echo then requests the device’s description using that HTTP URL. The description is then returned as an HTTP response.

The actual “on/off” functionality of the WeMo devices is simpler since the Echo already knows about the device. The Echo simply connects to the WeMo over the HTTP interface and issues a “SetBinaryState” command. The WeMo then obliges and returns a confirmation via HTTP.

WeMo Echo
How Echo Communicates with WeMo Devices

[Steve] was able to use this information to set up his own WeMo “virtual cloud”. Each virtual device would have its own IP address. They would also need to have a listener for UDP broadcasts as well as an HTTP listener running on the WeMo port 49153. Each virtual device would also need to be able to respond to the UPnP discovery requests and the “on/off” commands.

[Chris] used a Linux server, creating a new virtual Ethernet interface for each virtual WeMo switch. A single Python script runs the WeMo emulation, listening for the UPnP broadcast and sending a different response for each virtual device. Part of the response includes the device’s “friendly name”, which is what the Echo listens for when the user says voice commands. Since the virtual WeMo devices are free, this allows [Chris] to make multiple phrases for each device. So rather than be limited to “television”, he can also make a separate device for “TV” that performs the same function. [Chris] is also no longer limited to only specific brands of home automation gear.

There’s still a long way to go in hacking this device. There’s a lot of hardware under the hood to work with. Has anyone else gotten their hands (and bench tools) on one of these?

A Real-Time Networked VU Running On The ESP8266

Even though the ESP8266 WiFi chipsets are really cheap (and can be somewhat challenging to work with), they still pack a lot of processing power. For instance, [Mr.jb.swe] took one of these modules and made a stand-alone live VU meter with WS2812B LED strip. The VU runs entirely on the ESP chip, without any additional microcontroller. It’s an example we think a lot of projects could follow to do away with unused horsepower (extra microcontrollers) sometimes used to avoid programming directly on the ESP. The stuff you can do with these modules is wild… did you see this WiFi signal strength mapping project?

The ESP chipset acts as a UDP client which receives packets from a WinAmp plugin that [Mr.jb.swe] wrote. The plugin continuously calculates the dB of whatever track is playing and streams it over WiFi to his ESP8266. He also mentions that the ADC of the ESP chipset could be used to sample audio as well, although that pretty much eliminates the need for WiFi.

The whole setup is very responsive even though the processor is parsing UDP messages, driving the WS2812 strip, and driving a small OLED display for debug—and it doesn’t even use a separate microcontroller. [Mr.jb.swe] also posted snippets of his code to get you started on your own project. Check out the videos after the break to see it in action.

Continue reading “A Real-Time Networked VU Running On The ESP8266”

Audio Networking With GNU Radio

fsk

Thought GNU Radio was just for radio? Think again. [Chris] has been hard at work turning the signal generation and analysis of the best tool for software defined radio into a networking device for speakers and a microphone.

The setup uses GNU Radio to generate a carrier signal whose frequency is modulated with a data stream. With this modulated signal piped over a laptop’s speakers, [Chris] is able to send UDP packets across his desk using nothing but sound.

[Chris] had recently used a similar technique to transmit data via audio with GNU Radio, but this latest build is a vast improvement; this is now a duplex networking, meaning two computers can transmit and receive at the same time.

In the end, [Chris] created a strange, obsolete device called a “modem”. It’s not exactly fast; sending ‘Hello World’ takes quite a bit of time, as you can see in the video below.

Continue reading “Audio Networking With GNU Radio”

UDP Between STM32-F4 Discovery Boards

stm32-f4-udp

[The Backwoods Engineer] tested out a new accessory kit for the STM32-F4 Discovery board. The image above shows two boards communicating with the UDP protocol. Notice the extra PCB into which each Discovery board has been plugged. This is a third-party add-on which adds Ethernet, RS-232, SD card slot, and a connector for LCD or Camera. We’ve had one of these F4 Discovery boards on hand for a while and haven’t figured out a good way to connect external hardware to the huge dual pin-headers. This doesn’t solve the problem — the base board also includes dual headers to break-out all the pins — but having Ethernet, serial, and SD certainly reduces the need to add all that much more. The other drawback to the hardware is that the sample firmware is targeted at the IAR Embedded Workbench which is neither free, nor in the realm of affordable for hobbyists.

The NIC used on the baseboard has auto-crossover capabilities so the boards were connected using a regular Cat6 patch cable. This example has the boards constantly sending UDP packets with the module on the right reporting status information to a terminal via the serial connection.