LEGO vacuuming box

Self-Vacuuming LEGO Box Makes Life Better

The last chapter of the fourth book of the Hitch-Hiker’s Guide to the Galaxy trilogy mentions two hacks that made life pleasant enough to prevent a war: a super-fly that could fly out of the open half of a half-open window, and an off-switch for children. This is one of those types of hacks. Plus, it’s just an awesome idea, fun to watch, and possibly adaptable for the workshop.

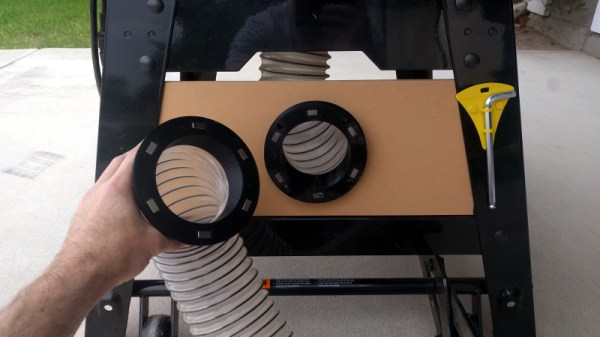
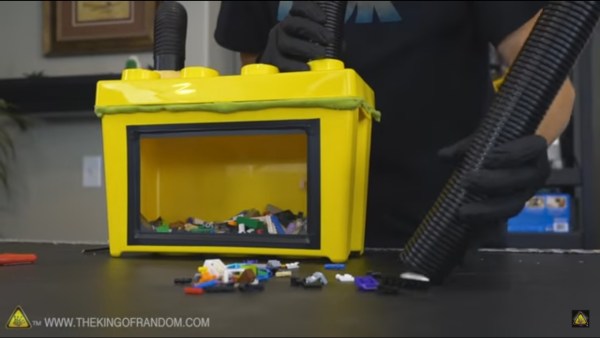
LEGO vacuuming box lidAfter the kids have gone to bed and LEGO bricks are scattered all over the floor, furniture, stairs (ouch), and everywhere else, wouldn’t it be nice if you could simply vacuum it all up directly into the LEGO box? This ingenious hack from [The King or Random] YouTube channel shows how to just that. They put two holes in opposite corners of the box’s lid, one a tight fit for a flexible intake hose and the other for the Shopvac hose, or a normal household vacuum cleaner hose if you prefer. A disk cut from flyscreen covers the Shopvac hole in case the suction is strong enough to pull the bricks back out of the box and into the Shopvac. They also make a gasket for the lid by mixing up some silicone sealant and cornstarch, the cornstarch is to prevent the cured mix from remaining sticky. We of course really like the version they made which has a window in the side of the box for watching the bricks as they fly in. Check out their build and the action in the video below.
We wonder what other uses this can be put to. How about a container for sucking up a mess of loose hardware from a workbench or a garage floor for later sorting?

Where else can a vacuum come in handy? Here’s a vacuum table for holding down flexible material when using a laser cutter and another for holding parts on a CNC machine.

Continue reading “Self-Vacuuming LEGO Box Makes Life Better”

Programmable Air Makes Robotics A Breeze

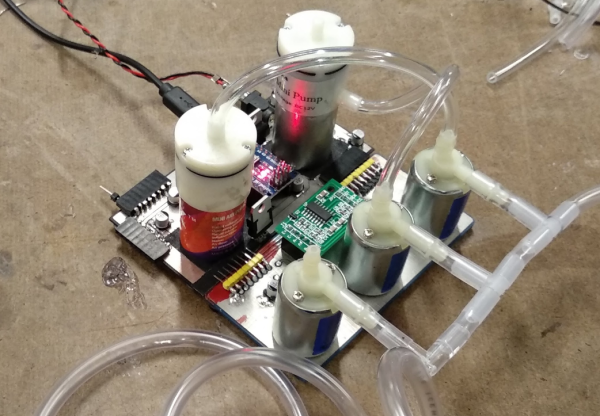
[Amitabh] was frustrated by the lack of options for controlling air pressure in soft robotics. The most promising initiative, Pneuduino, seemed to be this close to a Shenzhen production run, but the creators have gone radio silent. Faced with only expensive alternatives, he decided to take one for Team Hacker and created Programmable Air, a modular system for inflatable and vacuum-based robotics.

The idea is to build the cheapest, most hacker-friendly system he can by evaluating and experimenting with all sorts of off-the-shelf pumps, sensors, and valves. From the looks of it, he’s pretty much got it dialed in. Programmable Air is based around $9 medical-grade booster pumps that are as good at making vacuums as they are at providing pressurization. The main board has two pumps, and it looks like one is set to vacuum and the other to spew air. There’s an Arduino Nano to drive them, and a momentary to control the air flow.

Programmable Air can support up to 12 valves through daughter boards that connect via right-angle header. In the future, [Amitabh] may swap these out for magnetic connections or something else that can withstand repeated use.

Blow past the break to watch Programmable Air do pick and place, control a soft gripper, and inflate a balloon. The balloon’s pressurization behavior has made [Amitabh] reconsider adding a flow meter, but so far he hasn’t found a reasonable cost per unit. Can you recommend a small flow meter that won’t break the bank? Let us know in the comments.

Continue reading “Programmable Air Makes Robotics A Breeze”

Tiny Vacuum Chamber Arm To Help With Homemade Semiconductors

[Nixie] wants to make semiconductors at home, and that requires some unusual tools. Chief among them is a vacuum chamber to perform thin-film deposition, and true to the hacker credo his is homemade, and will soon be equipped with a tiny manipulator arm with magnetically coupled mechanical controls.

If [Nixie]’s setup looks familiar, it might be because we featured his plasma experiments a few days ago. He was a little cagey then about his goal, but he’s come clean with his desire to make his own FETs (a project that is his 2018 Hackaday Prize entry). Doing so will require not only creating stable plasmas, but also the ability to move substrates around inside the vacuum chamber. Taking inspiration from the slender and maneuverable instruments surgeons use for laparoscopic procedures, [Nixie] is working on a miniature arm that will work inside his vacuum chamber. The video below is a 3D-printed proof-of-concept model in action, and shows how the arm’s segments will be controlled by cables. What’s really interesting is that the control cables will not penetrate the vacuum chamber — they’ll be moved right through the glass wall using magnets.

We’re keen to see chips from [Nixie]’s home fab lab, but it looks like there will be a lot of cool hacks between here and there. We’ll be watching closely. Continue reading “Tiny Vacuum Chamber Arm To Help With Homemade Semiconductors”

Hybrid 3D-Printer Creates Complete Circuits, Case And All

The cool kids these days all seem to think we’re on the verge of an AI apocalypse, at least judging by all the virtual ink expended on various theories. But our putative AI overlords will have a hard time taking over the world without being able to build robotic legions to impose their will. That’s why this advance in 3D printing that can incorporate electronic circuits may be a little terrifying, at least to some.

The basic idea that [Florens Wasserfall] and colleagues at the University of Hamburg have come up with is a 3D-printer with a few special modifications. One is a separate extruder than squirts a conductive silver-polymer ink, the other is a simple vacuum tip on the printer extruder for pick and place operations. The bed of the printer also has a tray for storing SMD parts and cameras for the pick-and-place to locate parts and orient them before placing them into the uncured conductive ink traces.

The key to making the hardware work together though is a toolchain that allows circuits to be integrated into the print. It starts with a schematic in Eagle, which joins with the CAD model of the part to be printed in a modified version of Slic3r, the open-source slicing package. Locations for SMD components are defined, traces are routed, and the hybrid printer builds the whole assembly at once. The video below shows it in action, and we’ve got to say it’s pretty slick.

Sure, it’s all academic for now, with simple blinky light circuits and the like. But team this up with something like these PCB motors, and you’ve got the makings of a robotic nightmare. Or not.

Continue reading “Hybrid 3D-Printer Creates Complete Circuits, Case And All”

Practical Plasma For Thin-Film Deposition

[Nixie] wants to sputter. We know, who doesn’t? But [Nixie] has a specific purpose for his sputtering: thin-film deposition, presumably in support of awesome science. But getting to that point requires a set of tools that aren’t exactly off-the-shelf items, so he’s building out a DIY sputtering rig on the cheap.

If you’re not familiar with sputtering, that’s understandable. In this context, sputtering is a process that transfers particles from one solid to another by bombarding the first solid with some sort of energetic particles, usually electrons or a plasma. When properly controlled, sputtering has applications from mass spectrometry to the semiconductor industry, where it’s used to either deposit thin films on silicon wafers or etch them away selectively.

No matter the application, sputtering needs a stable stream of plasma. [Nixie] has posted a series of articles on his blog walking us through his plasma experiments, from pulling a really strong vacuum to building a high-voltage power supply from a microwave oven transformer. It’s a project that needs a deep well of skills and tools, like glassworking, machining, and high-voltage electronics. Check out the plasma in the video below.

Will [Nixie] be using this for a DIY fab lab? Will it be used to make homebrew LEDs? The world waits to hear.

Continue reading “Practical Plasma For Thin-Film Deposition”

Simple Mechanism Gives Support For SMT Assembly

With the fine work needed for surface-mount technology, most of the job entails overcoming the limits of the human body. Eyes more than a couple of decades old need help to see what’s going on, and fingers that are fine for manipulating relatively large objects need mechanical assistance to grasp tiny SMT components. But where it can really fall apart is when you get the shakes, those involuntary tiny muscle movements that we rarely notice in the real world, but wreak havoc as we try to place components on a PCB.

To fight the shakes, you can do one of two things: remove the human, or improve the human. Unable to justify a pick and place robot for the former, [Tom] opted to build a quick hand support for surface-mount work, and the results are impressive considering it’s built entirely of scrap. It’s just a three-piece arm with standard butt hinges for joints; mounted so the hinge pins are perpendicular to the work surface and fitted with a horizontal hand rest, it constrains movement to a plane above the PCB. A hole in the hand rest for a small vacuum tip allows [Tom] to pick up a part and place it on the board — he reports that the tackiness of the solder paste is enough to remove the SMD from the tip. The video below shows it in action with decent results, but we wonder if an acrylic hand rest might provide better visibility.

Not ready for your own pick and place? That’s understandable; not every shop needs that scale of production. But we think this is a great idea for making SMT approachable to a wider audience.

Continue reading “Simple Mechanism Gives Support For SMT Assembly”

A Freeze Dryer You Can Build In Your Garage

What do trail mix, astronaut ice-cream, and cryogel have in common? This may sound like the introduction to a corny riddle, but they are all things you can make in your garage with a homemade freeze dryer. [The Thought Emporium] built his own freeze dryer with minimum fuss and only a few exotic components like a vacuum pump and a high-quality pressure gauge. The video is also posted after the break which contains a list for the parts and where they can be purchased.

Freeze drying uses a process called cryodesiccation or lyophilization. Below a certain pressure, water skips the liquid phase and goes directly to a gas, so frozen items can transition from ice to dry without a soggy step. When you jump the liquid phase, objects hold their shape when they were frozen, and since no heat is used, you don’t carmelize your sugars.

A freeze-dryer like this has three parts. The first is the pump which doesn’t need any explanation. Next to the pump there must be a water trap. This chilly compartment recondenses the water vapor, so it doesn’t get inside the pump or saturate the things you’re trying to dry. Lastly, there is the drying chamber where your items are placed to have their moisture taken out.

Astronaut ice cream has been made on Hackaday before. [The Thought Emporium] has also been seen including a piece on making your own graphene.

Continue reading “A Freeze Dryer You Can Build In Your Garage”