S15351 tube transmitter

Retro And New Tech Combine In This Hybrid Ham Transmitter

We’ve said it before and we’ll say it again: the best part about holding an amateur radio license is that it lets you build and use your own transmitting equipment. Hams have been doing this for more than a century — indeed, it was once the only way to get on the air — using whatever technology was available. But the mix of technologies in this low-power transmitter for the 80-meter band is something you don’t see every day.

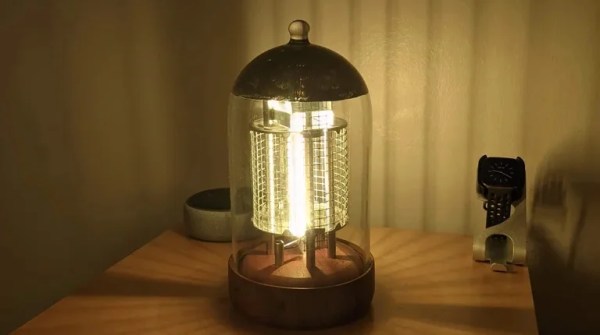
As ham [Helge Fykse (LA6NCA)] describes in the video below, the project began when he came into possession of a bonanza of vacuum tubes — 12A6 tetrodes, specifically. The new-old-stock tubes were perfect for an RF power amplifier, but that left the problem of what to use for an oscillator. [Helge] chose to meld the old with the new and used oscillator board that he designed. The board has an ATmega88 microcontroller and an Si5351 oscillator, along with a 3V3 regulator to let the module run on 12 volts. And for a nice retro touch, [Helge] put the board in a 3D printed case that looks like an old-fashioned quartz crystal.

There are some other nice design touches here too. A low-pass filter cleans up the harmonics of the oscillator’s 3.5-MHz square wave output before feeding it to the amplifier, in a nod to proper spectrum hygiene. The primary for the amp’s air-core output transformer is hand-wound, with 3D printed spacers to keep the winding neat and even. The tuning process shown below is interesting, and the transmitter was used to make a solid contact with another ham about 100 km away. And we really liked the look of [Helge]’s shack, stuffed as it is with gear both old and new.

We’ve personally tried the Si5351 for QRP transmitters before, but this blend of the old and new really makes us want to find some tubes and get to playing.

Continue reading “Retro And New Tech Combine In This Hybrid Ham Transmitter”

Valve Reluctantly Shows How To Mod The Steam Deck

As the narrator in this official instructional video from Valve reminds the viewer several times, the gaming company would really rather you not open up your brand new Steam Deck and start poking around. They can’t guarantee that their software will function should you start changing the hardware, and since there’s no source for replacement parts yet anyway, there’s not much you can do in the way of repairs.

That said, Valve does believe you have the right to take apart your own device, and has produced the video below as an aid to those who are willing risk damaging their new system by opening it up. Specifically, the video goes over how to replace the most likely wear items on the handheld, namely the thumb sticks and the SSD. It seems inevitable that the stock thumb sticks will wear down after a couple years of hard use, so we’re glad to see they are easily removable modules. As for the SSD, it stands to reason that users would want to swap it out for faster and higher capacity models as they become available in the coming years.

Sooner or later, these are going to need to be replaced.

Now to be clear, we appreciate Valve making this video, and would love to see other manufacturers be so forthcoming. But we have to admit that some of its messaging does seem a bit heavy handed. The narrators admonition that users who open their Steam Deck are literally taking their lives into their own hands due to the danger of potentially rupturing the system’s lithium-ion battery is a bit hyperbolic for our tastes. The constant reminders of how badly you could bungle the job just comes off as overly preachy, though to be fair, we probably aren’t the intended audience.

Outside of its obvious gaming functions, we’re excited too see what the community can do with the Steam Deck. With official reference material like this, perhaps we’ll even start seeing some hardware modifications before too long. Though we wouldn’t blame you for hitting the Mute button halfway through.

Continue reading “Valve Reluctantly Shows How To Mod The Steam Deck”

Valve Sells Software, So What’s With All The Hardware?

Steam branding is strong. Valve Corporation has turned their third-party marketplace into the first place millions choose to buy their PC games. The service has seen record-breaking numbers earlier this year with over 25 million concurrent users, so whatever they are doing is clearly working. Yet with all those software sales, last month Valve announced a new piece of hardware they call the Steam Deck.

Use the colloquialism you’d like, “not resting on your laurels” or “Mamba Mentality”, it’s not as if competitors in the handheld PC space are boasting ludicrous sales numbers. At their core, Valve is in the business of selling computer games. So why venture into making hardware? Continue reading “Valve Sells Software, So What’s With All The Hardware?”

Overdriving Vacuum Tubes And Releasing The Magic Light Within

We’ve all seen electronic components that have been coaxed into releasing their small amount of Magic Smoke, which of course is what makes the thing work in the first place. But back in the old times, parts were made of glass and metal and were much tougher — you could do almost anything to them and they wouldn’t release the Magic Smoke. It was very boring.

Unless you knew the secret of “red plating”, of course, which [David Lovett] explores in the video below. We’ve been following [David]’s work with vacuum tubes, the aforementioned essentially smokeless components that he’s putting to use to build a simple one-bit microprocessor. His circuits tend to drive tubes rather gently, but in a fun twist, he let his destructive side out for a bit and really pushed a few tubes to see what happens. And what happens is pretty dramatic — when enough electrons stream from the cathode to the anode, their collective kinetic energy heats the plate up to a cherry-red, hence the term “red plating”.

[David] selected a number of victims for his torture chamber, not all of which cooperated despite the roughly 195 volts applied to the plate. Some of the tubes, though, cooperated in spades, quickly taking on a very unhealthy glow. One tube, a 6BZ7 dual triode, really put on a show, with something getting so hot inside the tube as to warp and short together, leading to some impressive pyrotechnics. Think of it as releasing the Magic Light instead of the Magic Smoke.

Having seen how X-ray tubes work, we can’t help but wonder if [David] was getting a little bit more than he bargained for when he made this snuff film. Probably not — the energies involved with medical X-ray tubes are much higher than this — but still, it might be interesting to see what kinds of unintended emissions red-plating generates.

Continue reading “Overdriving Vacuum Tubes And Releasing The Magic Light Within”

Bottle Filler Perfectly Tops Your Cup

You know those bottle fillers at schools and airports? What if you had one of those at home?

We know what you’re going to say: “My fridge has one of those!” Well ours doesn’t, and even though [Chris Courses’] fridge did, his bottle of choice didn’t fit in the vertically-challenged water and ice hutch, nor did it fill autonomously. The solution was to build a dubiously placed, but nonetheless awesome custom bottle filler in his kitchen.

The plumbing for the project couldn’t be more straight-forward: a 5-year undersink water filter, electronically actuated valve, some tubing, and a T to splice into the existing water line going to the fridge. Where the rubber hits the road is making this look nice. [Chris] spends a lot of time printing face plates, pouring resin as a diffuser, and post processing. After failing on one formulation of resin, the second achieves a nice look, and the unit is heavily sanded, filled, painted, prayed over, and given the green light for installation.

For the electronics [Chris] went for a Raspberry Pi to monitor four buttons and dispense a precise allotment tailored to each of his favorite drinking vessels. While the dispenser is at work, three rows of LEDs play an animated pattern. Where we begin to scratch our heads is the demo below which shows there is no drain or drip tray below the dispenser — seems like an accident waiting to happen.

Our remaining questions are about automating the top-off process. At first blush you might wonder why a sensor wasn’t included to shut off the filler automatically. But how would that work? The dispenser needs to establish the height of the bottle and that’s a non-trivial task, perhaps best accomplished with computer vision or a CCD line sensor. How would you do it? Continue reading “Bottle Filler Perfectly Tops Your Cup”

3D Printed Butterfly Valve Helps Automate Fume Extraction

It’s not something we always think about, but there’s plenty of hazardous fumes in the average workshop that can be deleterious to human health. Whether its soldering, lasercutting, or 3D printing, all of these processes release nasty chemicals into the air that are best filtered for health reasons. To help build out a working filtration system, [Fab] needed some valves, so set about printing some of his own.

[Fab] went with a simple butterfly valve design, similar to the throttle valve in most gasoline-powered cars. The butterfly vane rotates to vary the flow, turned by a small SG90 servo. A Wemos D1 Mini is used to run a pair of the valves, which are paired with a Y-adapter to connect both a soldering station and 3D printer to the fume extraction system. As a nice touch, a WiFi-enabled outlet is hooked up to the soldering iron which notifies the D1 Mini when it’s switched on, flipping the valve open to automatically start fume extraction.

It’s a tidy system that will enable [Fab] to breath easy in the workshop for years to come. Files are available for those wishing to print a set of butterfly valves for themselves. We’ve seen some other smart fume extractors before, too. Video after the break.

Continue reading “3D Printed Butterfly Valve Helps Automate Fume Extraction”

Steam Engine Replica From LEGO

If engineering choices a hundred years ago had been only slightly different, we could have ended up in a world full of steam engines rather than internal combustion engines. For now, though, steam engines are limited to a few niche applications and, of course, models built by enthusiasts. This one for example is built entirely in LEGO as a scale replica of a steam engine originally produced in 1907.

The model is based on a 2500 horsepower triple-expansion four-cylinder engine that was actually in use during the first half of the 20th century. Since the model is built using nothing but LEGO (and a few rubber bands) it operates using a vacuum rather than with working steam, but the principle is essentially the same. It also includes Corliss valves, a technology from c.1850 that used rotating valves and improved steam engine efficiency dramatically for the time.

This build is an impressive recreation of the original machine, and can even run at extremely slow speeds thanks to a working valve on the top,  allowing its operation to be viewed in detail. Maximum speed is about 80 rpm, very close to the original machine’s 68 rpm operational speed. If you’d prefer your steam engines to have real-world applications, though, make sure to check out this steam-powered lawnmower.

Thanks to [Hari] for the tip!

Continue reading “Steam Engine Replica From LEGO”