Dirty faders.

Giving Vintage Synths New Life In A Potentiometer Cleaning Showdown

As anyone who has ever owned a piece of older equipment that has a potentiometer in it can attest to, these mechanical components do need their regular cleaning ritual. Whether it’s volume knobs on a receiver or faders on a mixer, over time they get crackly, scratchy and generally imprecise due to the oxidation and gunk that tends to gather inside them.

This is your potentiometer caked with gunk.

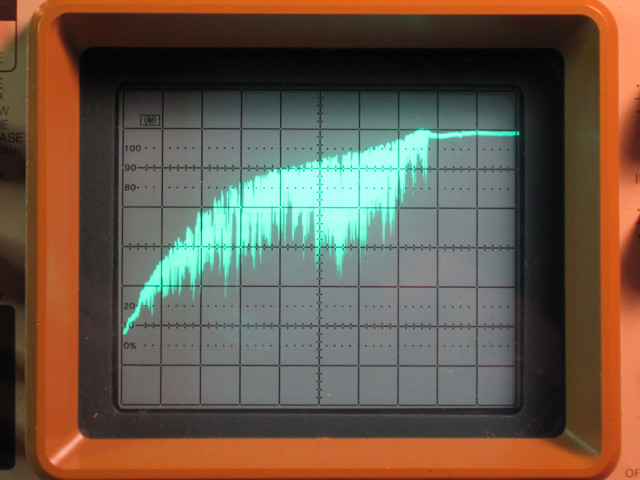
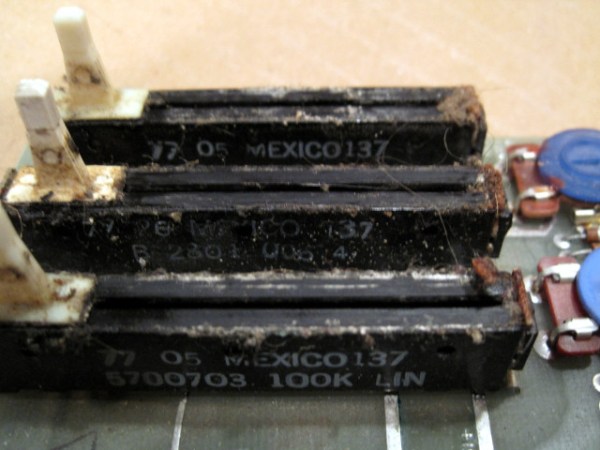
In this blast from the past, [Keith Murray] shows a few ways in which fader-style potentiometers can be cleaned, and how well each cleaning method works by testing the smoothness of the transition over time with an oscilloscope. It’s enlightening to see just how terrible the performance of a grimed-up fader is, and how little a blast of compressed air helped. Contact cleaner works much better, but it’s essential to get all of the loosened bits of gunk out of the fader regardless.

In the end, a soak in isopropyl alcohol (IPA), as well as a full disassembly followed by manual cleaning were the only ones to get the fader performance back to that of a new one. Using contact cleaner followed by blasting the fader out with compressed air seems to be an acceptable trade-off to avoid disassembly, however.

What is your preferred way to clean potentiometers to keep that vintage (audio) gear in peak condition? Let us know in the comments below.

Thanks, [Grant Freese], for the tip!

An Emulator For OBP, The Spaceflight Computer From The 1960s

[David Given] frequently dives into retrocomputing, and we don’t just mean he refurbishes old computers. We mean things like creating a simulator and assembler for the OBP spaceflight computer, which was used in the OAO-3 Copernicus space telescope, pictured above. Far from being a niche and forgotten piece of technology, the On-Board Processor (OBP) was used in several spacecraft and succeeded by the Advanced On-board Processor (AOP), which in turn led to the NASA Standard Spaceflight Computer (NSSC-1), used in the Hubble Space Telescope. The OBP was also created entirely from NOR gates, which is pretty neat.

One thing [David] learned in the process is that while this vintage piece of design has its idiosyncrasies, in general, the architecture has many useful features and is pleasant to work with. It is a bit slow, however. It runs at a mere 250 kHz and many instructions take several cycles to complete.

Sample of the natural-language-looking programming syntax for the assembler. (Example from page 68 of the instruction set manual for the OBP.)

One curious thing about the original assembler was documentation showing it was intended to be programmed in a natural-language-looking syntax, of which an example is shown here. To process this, the assembler simply mapped key phrases to specific assembly instructions. As [David] points out, this is an idea that seems to come and go (and indeed the OBP’s successor AOP makes no mention whatsoever of it, so clearly it “went”.) Since a programmer must adhere to a very rigid syntax and structure anyway to make anything work, one might as well just skip dealing with it and write assembly instructions directly, which at least have the benefit of being utterly unambiguous.

We’re not sure who’s up to this level of detail, but embedded below is a video of [David] coding the assembler and OBP emulator, just in case anyone has both an insatiable vintage thirst and a spare eight-and-a-half hours. If you’d prefer just the files, check out the project’s GitHub repository.

Continue reading “An Emulator For OBP, The Spaceflight Computer From The 1960s”

Vintage Remote Control Gets Bluetooth Upgrade

This swanky Magnavox remote is old enough to predate the use of infrared, and actually relies on ultrasound to communicate with the television. It’s a neat conversation starter, but not terribly useful today. Which is why [Chad Lawson] decided to gut the original electronics and replace it with a Adafruit Feather 32u4 Bluefruit LE that can actually talk to modern devices.

We know, we know. Some in the audience will  probably take offense to such a cool gadget being unceremoniously torn apart, but to be fair, [Chad] does say he has a second one that will remain in its original state. Plus a quick check on eBay shows these old remotes don’t seem to be particularly rare or valuable. In fact, after some browsing through the recently concluded auctions, we’re fairly sure he paid $27 USD for both of these remotes.

Anyway, [Chad] found that a piece of perfboard in his collection just happened to be nearly the same size as the PCB from the remote, which made the rest of the conversion pretty straightforward. He simply had to mount tactile switches on one side of the perfboard so the remote’s original buttons would hit them when pressed, and then wire those to the Adafruit on the other side. We know there’s a 3.7 V 500 mAh pouch battery in there someplace as well, though it’s not immediately clear where he hid it in the images.

The code [Chad] came up with tells the Adafruit to mimic a Bluetooth Human Interface Device (HID) and send standard key codes to whatever device pairs with it. That makes it easy to use as a media remote on the computer, for example. We’ve seen something similar done with the ESP32, if you’ve already got one in the parts bin and are looking to revamp a remote control of your own.

At the end of the write-up, [Chad] mentions he may try developing an ultrasonic receiver that can pick up the signals from the unmodified remote control. That would be a nice way to bring this whole thing full circle, and should appease even the most hardcore vintage remote control aficionados.

Teardown: Franz Crystal Metronome

I wish I could tell you that there’s some complex decision tree at play when I select a piece of hardware to take apart for this series, but ultimately it boils down two just two factors: either the gadget was something I was personally interested in, or it was cheap. An ideal candidate would check both boxes, but that’s not always the case. This time around however, I can confidently say our subject doesn’t fall into either category.

Now don’t get me wrong, at first glance I found the Franz Crystal Metronome to be intriguing in its own way. With that vintage look, how could you not? But I’m about as far from a musician as one can get, so you’d hardly find a metronome on my wish list. As for the cost, a check on eBay seems to show there’s something of a following for these old school Franz models, with ones in good condition going for $50 to $80. Admittedly not breaking the bank, but still more than I’d like to pay for something that usually ends up as a pile of parts.

That being the case, why are you currently reading about it on Hackaday? Because it exploits something of a loophole in the selection process: it doesn’t work, and somebody gave it to me to try and figure out why. So without further ado let’s find out what literally makes a Franz Crystal Metronome tick, and see if we can’t get it doing so gain.

Continue reading “Teardown: Franz Crystal Metronome”

Restoring A Vintage Tube Tester To Its Former Glory

It can be difficult for modern eyes to make much sense of electronics from the 1960s or earlier. Between the point-to-point soldering, oddball components, and the familiar looking passives blown up to comical proportions like rejected props from “Honey, I Shrunk the Kids”, even experienced hardware hackers may find themselves struggling to understand what a circuit is doing. But that didn’t stop [Cat0Charmer] from taking the time to lovingly restore this Hickok Cardmatic KS-15874-L2 tube tester.

The good news was that the machine had nearly all of its original parts, down to the Hickok branded tubes in the power supply. Unfortunately it looks like a few heavy handed repairs were attempted over the years, with a nest of new wires and components intermixed with what [Cat0Charmer] actually wanted to keep. The before and after shots of individual sections of the machine are particularly enlightening, though again, don’t feel to bad if you still can’t make heads or tails of the cleaned up version.

Hiding new capacitors inside of the old ones.

As you’d expect for a machine of this age, many of the original components were way out of spec. Naturally the capacitors were shot, but even the carbon composition resistors were worthless after all these years; with some measuring 60% away from their original tolerances.

We particularly liked how [Cat0Charmer] hollowed out the old capacitors and installed the new modern ones inside of them, preserving the tester’s vintage look. This trick wasn’t always feasible, but where it was applied, it definitely looks better than seeing a modern capacitor adrift in a sea of 60’s hardware.

After undoing ham-fisted repairs, replacing the dud components, and installing some new old stock tubes, the tester sprung to life with renewed vigor. The previously inoperable internal neon lamps, used by the tester’s voltage regulation system, shone brightly thanks to all the ancillary repairs and changes that went on around them. With a DIY calibration cell built from the schematics in an old Navy manual, [Cat0Charmer] got the tester dialed in and ready for the next phase of its long and storied career.

We love seeing old hardware get restored. It not only keeps useful equipment out of the scrap heap, but because blending new and old technology invariably leads to the kind of innovative problem solving this community is built on.

Digital Preservation For Old Batteries

The times they are a-changin’. It used to be that no household was complete without a drawer filled with an assortment of different sizes and types of batteries, but today more and more of our gadgets are using integrated rechargeable cells. Whether or not that’s necessarily an improvement is probably up for debate, but the fact of the matter is that some of these old batteries are becoming harder to find as time goes on.

Which is why [Stephen Arsenault] wants to preserve as many of them as possible. Not in some kind of physical battery museum (though that does sound like the sort of place we’d like to visit), but digitally in the form of 3D models and spec sheets. The idea being that if you find yourself in need of an oddball, say the PRAM battery for a Macintosh SE/30, you could devise your own stand-in with a printed shell.

The rather brilliantly named Battery Backups project currently takes the form of a Thingiverse Group, which allows other alkaline aficionados to submit their own digitized cells. The cells that [Stephen] has modeled so far include not only the STL files for 3D printing, but the CAD source files in several different flavors so you can import them into your tool of choice.

Like the efforts to digitally preserve vintage input devices, it’s not immediately clear how many others out there are willing to spend their afternoons modeling up antiquated batteries. But then again, we’ve long since learned not to underestimate the obscure interests of the hacker community.

Let’s Look At Some Cool Old LEDs

LEDs are now a mature technology, with all manner of colors and flavors available. However, back in the 1970s, it was early days for this fledgling display tech, and things looked very different. [IMSAI Guy] happened to work at the optoelectronics division of Hewlett-Packard during their development of LED displays, and has a handful of prototypes from those heady days.

The video is a great look at not only vintage display hardware, but also rarely seen prototypes that seldom left the HP offices. Matrix, 7-segment and even 16-segment devices are all in attendance here. There’s great macro photography of the packages, including the now-forgotten bubble displays as well as hermetically sealed glass packages. The parts all have a uniquely 1970s look, drenched in gold plating and otherwise just looking very expensive.

The followup video breaks out the microscope and powers up the displays. [IMSAI Guy] shares some useful tips on how to best tinker with unknown LED parts, as well as knowledge about the chemical compounds and manufacturing processes involved in LED production. If you don’t know your III-V compounds from your II-VI compounds, prepare to learn.

It’s always interesting to take a look back, and even better to get a peek at the experiments of engineers of the past.

If you’re wondering about applications of this hardware, we’ve seen messageboards and watches before. Video after the break.

Continue reading “Let’s Look At Some Cool Old LEDs”