Plastics: Acrylic

If anything ends up on the beds of hobbyist-grade laser cutters more often than birch plywood, it’s probably sheets of acrylic. There’s something strangely satisfying about watching a laser beam trace over a sheet of the crystal-clear stuff, vaporizing a hairs-breadth line while it goes, and (hopefully) leaving a flame-polished cut in its wake.

Acrylic, more properly known as poly(methyl methacrylate) or PMMA, is a wonder material that helped win a war before being developed for peacetime use. It has some interesting chemistry and properties that position it well for use in the home shop as everything from simple enclosures to laser-cut parts like gears and sprockets.

Continue reading “Plastics: Acrylic”

Welding Robot Takes On A Hot, Dirty, Dangerous Job

They used to say that robots would take over the jobs too dirty or dangerous for humans. That is exactly what [Joel Sullivan] had in mind when he created this welding robot. [Joel] designed the robot for the OSB industry. No, that’s not a new operating system, it’s short for Oriented Strand Board. An engineered lumber, OSB is made of strands (or chips) of wood. It’s similar to plywood but doesn’t require large thin sheets of lumber. To make a panel of OSB, a 5-inch thick matt of wood chips is mixed with glue and compressed down to 5/16″ at 7500 PSI and 400° F.

The presses used to make OSB are a massively parallel operation. 20 or more boards can be pressed at once. Thy press is also a prime area for damage. A nut or bolt hidden in the wood will dig into the press, causing a dent which will show up on every sheet which passes through that section. The only way to fix the press is to shut it down, partially dismantle it, and fill the void in with a welder. [Joel’s] robot eliminates most of the downtime by performing the welding on a still hot, still assembled press.

The robot looks like it was inspired by BattleBots, which is fitting as the environment it works in is more like a battleground. It’s a low, wide machine. In the front are two articulated arms, one with a welder, and one with a die grinder. The welder fills any voids in the press platen, and the die grinder grinds the fresh welds flat.  An intel NUC controls things, with plenty of motor drives, power supplies, and relays on board.

[Joel’s] bot is tethered, with umbilicals for argon, electricity and compressed air. Air travels through channels throughout the chassis and keeps the robot cool on the hot press. Everything is designed for high temperatures, even the wheels. [Joel] tried several types of rubber, but eventually settled on solid aluminum wheels. The ‘bot doesn’t move very fast, so there is plenty of traction. Some tiny stepper motors drive the wheels. When it’s time to weld, pneumatic outriggers lock the robot in place inside the narrow press.

Cameras with digital crosshairs allow the operator to control everything through a web interface. Once all the parameters are set up, the operator clicks go and sparks fly as the robot begins welding.

If you’re into seriously strong robots, check out trackbot, or this remote-controlled snow blower!

Continue reading “Welding Robot Takes On A Hot, Dirty, Dangerous Job”

Homemade Shop Vise Packs A Hydraulic Punch

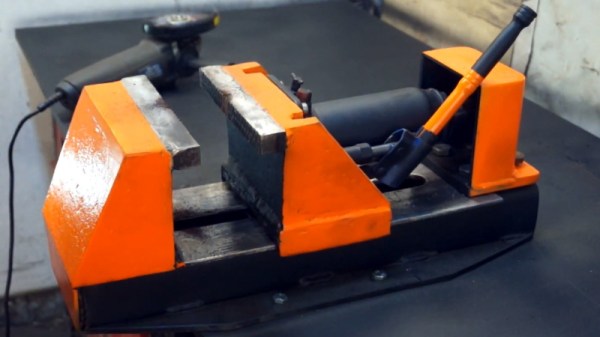
It’s a sad day when one of the simplest and generally most reliable tools in the shop – the bench vise – gives up the ghost. With just a pair of beefy castings and a heavy Acme screw, there’s very little to go wrong with a vise, but when it happens, why not take it as an opportunity to make your own? And, why not eschew the screw and go hydraulic instead?

That’s the path [Darek] plotted when his somewhat abused vise reached end-of-life with an apparently catastrophic casting failure. His replacement is completely fabricated from steel bar and channel stock, much of it cut on his nifty plasma cutter track. The vice has a fixed base and rear jaw, with a moving front jaw. Hiding inside is a 5-ton single-acting hydraulic cylinder. A single acting cylinder won’t open the vise on its own, so [Darek] came up with a clever return mechanism: a pair of gas springs from a car trunk.

With a pair of hardened steel jaws, some modifications to the power cylinder to allow foot operation, and a spiffy paint job, the vise was ready for service. Check out the build in the video below; we’re impressed with the power the vise has, and hands-free operation is an unexpected bonus.

Yes, most people buy vises, but from the small to the large, it’s nice to see them built from scratch too.

Continue reading “Homemade Shop Vise Packs A Hydraulic Punch”

Scooter Hauls Kids With A Little Heavy Metal

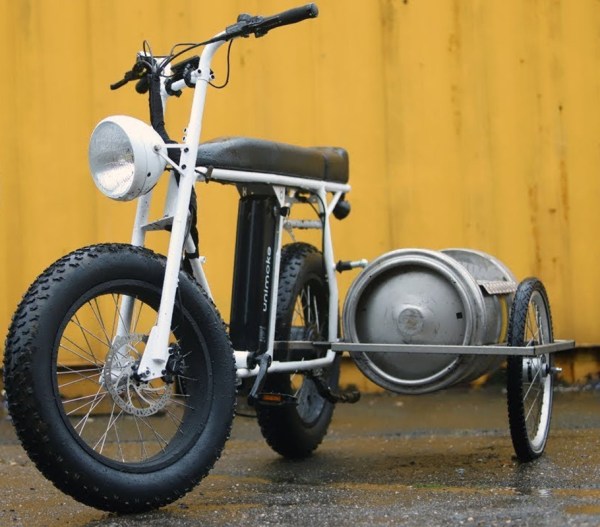
Where there’s a will, there’s a way. Similarly, where there’s a paying customer and a well stocked metalworking shop, there will also be a way. That’s about all the backstory you need to understand this latest creation from [Richard Day] of 42Fab. A customer asked him to build something that didn’t exist, and in a few hours he not only fabricated it from scratch but documented the whole thing for our viewing pleasure.

The object in question is a mount that would allow the customer to pull a “Burley Bee” kid trailer behind their electric scooter. The trailer is only meant for a bicycle, but the expected stresses of getting pulled around by a scooter seemed similar enough that [Richard] figured it should work. Especially since the ride height of the scooter lined up almost perfectly with the trailer’s tongue. The trick is, he wanted to avoid making permanent changes to either the scooter or the trailer.

On the scooter side, [Richard] came up with a clamp arrangement that would squeeze onto the frame. This gave him plenty of strength, without having to put any holes in the scooter. To create the clamp he took two pieces of 1/4″ x 2″ steel flat bar and welded 5/16″ nuts to them. By drilling the threads out of outer nuts they act as bushings, so cranking down on the bolts draws the two pieces together. To simplify the alignment, he welded the nuts to the bars while the bolts were threaded in, so he knew everything would be in place.

For the trailer side, he took another piece of flat steel and turned it into a “U” shape by cutting almost all the way through the back of it and then folding it over in his vice. A bead of metal was then laid in the cut with the welder to strengthen it back up. [Richard] used this opportunity to demonstrate the difference between pushing and pulling the torch while welding, which is an interesting tip to file away. A hole drilled through the two sides and a little grinding, and it’s ready to mount.

Between the two fabricated components is some flat stock welded at an eyed up angle. As [Richard] says in the video, the nice thing about these one-off projects is that you can basically design on the fly. Plus you can always use a hammer to make some final adjustments.

While his isn’t the first bike trailer hack we’ve seen here at Hackaday, it would be fair to say it’s something of a rarity around these parts. Usually we get word of somewhat larger bits of kit getting dragged around.

Continue reading “Scooter Hauls Kids With A Little Heavy Metal”

A Scratch-Built Drill Press Vise From Scrap

Never underestimate the importance of fixturing when you’re machining parts. No matter what the material, firmly locking it down is the key to good results, and may be the difference between a pleasant afternoon in the shop and a day in the Emergency Room. Flying parts and shattered tooling are no joke, but a lot of times quality commercial solutions are expensive and, well, commercial.  So this scratch-built drill press vise is something the thrifty metalworker may want to consider.

To be sure, [Ollari’s] vise, made as it is almost completely from scrap angle iron, is no substitute for a vise made from precision ground castings. But it’s clear that he has taken great care to keep everything as square and true as possible, and we give him full marks for maximizing his materials. And his tools — nothing more complicated than a MIG welder is used, and most of the fabrication is accomplished with simple hand tools. We like the way he built up sturdy profiles by welding strap stock across the legs of the angle iron used for the jaws, to give them a strong triangular cross-section to handle the clamping force. And using the knurled end of an old socket wrench as the handle was inspired; we’ll certainly be filing that idea away for a rainy day in the shop. Although we might use Acme rather than plain threaded rod.

We always enjoy seeing someone fabricate their own tools, and this one reminds us a bit of the full-size bench vise built up from layers of welded steel we featured a while back. It even looks a little like this 3D-printed vise, too.

Continue reading “A Scratch-Built Drill Press Vise From Scrap”

Spot Welding …Plastic?

Plastic milk bottles, when your project or prototype needs an urgent source of plastic, they are often the first thing to hand. Convenient and flexible, but strong at the same time and usually free, they’re the ultimate source of material in a pinch. However, when it comes to actually manipulating the HDPE plastic they’re made from, there’s often a challenge. It’s easy to cut, but not so easy to join. Conventional glues can have a hard time, making it difficult to bond.

Enter [zimitt], and a spot welding solution for joining HDPE with ease. Ok, so ‘spot welding’ might be a little optimistic given the speed of this process, but it’s useful nonetheless. To heat the plastic, a cheap soldering iron is recommended. A low wattage, straight-to-the-wall one does well, especially as they commonly have the washer-style end shown in the picture. To protect the plastic from burning, a BBQ mat is used – they’re temperature resistant and usually made with a PTFE surface.

First, place the two sheets of plastic face to face and sandwich top and bottom with the BBQ mat. Apply some heat to the mat with the soldering iron then, after a few seconds, remove the iron and provide pressure with a flat object to bond the plastic. [zimitt] used an espresso tamper for this which was ideal.

The results are impressive, and [zimitt] experiments with different plastics as well. Of course, you should exercise caution when attempting anything like this, given the health risks present when heating up different types of plastic.

HDPE is easy to recycle at home, and we’ve seen a lot of great uses: a plastic joiner’s mallet, plastic tiles, and even a filament extruder for 3D printing.

A CNC Plasma Cutter Table, From The Shop Floor Up

Some projects are simple, some focus on precision and craftsmanship, and some are more of the quick-and-dirty variety. This home-built CNC plasma cutter table seems to follow a “go big or go home” philosophy, and we have to say we’re mighty impressed by the finished product.

For those who follow [Bob]’s “Making Stuff” YouTube channel, this build has been a long time coming. The playlist below has eight videos that cover the entire process from cutting the first tubes of the welded frame to the initial test cuts with the finished machine. [Bob] took great pains to make the frame as square and flat as possible, to the extent of shimming a cross member to correct a 0.030″ misalignment before welding. He used good-quality linear rails for each axis, and hefty NEMA 23 steppers. There were a few false starts, like the water pan that was going to be welded out of five separate pieces of steel until the metal shop guys saved the day with their press brake. In the end, the machine turned out great; with a build cost of $2000 including the plasma cutter it’s not exactly cheap, but it’s quite a bargain compared to similar sized commercial machines.

We think the video series is a great guide for anyone looking to make a CNC plasma table. We’ve seen builds like this before, including [This Old Tony]’s CNC router. Watching these builds gives us the itch to get into the shop and start cutting metal. Continue reading “A CNC Plasma Cutter Table, From The Shop Floor Up”