Wemo Smart Plug Gets Brain Transplant

Like many modern smart home gadgets, Belkin’s Wemo brand of smart plugs has a tendency to phone home every time you turn on a lamp. [Gigawatts] wasn’t having it, so they figured out how to flash the device with OpenWRT and replicated its original functionality with a web interface. Unfortunately this stopped working after awhile, and rather than trying to diagnose the issue, it seemed the time would be better spent simplifying the whole thing.

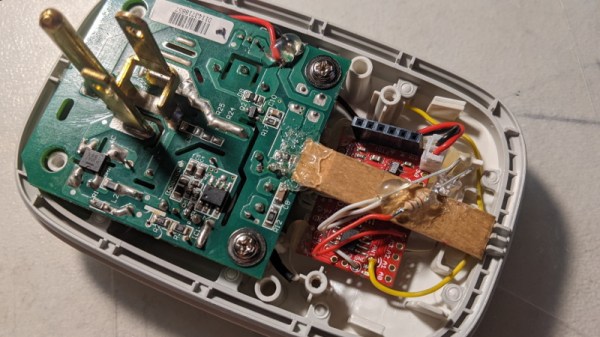
As [Gigawatts] explains, there are actually two separate boards inside the Wemo plug. One holds the relay to do the high-voltage switching, and the other provides the control. They are linked with a three wire connector, making it exceptionally simple to swap out the original controller for something different. The connector supplies 5 V and ground, all you’ve got to do is pull the third wire high to flick the switch.

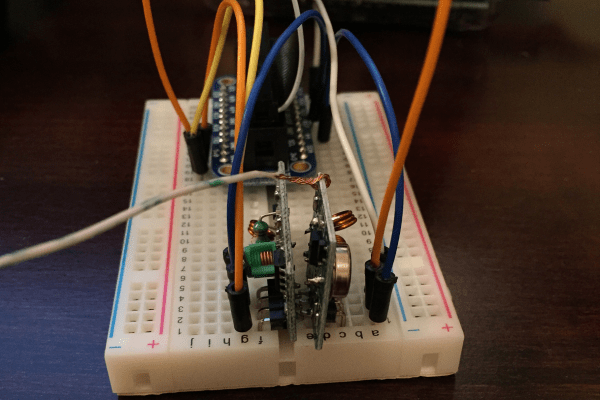
While the ESP8266 probably would have been the first choice for many a Hackaday reader, [Gigawatts] actually went with the Moteino, a low-power Arduino compatible board with integrated RFM69 transceiver. With an LED to indicate status and a few lines of code tweaked, the Moteino got this once WiFi-only smart plug speaking a new language.

There’s some debate over how effective smart plugs are from an energy efficiency standpoint, but even if this reborn Wemo doesn’t help [Gigawatts] save much power, at least it won’t be blabbing about everything to a third-party.

Alexa Controls This Projector Thanks To ESP8266

[jfessard] doesn’t have extra-sensory perception, but does have an ESP8266. The little board seems to pop up in every hack these days. Inspired by not wanting to get up from the bean-bag chair or leave the electronics-housing cabinet wide open to use an HDMI switcher, [jfessard] hacked together an Alexa-compatible projector control via the ESP8266!

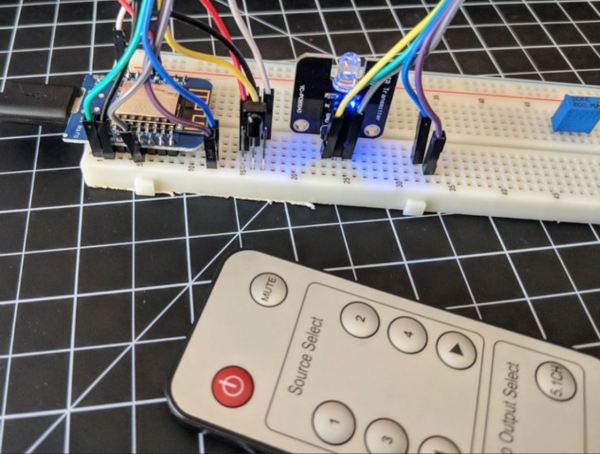
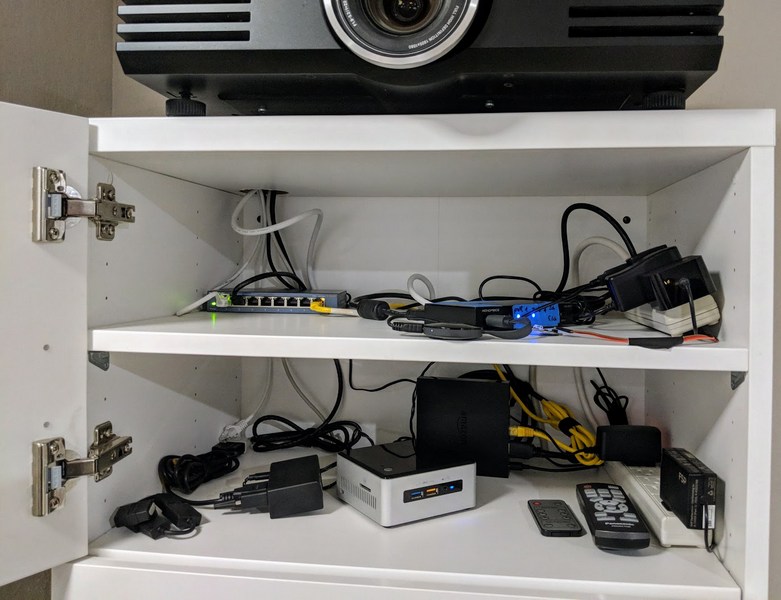
The core functionality here is the ability to turn the projector on and off, and to switch the HDMI source. [jfessard] connected the Panasonic PT-AE3000U projector to a Monoprice HDX-401TA 4×1 HDMI switcher. Tucked away in the cabinet below the projector, it is controlled using a IR LED transmitter breakout board sitting at the end of a fairly long set of jumper wire. The projector control itself is through a RS232 interface.

To make this easy to use with Amazon’s Alexa, [jfessard] turned to some libraries for the ESP8266 D1 Mini. The fauxmoesp library makes it look like a WeMo device, and the IRemoteESP8266 library made remote control code cloning a snap. One really frustrating part of this hack was the MAX232-style breakout board; getting a board to work when it’s labelled backwards takes a bit of head-scratching to figure out.

If the the projector ever gets too noisy, we suggest this hack that shushes the machine. For the moment, we’d rather take another look at this laser projector that mimics a cool ‘laser sky’ effect.

PLC And Linear Actuators Automate Double-Hung Windows

Very few residential architectural elements lend themselves to automation, with doors and windows being particularly thorny problems. You can buy powered doors and windows, true, but you’ll pay a pretty penny and have to go through an expensive remodeling project to install them. Solving this problem is why this double-hung window automation project caught our eye.

Another reason we took an interest in this project is that [deeewhite] chose to use a PLC to control his windows. We don’t see much love for industrial automation controllers around here, what with the space awash in cheap and easy to use microcontrollers. They have their place, though, and a project like this is a good application for a PLC. But the controller doesn’t matter at all if you can’t move the window, for which task [deeewhite] chose 12V linear actuators. The fact that the actuators are mounted in the center of the window is probably necessary given the tendency of sashes to rack in their frames and jam; unfortunately, this makes for a somewhat unsightly presentation. [deeewhite] also provides the ladder logic for his PLC and discusses how he interfaces his system with Alexa, a WeMo and IFTT.

We’d love to see this project carried forward a bit with actuators hidden under the window trim, or a rack and pinion system built into the window tracks themselves. This is a pretty good start and should inspire work on other styles of windows. While you’re at it, don’t forget to automate the window blinds.

[via r/DIY]

Belkin WeMo Teardown

[Brian Dipert] over at EDN has a teardown of Belkin’s answer to the Internet of Things (IoT) craze: the WeMo. This little WiFi gadget plugs into an outlet and lets you turn a connected device on and off from a smart phone app or something like Amazon Echo.

As you might expect from a cheap piece of consumer hardware, there’s not a whole lot inside. The digital board contains a Ralink WiFi chip, an antenna etched on the PCB, and a handful of components, including an SDRAM and some flash memory.

Continue reading “Belkin WeMo Teardown”

How To Make Amazon Echo Control Fake WeMo Devices

[Chris] has been playing with the Amazon Echo. It’s sort of like having Siri or Google Now available as part of your home, but with built-in support for certain other home automation appliances like those from Belkin WeMo and Philips. The problem was [Chris] didn’t want to be limited to only those brands. He had other home automation gear that he felt should work with Amazon Echo, but didn’t. That’s when he came up with the clever idea to just emulate one of the supported platforms.

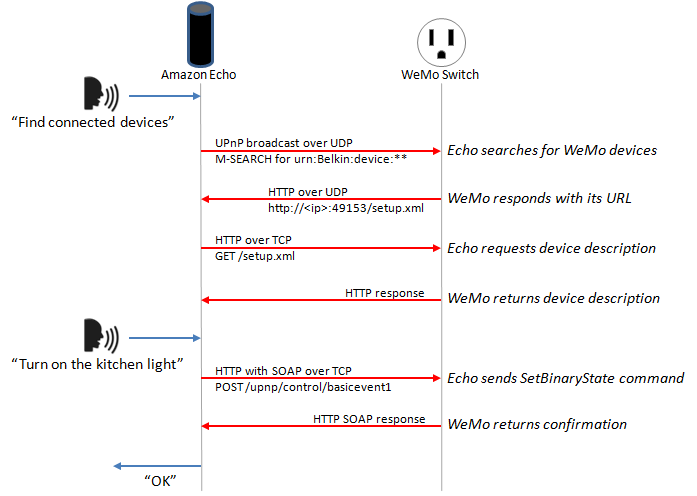
The WeMo devices use UPnP to perform certain functions over the network. [Chris] wanted to see how these communications actually worked, so he fired up his laptop and put his WiFi adapter into monitor mode. Then he used Wireshark to start collecting packets. He found that the device detection function starts out with the Echo searching for WeMo devices using UPnP. The device then responds to the Echo with the device’s URL using HTTP over UDP. The Echo then requests the device’s description using that HTTP URL. The description is then returned as an HTTP response.

The actual “on/off” functionality of the WeMo devices is simpler since the Echo already knows about the device. The Echo simply connects to the WeMo over the HTTP interface and issues a “SetBinaryState” command. The WeMo then obliges and returns a confirmation via HTTP.

WeMo Echo
How Echo Communicates with WeMo Devices

[Steve] was able to use this information to set up his own WeMo “virtual cloud”. Each virtual device would have its own IP address. They would also need to have a listener for UDP broadcasts as well as an HTTP listener running on the WeMo port 49153. Each virtual device would also need to be able to respond to the UPnP discovery requests and the “on/off” commands.

[Chris] used a Linux server, creating a new virtual Ethernet interface for each virtual WeMo switch. A single Python script runs the WeMo emulation, listening for the UPnP broadcast and sending a different response for each virtual device. Part of the response includes the device’s “friendly name”, which is what the Echo listens for when the user says voice commands. Since the virtual WeMo devices are free, this allows [Chris] to make multiple phrases for each device. So rather than be limited to “television”, he can also make a separate device for “TV” that performs the same function. [Chris] is also no longer limited to only specific brands of home automation gear.

There’s still a long way to go in hacking this device. There’s a lot of hardware under the hood to work with. Has anyone else gotten their hands (and bench tools) on one of these?

RasPi Power Controller

WiFi Controlled Power Outlets With Raspberry Pi

[Tim] was looking for a way to control his power outlets using WiFi. He looked into purchasing a WeMo but he realized that he could build something even better with more bang for his buck. He started out by purchasing a five pack of Etekcity wireless remote control outlet switches. These are kind of like the WeMo, only they aren’t controlled via WiFi. Instead, they come with an RF controller. [Tim] just needed to find a way to bridge the gap between the RF remote and WiFi.

[Tim] decided to use a Raspberry Pi as the brains of the controller. He also purchased a SMAKN 433MHz RF receiver and transmitter for communicating with the wireless outlet switches. The wiring for the modules is pretty simple. There are only four wires. There are power and ground wires for each module. Then the transmitter needs two GPIO pins while the receiver only needs one.

[Tim] began with a fresh installation of Raspbian. He then installed Wiring Pi, which gives you the ability to interface with the GPIO pins in a way that is similar to Arduino. He also installed Apache and PHP to create a web interface for switching the outlets. The last step was to write some custom software. The software included a script that allowed [Tim] to sniff out the controls of his RF remote. The correct codes are entered into the “toggle.php” file, and everything is set. All [Tim] has to do now is browse to his Pi’s web server and click a button. All of the custom code is available via git.

AlarmLamp

Prefix Your Phone Alarm With A Desk Lamp

If you are like [Gbola], then you have a hard time waking up during the winter months. Something about the fact that it’s still dark outside just makes it that much more difficult to get out of bed. [Gbola] decided to build his own solution to this problem, by gradually waking himself up with an electric light. He was able to do this using all off-the-shelf components and a bit of playing around with the Tasker Android application.

[Gbola] started out with a standard desk lamp. He replaced the light bulb with a larger bulb that simulates the color temperature of natural daylight. He then switched the lamp on and plugged it into a WeMo power switch module. A WeMo is a commercial product that attempts to make home automation accessible for consumers. This particular module allows [Gbola] to control the power to his desk lamp using his smart phone.

[Gbola] mentions that the official WeMo Android application is slow and includes no integration with Tasker. He instead decided to use the third-party WeMoWay application, which does include Tasker support. Tasker is a separate Android application that allows you to configure your device to perform a set task or series of tasks based on a context. For example you might turn your phone to silent mode when your GPS signal shows you are at work. WeMoWay allows [Gbola] to interact with his WeMo device based on any parameter he configures.

On top of all of that, [Gbola] also had to install three Tasker plugins. These were AutoAlarm, Taskkill, and WiFi Connect. He then got to work with Tasker. He configured a custom task to identify when the next alarm was configured on the phone. It then sets two custom variables, one for 20 minutes before the alarm (turn on the lamp) and one for 10 minutes after (turn it off).

[Gbola] then built a second task to actually control the lamp. This task first disconnects and reconnects to the WiFi network. [Gbola] found that the WeMoWay application is buggy and this “WiFi reset” helps to make it more reliable. It then kills the WeMoWay app and restarts it. Finally, it executes the command to toggle the state of the lamp. The project page has detailed instructions in case anyone wants to duplicate this. It seems like a relatively painless way to build your own solution for less than the cost of a specialized alarm clock lamp.