A Beverage Cooler That Comes To You!

Feel like taking a long walk, but can’t be bothered with carrying your drinks? Have no fear, this  “Follow Me” Cooler Bot is here!

Really just a mobile platform with a cooler on top, the robot connects to smartphone via Bluetooth, following it using GPS. Making the platform involves a little woodworking skill, and an aluminium hub with a 3D-printed hub adapter connects the motors to a pair 6″ rubber wheels with a swivel caster mounted at the rear. A pocket in the platform’s base houses the electronics.

The Arduino Uno — via an L298n motor driver — controls two 12V DC, brushed and geared motors mounted with 3D printed brackets, while a Parallax PAM-7Q GPS Module in conjunction with an HMC 5883L compass help the robot keep its bearing. A duo of batteries power the motors and the electronics separately to prevent  any malfunctions.

Continue reading “A Beverage Cooler That Comes To You!”

Australian Raspberry Pi Tutorials

There’s a new and very detailed video tutorial about the Raspberry Pi available from the Australian firm Core Electronics.  There are 30 videos and 5 chapters in total. A few of the introduction videos are short, but the detail videos range from 3 to 16 minutes.

The instructor [Michael] starts out at the very beginning — loading NOOBS on the Pi — and then moves on to Python, shell scripting, and building GUI applications with TkInter. It also covers using Particle Pi for IoT applications that integrate with IFTTT.

We do realize that most people reading Hackaday have probably used a Raspberry Pi at least once or twice. However, we also know that we all get asked to recommend material for beginners, or — in some cases — we are using material to teach classes in schools or hackerspaces.

Continue reading “Australian Raspberry Pi Tutorials”

Hackaday Links: July 2, 2017

A few months ago, we had a Hack Chat with Chip Gracey, the guy behind Parallax, the Basic Stamp, the Propeller, and the upcoming Propeller II. Now we’ve finally got around to editing that transcript. There’s a lot of awesome stuff in here, from learning a Hardware Design Language to the actual costs of fabbing silicon.

Rigol, the manufacturers of every hackerspace’s favorite oscilloscope, announced a new chipset. The current lineup of Rigol scopes top out at around 1GHz. In a prototype scope based on this chipset, Rigol demonstrated 4GHz bandwidth and 20GS/s with one Billion point memory depth. What this means: Rigol will be making very powerful scopes in the near future.

Hackaday had a meetup this week in New York City. The June workshop at Fat Cat Fab Lab featured speakers involved with twitter bots, 8-bit art, one of the guys behind Beautiful Soup, and a talk on a completely self-sustainable record label. Want to attend one of these meetups? Check out the calendar.

Repairs of retrocomputers are always interesting, but usually the same. Wipe off some dust, possibly replace a cap or two, retrobrite the case, and you’re done. This is not the usual retrocomputer repair. [Drygol] found a C64 that was apparently stored in a swamp for several years. The power switch fell off when he touched it. Somehow, miraculously, the circuit worked and [Drygol] rewarded the board with a new enclosure, dyed keycaps, an SD2IEC mod, and a kernel switch mod.

Guess what’s back? A pen computer with a color sensor on one end, and an ink mixer in the other. The Scribble Pen is the Internet’s infamous crowdfunded color-sensing pen, and the scammer behind it is looking for another funding round. Has anything changed since we tore this thing apart three years ago? No, it’s still a scam. I’ve been keeping tabs on the guy behind it, he’s still not in prison, and there are still idiots on this planet.

The ‘A’ stands for ‘Arts’.

The Benchy is everyone’s favorite tugboat and 3D printer benchmarking tool. They usually float, sideways. However, [MakeShift] somehow figured out how to add weight to the keel and turn the cutest little tugboat into a real, remote controlled boat. You could probably model a proper hull for the bottom of this boat, and it would be one of the few 3D prints where the actual design would be subject to US Copyright.

Is the fidget spinner fad dying? Square, the startup built around turning old AUX to cassette adapters into POS terminals seems to think so. They’ve been graphing their sales figures for fidget spinners, and there has been a marked decline since school let out for the summer. Will the trend pick back up in September? Who cares.

Best Product Entry: A HSDK For Ultrasound Imaging

As an entry into this year’s Best Product portion of the Hackaday Prize, [kelu124] is developing a hardware and software development kit for ultrasound imaging.

Ultrasound is one of the primary tools used in modern diagnostic medicine. Head to the doctor with abdominal pain, and you can bet you’ll be seeing the business end of an ultrasound system. While Ultrasound systems have gotten cheaper, they aren’t something everyone has in the home yet.  [kelu124] is working to change that by building a hardware and software development kit which can be used to explore ultrasound systems. This isn’t [kleu124’s] first rodeo. HSDK builds upon and simplifies Murgen, his first open source ultrasound, and an entry in the 2016 Hackaday prize. [kelu124’s] goal is to “simplify everything, making it more robust and more user-friendly”.

The system is driven by a Raspberry Pi Zero W. A custom carrier board connects the Pi to the pulser block, which sends out the ultrasonic pings, and the analog front end, which receives the reflected signals. The receiver is called Goblin, and is a custom PCB designed [kelu124] designed himself. It uses a variable gain amplifier to bring reflected ultrasound signals up out of the noise.

A system like this would be a boon both to hackers and medical professionals working in the field. Ultrasonics can do more than just imaging. You can decrease healing time with ultrasonics, or even levitate things!

Home Built PCB Mill Reportedly Doesn’t Suck

It’s 2017, and getting a PCB professionally made is cheaper and easier than ever. However, unless you’re lucky enough to be in Shenzhen, you might find it difficult to get them quickly, due to the vagaries of international shipping. Whether you want to iterate quickly on designs, or just have the convenience of speed, it can be useful to be able to make your own PCBs at home. [Timo Birnschein] had just such a desire and set about building a PCB mill that doesn’t suck.

It might sound obvious, but it bears thinking about — if you know you’re incapable of building a good PCB mill in a reasonable period of time, you might save yourself a lot of pain and lost weekends by just ordering PCBs elsewhere. [Timo] was fairly confident however that the build would be able to churn out some usable boards, however, and got to work.

The build is meant to be accessible to the average hacker who wants one. The laser cut & 3D printed parts are readily available these days thanks to online services that can manufacture for those who don’t have the machines at home. [Timo] uses a rotary multitool for a spindle, a common choice for a budget CNC build.

With the hardware complete, [Timo] has spent time working on optimising the software side of things. Through careful optimisation of the G-Code, [Timo] has been able to improve performance and reduce stress on the tooling. It’s not enough to just build a good mill — you’ve got to have your G-Code squared away as well.

Overall, the results speak for themselves. The boards don’t suck; the mill can do traces down to 8 mil, and even drill the holes. We’d love to have one on the workbench when busting out some quick prototypes. For another take on the home-built PCB mill, why not check out this snap-together version?

PCB Solder Pad Repair & Cleanup

What do you do when your motherboard is covered in electrolytic grime, has damaged pads and traces that are falling apart? You call [RetroGameModz] to work their magic with epoxy and solder.

While this video is a bit old, involved repair videos never go out of style. What makes this video really special is that it breaks from the common trend of “watch me solder in silence” (or it’s close cousin, “watch me solder to loud music”). Instead, [RetroGameModz] walks you through what they’re doing, step by step in their repair of a motherboard. And boy do they have their work cut out for them: the motherboard they’re working on has definitely seen better days. Specifically, it was better before corrosion from a leaking electrolytic capacitor and the well-meaning touch of its owner.

After a quick review of the damage, all of the components are removed from the battle zone. Then the cleaning begins, taking special precautions not to rip pads up. After everything’s cleaned up, things get really interesting. [RetroGameModz] starts to make their own pads from raw copper using the old pads as templates to replace the missing ones on the motherboard. After a bit of epoxy, it’s hard to tell that the pads were handmade, they fit in so well.

This epoxy trick is also used to deal with some heavily damaged traces, cool! During this repair, [RetroGameModz] used an epoxy that is heat resistant up to 315°C for 60 seconds. If you ever find any kind of epoxy on the market that is specified to be heat resistant up to more than 315°C, [RetroGameModz] would be quite happy if you could leave some info in the comment section, as they’ve found high-temperature epoxies quite difficult to source.

This goes to show that some repairs really should be done by professionals. [RetroGameModz] surely agrees, stating that “If you are not a repair technician and your motherboard has stopped working, it would be in the best of your own interest not to attempt a repair that you really cannot handle.” Good advice. But, we can never resist trying to fix things ourselves before handing things off to the more experienced. Call it a vice, or a virtue; we’ll call it fun.

What do you think? Are there some repairs you rely on technicians for? Or do you fix everything yourself? Let us know in the comments.

Continue reading “PCB Solder Pad Repair & Cleanup”

The Almost Working, DIY Underwater Scooter Pistol Thing

A dive scooter, or a submersible ducted fan used by divers, is not a new invention. They’ve been around for years, used by everyone from the villain of the week on Miami Vice to professional divers. Now that high-capacity Lipos, 3D printers, and powerful brushless motors are cheap, it was only a matter of time before someone built a DIY dive scooter. [Peter Sripol] is the man, and he also built a dive scooter, underwater pistol thing.

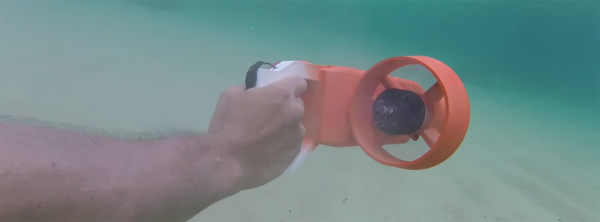
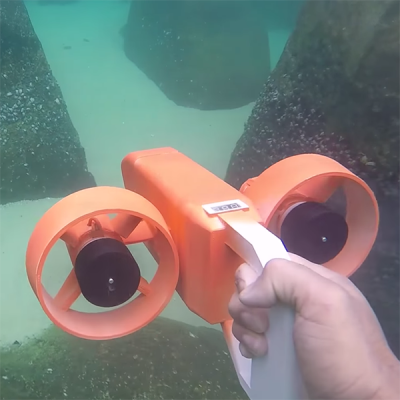
[Peter]’s dive scooter is almost entirely 3D printed. That includes the ducted fans/thrusters. The electronics are what you would expect from a grab bag from Hobby King and include two 2530 sized 400Kv motors from Avroto. These are massive motors made for massive quadcopters but they do seem to work just as well pulling a human underwater.

While this dive scooter was a marginal success, there were a few problems [Peter] had to work through. These were the lowest pitch propellers [Peter] has ever printed. To be fair, most of the props [Peter] has printed were used in air, not a fluid that’s hundreds of times denser. The electronics held up very well, considering the bath in salt water.

You can check out [Peter]’s video build and demo below.

Continue reading “The Almost Working, DIY Underwater Scooter Pistol Thing”