Will MiSTer Fool You Into Learning FPGAs?

What’s the killer app for FPGAs? For some people, the allure is the ultra-high data throughput for parallelizable tasks, which can enable some pretty gnarly projects. But what if you’re just starting out? How about 1980s style video games?

The MiSTer FPGA project created a bit of FPGA hardware that makes it easy to build essentially any old school video game or computer platform. That’s a massive clean slate. Of course, you can simply download someone else’s Atari ST or Commodore 64 setup and load it up, but if you want to learn FPGAs while recreating old-school video game machines, you’re going to want to get your hands dirty.

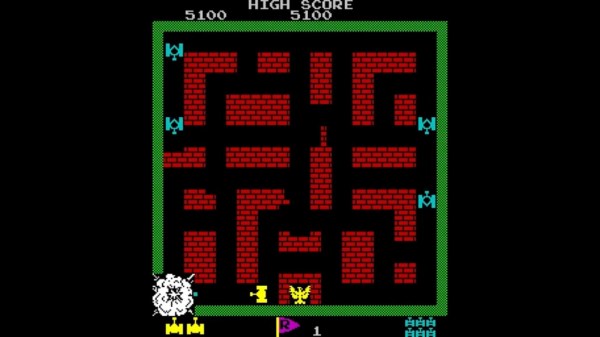
[Mister Retro Wolf] started up a video series last winter (trailer embedded below) where he’s embarked on a project to recreate a classic video game machine from the ground up using the MiSTer FPGA platform. In particular, he’s going to recreate the Namco Tank Battalion arcade game, from the schematics, in Verilog.

This is literally building a 6502-based video game machine from scratch (in gateware), so if you’re interested in retrocomputing or FPGAs, you’ll have something to learn here. He’s gotten through the CPU, screen, tilemap graphics, and memory so far, but it’s not done yet. To follow along, get yourself some hardware and you can probably catch up.

We’ve covered the MiSTer FPGA project before, of course, because we think it’s cool. And if a video game arcade machine is going to be your gateway drug into the seedy world of programmable gates, then so be it.

Continue reading “Will MiSTer Fool You Into Learning FPGAs?”

FPGA Starter Videos To Help Soften That Learning Curve

Digi-Key have been producing YouTube videos for a number of years now, and if you weren’t aware, they’re definitely worthy of some viewing time. The playlist we’re highlighting here is a pretty good introduction to FPGAs, specifically those supported by open source tools, with low cost hardware. If you’ve always wanted to get into hacking FPGA platforms, but don’t know where to start, this is going to be a big help. After first covering what an FPGA is and is not, and why you want to use one, [Shawn Hymel] dives in to the toolchain.

We’re really lucky that the bitstream for the Lattice iCE40 was reverse engineered by the super talented Claire (née Clifford) Wolf (AMP hour interview) which enabled the project ICEstorm toolchain to be created. Leveraging Yosys for synthesis and logic mapping, Icarus verilog coupled with GTKwave for simulation, netpnr for place and route and finally the project ICEstorm bitstream tools for packing into iCE40 format and loading onto the hardware. The whole toolchain flow is managed by APIO for simplicity, that is, provided your FPGA board is supported!

Of course, [Shawn] is using the low cost (for an FPGA) ICEStick by Lattice for this tutorial series, and they’re currently hard to get (you know why by now!) but, there are many other boards you could use. If you want to play with applications coupling a ARM micro to an FPGA, then the excellent BlackIce Mx is an option, but there are many other boards now with an decent micro nestled next to an FPGA and a few peripherals for convenience.

We should mention here, that project ICEstorm and the iCE40 is not the only show in town. Project Trellis has had our eye for a while, which targets the more complex Lattice ECP5 device. Yosys and friends do support more architectures, but the available flows usually require at least some vendor tool support at this time (looking straight at you, Xilinx) but as more devices get decoded, the open source tools will grow, and we will bring you that news!

What’s nice about this Digi-Key YT series, is that it doesn’t just cover the basic toolchain flow, then drop you in at the deep end of a big learning curve. There are videos covering subjects such as finite state machines (FSMs), test-benching and simulation, using embedded (block) memories, PLLs, harder subjects like dealing with metastability and clock-domain crossing (OK, he covers one technique – there’s more than one way to skin that particular cat) before finally looking at soft cores like the RISC-V. Lots to learn, and pretty well executed if you ask us! A Github version is available, for those who can’t stand watching the videos!

Continue reading “FPGA Starter Videos To Help Soften That Learning Curve”

DE10-Lite Dev Board / Game Controller

DE10-Lite-Ful FPGA Dev Board Hack Plays The 1981 Classic Defender

We’re not sure what the assignment was, but the results of [Garret Carter]’s homework for his Digital System Design class at Tennessee Tech couldn’t help but capture our attention. Below the break you can see what [Garrett] describes as a “simplified stylized version” of the 1981 arcade hit “Defender”.

With the goal of keeping the price low but keeping performance as high as possible, [Garrett] set forth to program the DE10-Lite FPGA development board in VHDL. The results are convincing, and while not perfect, came in under budget.

The DE10-Lite board gave [Garrett] the opportunity to get even more creative, using the dev board’s onboard switches, buttons, 7-segment LED’s and accelerometer to full effect. In this case, the dev board is not only the game, but also the controller and status display. A very neat hack indeed!

If you want to make your own, you can get the full project details at [Garrett]’s Github page. And [Garrett], we don’t know what marks your professor will give, but we give you an A+, would definitely play again.

While FPGA development boards aren’t necessarily inexpensive, our own Jenny List shows where you might be able to find a used but workable FPGA board for a fraction of the cost, If you know where to look.

Continue reading “DE10-Lite-Ful FPGA Dev Board Hack Plays The 1981 Classic Defender”

6502 Goes FPGA (Again)

While there has been no shortage of FPGA-based recreations of classic processors, we always enjoy seeing a new approach. Last month [Some Assembly Required] took on the challenge to recreate a classic computer from the ground up and started with a 6502 implementation in Verilog. You can see in the second video below that he’s made good progress and there are apparently more videos to come.

The ROL instruction is the subject of the second video. We liked the approach of looking at what the instruction does and how many cycles it takes on different variants It is always good to make sure you know exactly what you are trying to accomplish before you get started.

Continue reading “6502 Goes FPGA (Again)”

Capacitive Touch Controller For FPGAs

Most projects that interface with the real world need some sort of input device. Obviously this article is being written from a standardized “human interface device” but when the computers become smaller the problem can get more complicated. We can’t hook up a USB keyboard to every microcontroller since we often only need a few buttons, but even buttons can be a little bit too cumbersome for some applications. For something even simpler, we would like to turn your attention to capacitive touch controllers.

Granted, these devices are really only simpler from a hardware perspective. Rather than a switch that can be prone to failure either when its moving parts break or its contacts become corroded, a capacitive touch button only needs a certain conductive area on something like a PCB, along with a few passive components, to work. The real difficulty is in the software, so this project aims to make it simpler to bring these sort of devices to any FPGA that needs some sort of interface like this. It can operate in stand-alone mode or in a custom user interface, and was written to be platform-independent in VHDL without the need for any dependencies or macros.

The project’s page goes into a great amount of detail on how capacitive touch sensors like these work in general, and describes the operation of this specific code as well. Everything is open source, so it’s ready to be put to work right away. If you need capacitive touch capabilities on something like a microcontroller, though, take a look at this tiny Atmel-powered musical instrument instead.

A Game Boy connected to a monitor while playing Super Mario Land 2

FPGA Boards Add VGA And HDMI Interfaces To The Original Game Boy

The classic Game Boy remains a firm favorite in the realm of retrocomputing. Revolutionary as it was at the time, by today’s standards its display is rather primitive, with no backlight and a usable area measuring only 47 mm x 44 mm. [Martoni] figured out a way to solve this, by developing GbVGA and GbHdmi, two projects that enable the Game Boy to connect to an external monitor. This way, you can play Super Mario Land without straining your eyes, and we can also image potential uses for those who stream their gameplay online.

A Game Boy connected to a monitor while playing Super Mario Land 2 
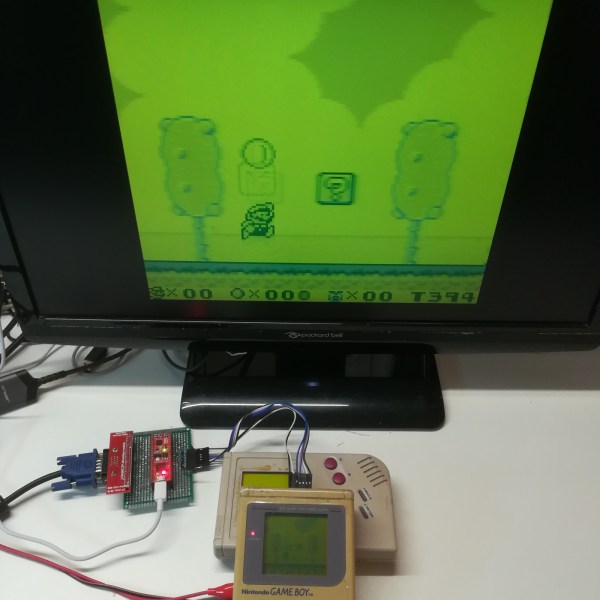
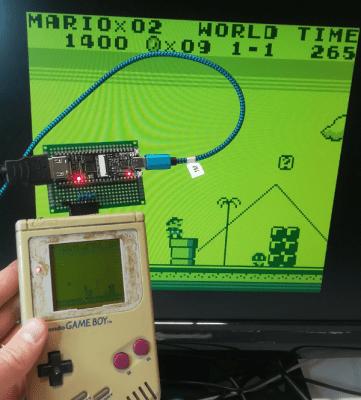
Getting the image data out of the Game Boy is surprisingly straightforward, and has been done a few times before. Basically, the connection between the CPU and the LCD screen is a serial interface with a 4 MHz clock, two data lines and two sync lines. [Martoni] uses pin headers sticking out of the Game Boy’s plastic case to connect these to a small FPGA board. The board in question is a Fireant for the VGA version and a Tang Nano 4K for the HMDI model. In either case the FPGA reads out each frame from the Game Boy’s LCD interface and draws the extracted image onto the monitor, using the same four shades of green as used on the original screen.

[Martoni] states that the ultimate goal of these projects is to make a Switch-like docking station for the original Game Boy, which is definitely something we’re looking forward to. Although adding external monitors to the Game Boy is not entirely new, we like the simplicity of this implementation and the fact that anyone can improve upon it thanks to the full source code being available. Similar hacks have been performed on the newer Game Boy Pocket and Game Boy Advance as well.

FPGA Retrocomputer: Return To Moncky

Part of the reason that retrocomputers are still so popular despite their obsolescence is that it’s possible to understand the entire inner workings of a computer like this, from the transistors all the way up to the software. Comparatively, it will likely be a long time (if ever) before anyone is building a modern computer from discrete components. To illustrate this point, plenty of 8-bit computers are available to either restore from original 80s hardware or to build from kits. And if you’d like to get even deeper into the weeds you can design your own computer including the instruction set completely from the ground up using an FPGA.

This project, called the Moncky project, is a step above the usual 8-bit computer builds as it is actually a 16-bit computer. It is built around an Arty Spartan-7 FPGA dev board running around 20 MHz and has access to 2 x 128 kB dual-port RAM for memory. To access the outside world there is a VGA output, PS/2 capability, SPI, and uses an SD card as a hard drive. This project really shines in the software, though, as the project creator [Kris Demuynck] builds everything from scratch in order to illustrate how everything works for educational purposes, and is currently working on implementing a C compiler to make programming the computer easier.

All of the project files, as well as all of the code, are available on the project’s GitHub page if you’d like to follow along or build on this homebrew 16-bit computer. It’s actually the third iteration of this computer, with the Moncky-1 and Moncky-2 being used to develop the more basic building blocks for this computer. While it’s not the first 16-bit computer we’ve seen implemented on an FPGA, it is one of the few that builds its own RISC instruction set and associated software rather than cloning a known existing processor. We’ve also seen some interesting x86 implementations on an FPGA as well.

Thanks to [koen-ieee] for the tip!