Adding An Audio Jack To Classic Headphones Is A Nifty Upgrade

One of the most common ways to junk a pair of headphones is to damage the cord. Obviously, the lead can be repaired, but it involves busting out the soldering iron and can be tedious when dealing with the tiny little coated wires.

It does involve soldering, but ideally, you only have to do it once.

[mauriziomiscio.mm] has a way of dealing with the problem in a once-and-done fashion, by installing a female audio jack into his vintage headphones. The benefit is that if the cable is damaged, it can simply be unplugged and replaced with a new one, and is commonly seen on headphones from companies like KRK. 

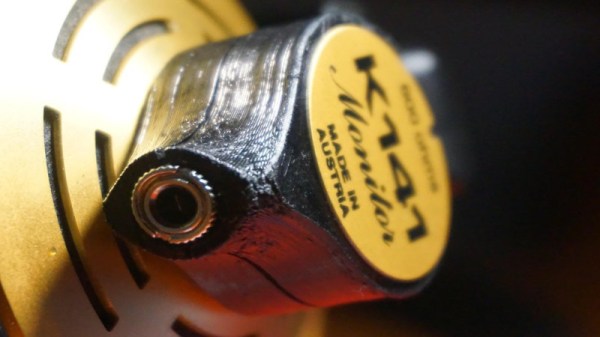
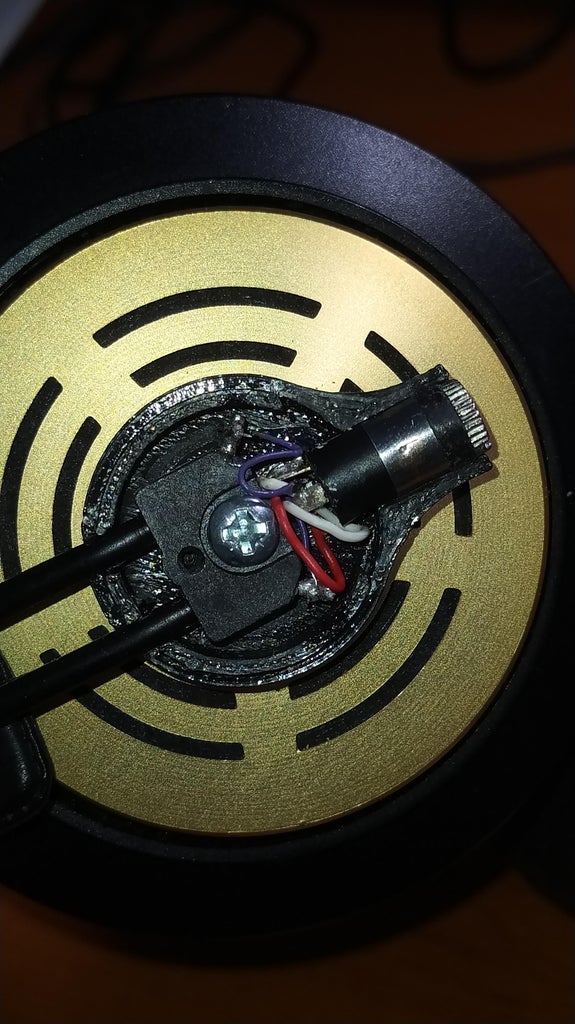
The hack is simple when applied to a classic pair of AKG K141 headphones. The little plastic casing on one earpiece is popped off, and replaced with a 3D-printed version that stoutly holds a female TRS jack in place. This can then be soldered up to the wiring inside the headphones.

With everything assembled, the headphones can now use an easily-replaceable cable, and one needn’t worry about having to bust out the soldering iron if the lead is damaged in future. It’s a particularly useful hack for those who use their headphones on the road, always throwing them into backpacks between gigs.

If that’s not hardcore enough, consider attaching a headphone jack to an old 8-track player for the most ridiculous Walkman you can imagine. If you’ve been working on your own portable audio hacks, be sure to drop us a line!

Hidden Shaft And Gears Make This Hollow Clock Go

[shiura]’s Hollow Clock 3 is a fantastic 3D printed take on a clock movement that uses a hidden mechanism to pull off its unusual operation. The Hollow Clock has no face, just an open space with an hour and minute hand that move as expected. Only the longer minute hand has any apparent connection to the rest of the clock body, with the rest appearing to hang in the air.

Hidden shaft and gearing.

This is how it works: the longer minute hand is connected to the white ring, and it is in fact this ring that rotates, taking the attached minute hand with it. But how does the hour hand remain stationary while the rest turns? A concealed shaft and gear assembly takes care of that. For every full rotation of the minute hand (actually the white ring), the hour hand is only permitted a relative advancement of 1/12th of a rotation. It’s a clever system, and you can see the insides in the photo here.

Unlike clock projects that showcase their inner workings, the Hollow Clock works hard to conceal them. If you decide to make your own, [shiura] warns to expect to do a bit of tweaking to fine-tune the amount of friction between moving parts so that operation is smooth, and provides useful guidelines for doing so. Take a few minutes to watch the clock in action in the video, embedded below.

Continue reading “Hidden Shaft And Gears Make This Hollow Clock Go”

Modernizing The Game Boy Advance

[Zekfoo] decided to honor the Game Boy Advance’s 20th birthday by redesigning it at the circuit level to give it a more modern twist. To quote the project readme:

I really want to like the Game Boy Advance. Growing up with a GBA SP, I was spoiled by its clicky buttons, rechargeable battery, and illuminated screen. When I finally got my hands on an original GBA, I couldn’t be more disappointed by the stark difference in feel and function. While today’s retro modding scene has produced many improvements for the GBA (referred to from now on as its codename AGB), the console still has many quirks that simple modding hasn’t been able to fix, but that can be addressed in a circuit redesign.

The four-layer board looks great and there a number of modernized features.

For example, this new version is rechargeable. The unit has proper switches, which most people will prefer over the mushy membrane switches. There’s also a screen light and an improved power supply that helps produce cleaner audio, among other things.

We were disappointed that the repository only has images and audio files — if you want to duplicate the build you are on your own. He’s also done a clone of the Game Boy Color, but — alas — no design files there either. Still, a couple of good-looking projects.

We always enjoy seeing old products given a facelift. If you think you just need an emulator, they sometimes don’t exactly mimic real hardware.

DE10-Lite Dev Board / Game Controller

DE10-Lite-Ful FPGA Dev Board Hack Plays The 1981 Classic Defender

We’re not sure what the assignment was, but the results of [Garret Carter]’s homework for his Digital System Design class at Tennessee Tech couldn’t help but capture our attention. Below the break you can see what [Garrett] describes as a “simplified stylized version” of the 1981 arcade hit “Defender”.

With the goal of keeping the price low but keeping performance as high as possible, [Garrett] set forth to program the DE10-Lite FPGA development board in VHDL. The results are convincing, and while not perfect, came in under budget.

The DE10-Lite board gave [Garrett] the opportunity to get even more creative, using the dev board’s onboard switches, buttons, 7-segment LED’s and accelerometer to full effect. In this case, the dev board is not only the game, but also the controller and status display. A very neat hack indeed!

If you want to make your own, you can get the full project details at [Garrett]’s Github page. And [Garrett], we don’t know what marks your professor will give, but we give you an A+, would definitely play again.

While FPGA development boards aren’t necessarily inexpensive, our own Jenny List shows where you might be able to find a used but workable FPGA board for a fraction of the cost, If you know where to look.

Continue reading “DE10-Lite-Ful FPGA Dev Board Hack Plays The 1981 Classic Defender”

Advanced PCB Graphics With KiCAD 6 And Inkscape

There are many, many video tutorials about designing the functional side of PCBs, giving you tips on schematic construction, and layout tips. What is a little harder to find are tutorials on the graphical aspects, covering the process from creating artworks and how you can drive the tools to get them looking good on a PCB, leveraging the silkscreen, solder and copper layers to maximum effect. [Stuart Patterson] presents his guide for Advanced PCB Graphics in KiCAD 6.0 and Inkscape, (Video, embedded below) to help you on your way to that cool looking PCB build.

Silkscreen layers in yellow, solder mask opening in red

The first step is to get your bitmap, whether you create it yourself, or download it, and trace it into a set of vectors using the Inkscape ‘trace bitmap’ tool. If you started with an SVG or similar vector shape, then you can skip that stage.

Next simply create a PCB outline shape by deleting all the details that aren’t part of the outline. A little scaling here and there to get the dimensions correct and you’re done with the first part. [Stuart] has an earlier video showing that process.

The usability improvements in KiCAD 6.0 are many, but one greatly demanded feature is the ability to group objects, just like you do in Inkscape and any other vector graphics tool for that matter. That means you can simply import that SVG outline into the Edge.Cuts PCB layer and all the curves will be nicely tied together. Next you select the details you want for the silkscreen layer, solder mask removal layers and any non-circuit copper. In Inkscape it would be wise to use the layers feature to assign the different material types to a uniquely named layer, so they can be hidden for exporting. This allows you to handle silk, mask and copper PNG exports from a single master file, in addition to any vector details for outline, slots and holes.

Once you have PNG bitmap exports for the silk, mask etc. you need to create a footprint inside a board-specific library, using the KiCAD image converter tool. It was interesting to note that you can export a new image footprint from the tool and paste it straight into the footprint editor, and tweak all the visibility details at the same time. That will save some time and effort for sure. Anyway, we hope this little tutorial from [Stuart] helps, and we will be sure to bring you plenty more in the coming months.

Need some more help with KiCAD? Checkout this tutorial, and if you want a bit more power from the tool, you need some action plugins!

Continue reading “Advanced PCB Graphics With KiCAD 6 And Inkscape”

The Year Of Owning It

Talking over the year in review on the Podcast, Tom Nardi and I were brainstorming what we thought was the single overarching trend in 2021, and we came up with many different topics: victories in the right to repair, increasingly dystopian service contracts, a flourishing of cyberdecks, and even greater prevalence of reverse engineering style hacks. And then we realized: they are all different faces of the same beast — people just want to own the devices that they own.

Like Dr. Jekyll and Mr. Hyde, our modern Internet-connected-everythings have two sides. On one side, we get so much additional functionality from having everything on the net. But on the other, if your car is always connected, it gives Toyota a means to make you pay a monthly fee to use a car fob, and if you have to use Cricut’s free online service to upload designs to the cutter, they can suddenly decide to start charging you. It allows Samsung to not only spy on whatever you’re currently watching on your smart TV, but to also brick it if they want to. More and more, we don’t actually own (in the sense of control) the devices that we own (in the sense of having purchased).

We don’t have to take it lying down. On the one hand, consumer protest made Cricut walk back their plans, and may do the same with Toyota. We can achieve a lot, collectively, by just talking about our grievances, and letting the firms in question know how we feel — naturally also with our wallets. But as hackers and all-around techie types, we can do even more. When something is broken because of a bad service, we can often fix it with firmware or by standing up our own version of the service. We can pwn them.

But there’s even more to the cyberdeck and the extreme DIY movements of the last few years than just the defense against lock-in or the liberating of hardware. There’s also the pride of truly owning something because you made it. Not just owning it because you bought it, or owning it because you control it, but owning it because you understand it and because you gave birth to it.

Whichever way you’re into owning your own, I think that’s the single overarching trend of 2021 — both on the positive and proactive side and the negative and reactive. Talking about it, reverse engineering it, or building it yourself, 2021 was the year of owning it.

Baby Steps Toward DIY Autonomous Driving: VW Golf Edition

Nice thermal design, but conformal coating and no ID marks make this tough to reverse engineer

[Willem Melching] owns a 2010 Volkswagen Golf – a very common vehicle in Europe – and noticed that whilst the electronic steering rack supports the usual Lane Keep Assist (LKAS) system, and would be theoretically capable of operating in a far more advanced configuration using openpilot, there were some shortcomings in VW’s implementation which means that it would not function for long enough to make it viable. Being very interested in and clearly extremely capable at reverse engineering car ECUs and hacking them into submission, [Willem] set about documenting his journey to unlocking openpilot support for his own vehicle.

And what a journey it was! The four-part blog series is beautifully written, showing every gory detail and all tools used along the way. The first part shows the Electronic Power Steering (EPS) ECU from a 2010 Volkswagen Golf Mk6 module (which rides on the back of the three-phase steering rack motor) being cracked open to reveal an interesting multi-chip module approach, with bare die directly bonded to a pair of substrate PCBs, that are in turn, bonded to the back of the motor casing, presumably for heat dissipation reasons. Clever design, but frustrating at the same time as this makes part identification somewhat tricker!

Entropy less the 1.0, and zero sections indicate no encryption applied

[Willem] uses a variety of tools and tricks to power up and sniff the ECU traffic on the CAN bus, when hooked up to a SAE J2534-compliant debug tool, eventually determining it speaks the VW-specific TP2.0 CAN bus protocol, and managed to grab enough traffic to check that it was possible to use the standard KWP2000 diagnostic protocol to access some interesting data. Next was a very deep dive into reverse engineering update images found online, by first making some trivial XOR operations, then looking at an entropy plot of the file using Binwalk to determine if he really did have code, and if it was encrypted or not, After running cpu_rec, it was determined the CPU was a Renesas V850. Then the real work started – loading the image into Ghidra to start making some guesses of the architecture of the code, to work out what needed patching to make the desired changes. In the final part of the series, [Willem] extracts and uses the bootloader procedure to partially patch the code configuration area of his vehicle and unlocks the goal he was aiming at – remote control of his steering. (OK, the real goal was running openpilot.)

In our opinion, this is a very interesting, if long, read showing a fascinating subject expertly executed. But we do want to stress, that the vehicular EPS module is an ASIL-D safety tested device, so any hacks you do to a road-going vehicle will most definitely void your insurance (not to mention your warranty) if discovered in the event of a claim.

Older ECUs are a bit easier to hack, if you can pull the EPROM, and people out there are producing modules for allsorts of vehicular hacking. So plenty to tinker with!