Lamp’s Ghostly Glow Benefits From Happy Mistake

[cyborgworkshop]’s youngest sister is a fan of a character in a popular video game (Thresh from League of Legends) who wields an iconic lantern with a mystical green glow. He resolved to make a replica of that lantern. Perhaps as a gift for the cherished family member? Certainly not! [cyborgworkshop]’s goal was the simple joy of having something “to lord over her.” Ah, ain’t siblings grand?

Why the glow powder turned pink in clear varnish is a bit of a mystery.

There were some interesting things learned in the process of making the ghostly green lamp. The first part of the build log is all about post-processing the lantern model, which was 3D printed at a chunky 0.48 mm layer height, but the rest is about getting the ghostly green glow to come out the way it did. [cyborgworkshop] used both glow in the dark paint and glow in the dark powder to really make the object pop, but the process involved some trial and error. Originally he mixed the glow powder into some clear varnish, and despite the mixture turning pink for some mysterious reason, a small sample spot appeared to turn out fine. However, after applying to the lantern and waiting, the varnish remained goopy and the glow powder settled out of the mixture. He ended up having to remove it as best he could and tried a heavy application of the glow paint instead. This ended up being a real blessing in disguise, because the combination resulted in a gritty stone-like texture that glowed brightly! As [cyborgworkshop] observes, sometimes mistakes end up being the highlight of a piece.

After more glow powder for highlighting, the finishing touches were a thin black wash to mute the powder’s whiteness, and a clear coat. The result looks great and a short video is embedded below. Oh, and if anyone has an idea why glow powder would turn pink when mixed into varnish, let us know in the comments!

Continue reading “Lamp’s Ghostly Glow Benefits From Happy Mistake”

Laser Levitation With Scrap Parts

After a year away from YouTube, the ever-energetic [Styropyro] has returned with whiteboard in hand to remind us just how little we actually know about lasers. In the last month he’s really hit the ground running with plenty of new content, but one video of his particularly stands out: a practical demonstration of laser levitation. Even better, unlike most of his projects, it looks like we can replicate this one without killing ourselves or burning our house down!

For those unaware, laser levitation is probably as close as we’ll get to Star Trek-style tractor beams in our lifetimes. In fact, the NASA Innovative Advanced Concepts program has been examining using the technology for capturing small particles in space, since it would allow sample collection without the risk of physical contamination. While the demonstration [Styropyro] performs lacks the “tractor” part of the equation (in other word’s, there’s no way to move the particle along the length of the beam) it does make us hopeful that this type of technology is not completely outside the reach of our home labs.

The trick seems to be with the focus of the laser beam itself. Your average laser pointer just doesn’t have the appropriate beam for this kind of work, but with a diode pulled from a DVD burner and a driver circuit made from parts out of the junk bin, the effect can be demonstrated very easily as long as you can keep the air in the room extremely still. Of course, what you’re trying to pick up is also very important, [Styropyro] has found that synthetic diamond powder works exceptionally well for this experiment. At about $1.60 a gram, it won’t break the bank either.

So how does it work? With a few trips to the aforementioned white board, Professor Pyro explains that the effect we’re seeing is actually electromagnetic. If the particle you want to levitate is small enough it will become polarized by the light, which is in itself an electromagnetic wave. Once you’ve got your mind wrapped around that, it logically follows that the levitating particle will experience the Lorentz force. Long story short, the particle is suspended in the air for the same reason that a projectile is ejected from a rail gun: if you’ve got enough power and the mass of the object is low enough, there will be an observable force.

We’ve been covering the work of [Styropyro] for years now, and are glad to see him back on YouTube creating new content and terrifying a new generation of viewers. Between this and the return of [Jeri Ellsworth], it’s like we’re experiencing a YouTube hacker Renaissance.

Continue reading “Laser Levitation With Scrap Parts”

CastAR Shuts Doors

Polygon reports CastAR is no more.

CastAR is the brainchild of renaissance woman [Jeri Ellsworth], who was hired by Valve to work on what would eventually become SteamVR. Valve let [Jeri] go, but allowed her to take her invention with her. [Jeri] founded a new company, Technical Illusions, with [Rick Johnson] and over the past few years the CastAR has appeared everywhere from Maker Faires to venues better focused towards innovative technologies.

In 2013, Technical Illusions got its start with a hugely successful Kickstarter, netting just north of one million dollars. This success drew the attention of investors and eventually led to a funding round of $15 million. With this success, Technical Illusions decided to refund the backers of its Kickstarter.

We’ve taken a look a CastAR in the past, and it’s something you can only experience first-hand. Unlike the Oculus, Google Cardboard, or any of the other VR plays companies are coming out with, CastAR is an augmented reality system that puts computer-generated objects in a real, physical setting. Any comparison between CastAR and a VR system is incomplete; these are entirely different systems with entirely different use cases. Think of it as the ultimate table top game, or the coolest D&D game you could possibly imagine.

The Fab Lab Next Door: DIY Semiconductors

You think you’ve got it going on because you can wire up some eBay modules and make some LEDs blink, or because you designed your own PCB, or maybe even because you’re an RF wizard. Then you see that someone is fabricating semiconductors at home, and you realize there’s always another mountain to climb.

We were mesmerized when we first saw [Sam Zeloof]’s awesome garage-turned-semiconductor fab lab. He says he’s only been acquiring equipment since October of 2016, but in that short time he’s built quite an impressive array of gear; a spin-coating centrifuge, furnaces, tons of lab supplies and toxic chemicals, a turbomolecular vacuum pump, and a vacuum chamber that looks like something from a CERN lab.

[Sam]’s goal is to get set up for thin-film deposition so he can make integrated circuits, but with what he has on hand he’s managed to build a few diodes, some photovoltaic cells, and a couple of MOSFETs. He’s not growing silicon crystals and making his own wafers — yet — but relies on eBay to supply his wafers. The video below is a longish intro to [Sam]’s methods, and his YouTube channel has a video tour of his fab and a few videos on making specific devices.

[Sam] credits [Jeri Ellsworth]’s DIY semiconductor efforts, which we’ve covered before, as inspiration for his fab, and we’re going to be watching to see where he takes it from here. For now, though, we’d better boost the aspiration level of our future projects.

Continue reading “The Fab Lab Next Door: DIY Semiconductors”

1 KB Challenge: And The Winners Are…

The 1 kB Challenge deadline has come and gone. The judges have done their work, and we’re ready to announce the winners. Before you jump down to find out who won, I’d like to take a moment to say thanks to everyone who participated. We had some incredible entries. To say that judging was hard is quite an understatement. Even [Eben Upton], father of the Raspberry Pi got in on the action. He created a new helicopter game for the classic BBC Micro. Look for writeups on the winners and many of the other entries in the coming weeks.

Grand Prize

brainfck
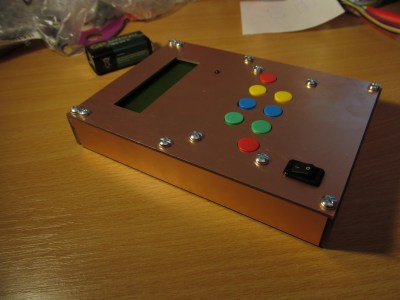
The grand prize goes to [Jaromir Sukuba] for Brainf*cktor. [Jaromir] went above and beyond this time. He created a computer which can be programmed in everyone’s favorite esoteric programming language. Brainf*cktor uses 1019 bytes of program memory in [Jaromir’s] PIC18F26K22. You can write, execute and edit programs. [Jaromir] ran into a bit of a problem with his LCD. The character tables would have thrown him over the 1 kB limit. Not a problem – he designed his own compressed character set, which is included in the 1019 bytes mentioned above. All the clever software takes physical form with a homemade PCB, and a case built from blank PCB material. Best of all, [Jaromir] has explained his software tricks, as well as included a full build log for anyone who wants to replicate his project. All that hard work will be rewarded with a Digi-Comp II kit from EMSL.

First Prize

mos
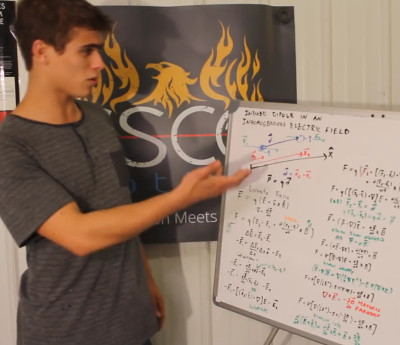
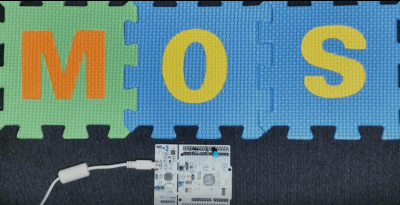
First prize goes to [Dumitru Stama] with M0S – CortexM0 RTOS in 1024 bytes. Operating systems are complex beasts. Many of our readers have toyed with the Linux Kernel. But writing a real-time OS from scratch? That’s quite an undertaking.  [Dumitru] didn’t shy away from the challenge. He designed a Real-Time Operating System (RTOS) for ARM processors, written completely in ARM thumb assembly instructions. This is no bare-bones executive. M0S has a rich list of features, including preemptive task scheduling, mutexes, and inter-process communication. [Dumitru] even gave us memory allocation with an implementation of malloc() and free(). The OS was demonstrated with a NUCLEO-F072RB board from ST-Micro.

[Dumitru] didn’t just drop a GitHub link and run. He documented M0S with seven project logs and a 37-minute long video. The video uses electronic whiteboard drawings to clearly explain all the internal workings of the operating system, as well as how to use it.

[Dumitru] is the proud new owner of a Maker Select 3D printer V2!

Second Prize

1klaser
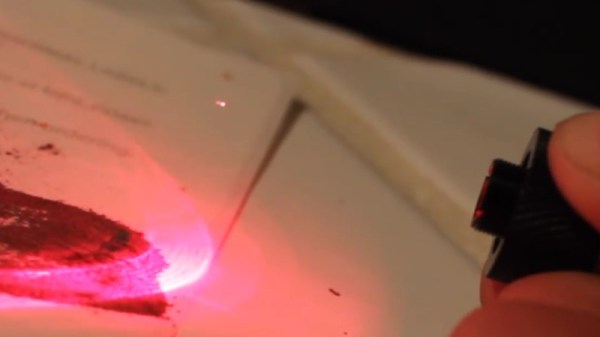
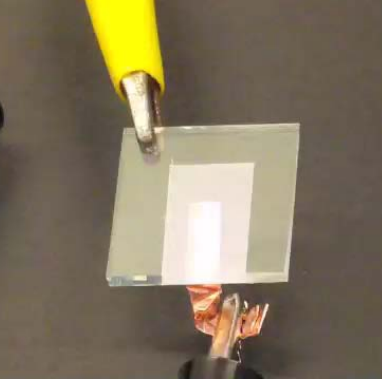
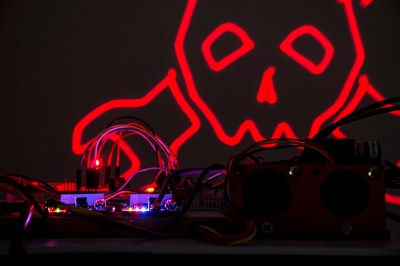
Second prize goes to [Cyrille Gindreau] with 1K Challange Laser. Vector lasers generally take lots of memory. You have to manage galvanometers, laser drive, and perform all the magic it takes to convert a set of vectors to lines drawn in space. The project uses 912 bytes of program and initialized data memory to command an MSP430 to draw an image.

Proving that flattery will get you everywhere, [Cyrille] picked the Hackaday logo as the subject. The Jolly Wrencher is not exactly simple to convert to vector format, though. It took some careful optimizations to come up with an image that fit within 1 kB. [Cyrille] wins a Bulbdial Clock kit from EMSL.

Third Prize

tinygames
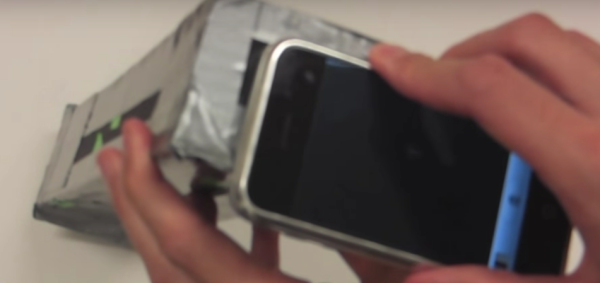
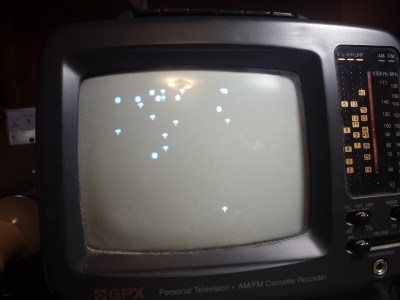
Third prize goes to [Mark Sherman] with tinygames. Video games have been around for awhile, but they are never quite this small. [Mark] coaxed the minuscule Atmel ATtiny84 to play Centipede with only 1024 bytes of program memory. Even the BOM is kept small, with just a few support components. Control is handled by an Atari 2600 compatible joystick. Video is black and white NTSC, which is demonstrated on a period accurate CRT. [Mark] generates his video by racing the electron beam, exactly the same way the Atari 2600 did it.

[Mark] will take home a Blinkytile kit from Blinkinlabs.

Final thoughts

First of all, I’d like to thank the judges. Our own [Jenny List], [Gerrit Coetzee], [Pedro Umbelino], [Bil Herd], and [Brian Benchoff] worked hard with me in judging this contest. I’d also like to thank our community for creating some amazing projects. The contest may be over, but these projects are now out there for others to build, enjoy, and learn from.

I’ve wanted to organize this contest since [Jeri Ellsworth] and [Chris Gammell] took on the 555 contest way back in 2011. The problem is creating a set of rules that would be relatively fair to every architecture. I think 133 entries to this contest proves that we found a very fair set of constraints. It is safe to say this won’t be the last 1 kB Challenge here at Hackaday, so if you have ideas for future editions, share them in the comments!

Bring Doping, Microfluidics, Photovoltaics, And More Into The Home

Can you make a spectrometer for your home lab all from materials you have sitting around? We might not believe it from a less credible source, but this MIT course does indeed build a spectrometer from foam board using two razor blades as the silt cover and a writable CD as the diffraction grating. The coolest part is removing the metal backing of the CD.

mit_experiments_thumbHackaday reader [gratian] tipped us off about the course available from MIT courseware called Nanomaker. It boils down some fairly complicated experiments to the kind one can do in the home lab without involving thousands of dollars of lab equipment. The whole point is to demystify what we think of as complicated devices and topics surrounding photovoltaics, organic photovoltaics, piezoelectricity and thermoelectricity.


Spectrometers are used to analyze the wavelengths of a light source. Now that you have a measurement tool in hand it’s time to build and experiment with some light sources of your own. Here you can see an LED that is the topic of one of the course labs.

If you have a bit of background in chemistry this is a good step-by-step guide for getting into these types of experiments at home. It reminds us of some of the really cool stuff [Jeri Ellsworth] was doing in her garage lab, like making her own EL panels.

Continue reading “Bring Doping, Microfluidics, Photovoltaics, And More Into The Home”

Behold: Valve’s VR And AR Prototypes

Just in case anyone secretly had the idea that Valve Software’s VR and other hardware somehow sprang fully-formed from a lab, here are some great photos and video of early prototypes, and interviews with the people who made them. Some of the hardware is quite raw-looking, some of it is recognizable, and some are from directions that were explored but went nowhere, but it’s all fascinating.

ValvePrototypeVIsit-172-Medium
An early AR prototype that worked like looking through a tube into another world.

The accompanying video (embedded below) has some great background and stories about the research process, which began with a mandate to explore the concepts of AR and VR and determine what could be done and what was holding things back.

One good peek into this process is the piece of hardware shown to the left. You look into the lens end like a little telescope. It has a projector that beams an image directly into your eye, and it has camera-based tracking that updates that image extremely quickly.

The result is a device that lets you look through a little window into a completely different world. In the video (2:16) one of the developers says “It really taught us just how important tracking was. No matter [how you moved] it was essentially perfect. It was really the first glimpse we had into what could be achieved if you had very low persistence displays, and very good tracking.” That set the direction for the research that followed.

Continue reading “Behold: Valve’s VR And AR Prototypes”