Physical Control Panel Elevates Flight Sim Experience

Like so many of us, [pgsanchez] has been bitten by the flight simulator bug. It’s a malady that can only be treated, but never cured — and like so many hobbies, it has a nasty tendency to spawn more hobbies. A software developer by trade, [pgsanchez] is also adept with Arduino and electronics, and his blog post about the PGS-2 Flight Simulator Control Panel demonstrates his fine abilities well, as does the video below the break.

A player of Digital Combat Simulator, he grew tired of having to remember awkward key combinations to control the simulator. Flying a jet, even in a simulator, can require quick thinking bound with quick reflexes, so having a button to press, a switch to flip, or a knob to turn can be vastly superior to even the simplest keyboard based command.

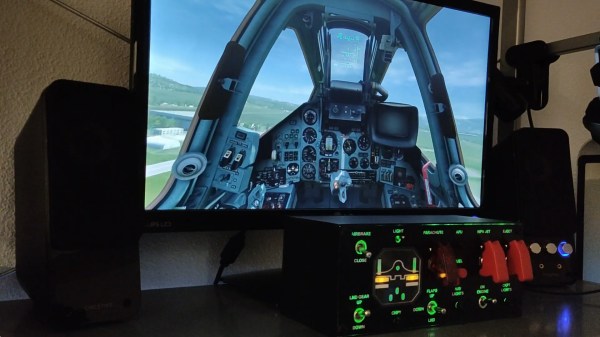
An Arduino interfaces the buttons to the computer, and a white acrylic case is employed to keep all the parts flying in formation. Yes, a white case — with great care taken to allow the case to be backlit. The effect is excellent, and it looks like the panel would be right at home in the Sukhoi Su-25T that it’s designed to control in the game.

We appreciated the attention to detail in the panel, as even the gear status lights and flap indicators match those in the simulator, a nice touch! What more could [pgsanchez] build? We’d like to see! If you’re into flight sims and the like, you might be interested in this fully 3D printed flight sim controller.

Continue reading “Physical Control Panel Elevates Flight Sim Experience”

N-Gage Controller Uses All The Buttons

If there’s anything you can guarantee about a video game system, it’s that in 20 years after one suffers a commercial failure there will be a tiny yet rabid group of enthusiasts obsessed with that system. It’s true for the Virtual Boy, the Atari Jaguar, and of course, the Nokia N-Gage. For those not familiar, this was a quirky competitor of the Game Boy Advance that was also a cell phone. And for that reason it had more buttons than a four-player arcade cabinet, which has led to things like this custom controller.

Most N-Gage gaming these days takes place on emulators, this build is specifically built for the emulator experience. The original system had so many buttons that it’s difficult to get even a standard 102-key keyboard mapped comfortably to it, so something custom is almost necessary. [Lvaneede], the creator of this project, took some parts from an existing arcade cabinet he had and 3D printed the case in order to craft this custom controller. The buttons he chose are a little stiff for his liking, but it’s much better than using a keyboard.

In the video below, [Lvaneede] demonstrates it with a few of the N-Gage’s games. It seems to hold up pretty well. With backing from Sony and Sega, it’s a shame that these gaming platforms weren’t a bigger hit than they were, but there are plenty of people around with original hardware who are still patching and repairing them so they can still play some of these unique games.

Thanks to [Michael] for the tip!

Continue reading “N-Gage Controller Uses All The Buttons”

3D Printed Buttons, Printed As A Single Unit

These nifty buttons come from [Marc Schömann], and they are intended to cover just about any kind of tact switches. The buttons, their cover, and the compliant bits that act as a spring can be 3D printed as a complete unit that requires no assembly, and can be used fresh off the print bed.

The design is still being developed, but those interested in playing with it can download the current model here. [Marc] printed this version in two colors, but that’s just to make how the buttons work easier to see. It also gave him an opportunity to test and tune the tool changer on his printer.

Tool changer, you say? Yes, indeed. The printer is the Blackbox, a open source, tool-changing 3D printer of [Marc]’s own design with its own Hackaday.io project page.

Embedded below is a video overview of the button design being prepped and printed on a Blackbox printer, with a tool change happening in the process. Tool changing is an attractive feature that many people including E3D have taken a swing at, and it’s always exciting to see it in action.

Continue reading “3D Printed Buttons, Printed As A Single Unit”

Bixel, An Open Source 16×16 Interactive LED Array

The phrase “Go big or go home” is clearly not lost on [Adam Haile] and [Dan Ternes] of Maniacal Labs. For years they’ve been thinking of creating a giant LED matrix where each “pixel” doubled as a physical push button. Now that they’ve built up experience working on other LED projects, they finally decided it was time to take the plunge and create their masterpiece: the Bixel.

Creating the Bixel (a portmanteau of button, and pixel) was no small feat. The epic build is documented in an exceptionally detailed write-up on the team’s site, in addition to the time-lapse video included after the break. [Adam] tells us the Bixel took around 100 hours of assembly, and we don’t doubt it. This is truly one of those labors of love which is unlikely to be duplicated, though all of the source files for both the hardware and software are available if you’re feeling brave enough.

The write-up contains a lot of fascinating detail about the design and construction of the Bixel, but perhaps the least surprising of all of them is that the final product ended up being very different from what they originally envisioned. The plan was to simply use lighted arcade buttons in a 16×16 grid, as they were purpose-built for exactly what the guys had in mind. But when they priced them out, the best they could do was $2 a pop. That’s $500 for just the buttons alone, before they even got into the enclosure or electronics. Like any good hackers, [Adam] and [Dan] decided to ditch the ready-made solution and come up with something of their own.

In the end, they cut the individual LEDs out of RGB strips, and soldered them down to their custom designed 500mmx500mm PCB. To the sides of each section of strip are two tactile switches, and above is a “sandwich” made of laser cut acrylic. The sheet closest to the LEDs has a 25mm hole, the top sheet has a 20mm hole, and between them is a circle of acrylic that acts as the “button”. Once it’s all screwed together, the button can’t fall out of the front or move from side to side, but it can be pushed down to contact the tactile switches.

To wire it all up they took a cue from the DIY keyboard scene and used a Teensy, some 595 shift registers, and 256 1N4148 diodes. A Raspberry Pi running their Python framework does the heavy computational lifting, leaving the Teensy to just handle talking to the hardware. Overall it’s a fantastic design to emulate if you’re looking to create large arrays of buttons on the cheap; such as whenever you get around to building that starship simulator.

Continue reading “Bixel, An Open Source 16×16 Interactive LED Array”

Learn Resin Casting Techniques: Duplicating Plastic Parts

Resin casting lets you produce parts that would be otherwise impossible to make without a full CNC and injection molding set-up. It costs about as much as a 3d printer, 300 to 600 US dollars, to get a good set-up going. This is for raw material, resin, dye, pressure chamber, and an optional vacuum degassing set-up. A good resin casting set-up will let you produce parts which are stronger than injection molding, and with phenomenal accuracy, temperature resistance, and strength. I will be covering various techniques from the simple to advanced for using resin casting from a hacker’s perspective.

Continue reading “Learn Resin Casting Techniques: Duplicating Plastic Parts”

ODB-II Hacking Using An Android Tablet

What a strange message to read on the digital dashboard display of your car. This is proof that [Kristoffer Smith] was able to control the ODB-II bus on his Eagle Grand Cherokee.

He’s not just doing this for the heck of it. It stems from his goal of adding an Android tablet on the dashboard which has been a popular hack as of late. This left [Kristoffer] with steering wheel controls that did nothing. They originally operated the radio, so he set out to make them control the tablet.

He had seen an Arduino used to control the CAN bus, but decided to go a different route. He grabbed a USB CAN bus interface for around $25. The first order of business was to use it with his computer to sniff the data available. From there he was able to decode the traffic and figure out the commands he needed to monitor. The last piece of the puzzle was to write his own Android code to watch for and react to the steering wheel buttons. You can check out the code at his repository and see the demo after the break.

Continue reading “ODB-II Hacking Using An Android Tablet”

Stellaris Launchpad Shield Shows Good Fabrication Technique

launchpad-shield-with-great-fabrication

Here’s an LED and Button shield for the Stellaris Launchpad (translated) which you can fabricate at home. It gives you access to a 5×5 matrix of LEDs, and adds four more buttons. In order to cut down on the number of I/O pins required to operate the lights [Cosimo] is using the concept of Charlieplexing. This lets him get away with just six driver pins and four button pins.

It’s not just the finished product that interests us here. The fabrication itself is worth clicking through to his project post. What initially caught our eye is the use of Kapton tape as an insulator so that clipped off LEDs could be used as jumpers flat against the top side of the board before populating the LEDs themselves. After those are soldered in place he masks them off, as well as the button footprints, and uses spray paint to protect the top side of the board. The final look is more polished than most at-home project boards.