Sandpaper Alternatives For 3D Prints

A finished 3D print, especially plastic deposition types, often have imperfections in them from the process of laying down each layer of material and from the printer itself. For small batches or one-off parts, we might reach for a few pieces of sandpaper to smooth out these rough edges. While that might work for a small number of parts, it’s not always the best or lowest-effort option for refining these prints. There are a few alternative methods to try out if your fingers are getting sore, though.

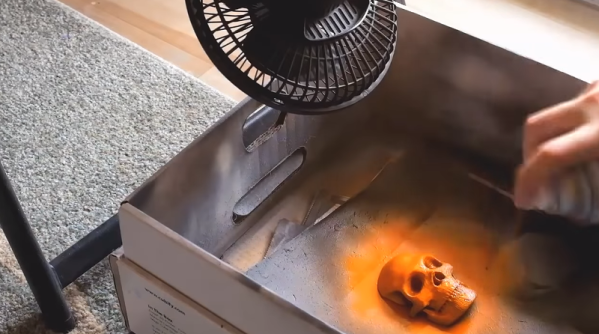
Rather than removing material as sandpaper does, most of these methods involve adding material to the print in order to fill in the rough edges of the print. There is a 3D-print-specific product listed called 3D Gloop! which is generally used as a glue to hold plastic parts together, but can also act as a fill in a pinch. Two other similar methods, one using spray paint and polyurethane and the other using epoxy, are more general-purpose ways of finishing the prints with a more natural texture than the printer will produce on its own. They’re not all additive, though; the final (and perhaps, most toxic) method here to achieve a smooth surface on a print uses solvent to remove some of the material instead.

While sandpaper does have its time and place, certain prints may lend themselves more to being finished by one of these other methods especially if they are overly complex, fragile, or an unusual size. Take note of the safety gear you’ll want to have on hand for most of these methods, though, as gloves and a respirator are highly encouraged and possibly helpful even if using only sandpaper. These aren’t the only ways of finishing 3D prints, either. Some of our other favorites are using glazing putty or silver for the finish.

Cart Cruises Abandoned California Rail

Southern California is known for its nearly perfect year-round climate, excellent surf, and extremely high cost of living, but once you get away from the coast things are radically different. Rural California has huge tracts of land run by the Bureau of Land Management (BLM), which is publicly accessible to anyone willing to venture into the deserts. There’s not much in the way of infrastructure out there, but [Ryan] does have a unique way of traveling through it using abandoned railroad lines and this custom rail cart.

The frame of this cart is simple enough, it’s little more than 2×3 framing with a plywood deck. Some extra support is added for the motor mount and for the seating location. It uses slightly longer go-kart axles to accommodate the width of the railroad, and a small six horsepower gas engine with a single gear to power the rear axle. There are no brakes other than the riders’ shoes, and while this all seems straightforward enough the real hack here is [Ryan]’s custom wheels. He found that steel or cast wheels were not particularly comfortable on long journeys so after a few attempts he has come up with a home-built polyurethane wheel which is cast in a mold around a steel go-cart wheel and then trimmed on a lathe.

For pure exploration, there’s almost no better place to go than the American west thanks to all the public BLM land available. In this cart, you can explore long distances using an extremely low-cost method of transportation. We’ve added another video of [Ryan] exploring this area below the break to show the cart being used, too, but if you’d like a more multipurpose vehicle to use on abandoned rail near you, take a look at this bicycle which is converted to operate on the railroad.

Continue reading “Cart Cruises Abandoned California Rail”

A Rotocasting Machine Sized For The Home Shop

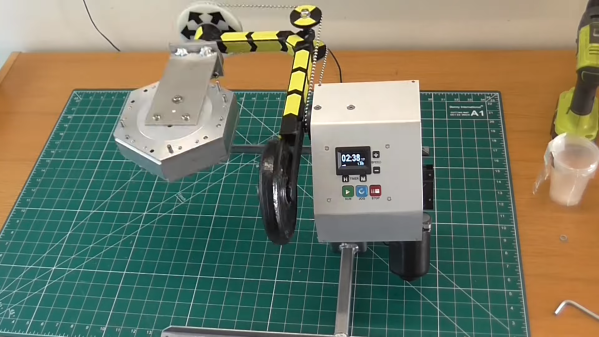
If you’ve ever wondered how large, hollow plastic structures like tanks and drums are formed, you’re in luck: [Andy] not only fills us in on the details of rotational casting and molding, but he also built this sweet little rotational casting machine to help him with his DIY projects.

Granted, [Andy]’s build won’t be making anything too large, like a car fuel tank or a kayak. Not only is it sized more for smallish parts, but those structures are generally made with the related process of rotational molding. Both processes use an enclosed multipart mold that’s partially filled with plastic resin, and then rotate the mold around two axes to distribute a thin layer of resin around the inside of the mold. The difference is that roto-molding uses a thermoplastic resin, whereas roto-casting uses resins like polyurethane and silicone that set at room temperature.

The machine looks simple, but only because he took great pains to optimize it. The videos below cover the build in detail — feel free to skip to the 11:38 mark of the second video if you just want to see it in action. Though you’ll be missing some juicy tidbits, like welding a perfect 90° joint in square tubing. There’s also the custom tool [Andy] built to splice the beaded chain he used to drive the spinning of the mold, which was pure genius.

Using the machine and a complex nine-piece mold, [Andy] was able to create remarkably detailed tires for RC cars from polyurethane resin. We’d love to see what else this rig is good for — almost as much as we want to see details on how the mold was made. We’ve seen other rotational casting machines before, but this one takes the cake for fit and finish.

Continue reading “A Rotocasting Machine Sized For The Home Shop”

Hackaday Podcast 016: 3D Printing With Steel, Molding With Expanded Foam, QUIP-Package Parts, And Aged Solder

Join Editors Elliot Williams and Mike Szczys to recap the week in hardware hacking. This episode looks at microfluidics using Shrinky Dinks, expanding foam to build airplane wings, the insidious effect of time on component solder points, and Airsoft BBs used in 3D printing. Finishing out the episode we have an interview with two brothers who started up a successful business in the Shenzhen electronics markets.

Take a look at the links below if you want to follow along, and as always, tell us what you think about this episode in the comments!

Take a look at the links below if you want to follow along, and as always, tell us what you think about this episode in the comments!

Direct download (60 MB or so.)

Continue reading “Hackaday Podcast 016: 3D Printing With Steel, Molding With Expanded Foam, QUIP-Package Parts, And Aged Solder”

3D Printed Wheels Get Some Much Needed Grip

You’d be hard-pressed to find more ardent supporters of 3D printing then we here at Hackaday; the sound of NEMA 17 steppers pushing an i3 through its motions sounds like a choir of angels to our ears. But we have to admit that the hard plastic components produced by desktop 3D printers aren’t ideal for a number of applications. For example, the slick plastic is useless for all but the most rudimentary of wheels. Sure there are flexible filaments that can give a printed wheel a bit of grip, but they came with their own set of problems (not to mention, cost).

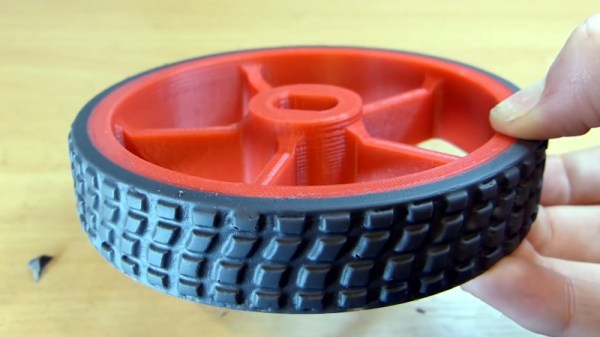
In the video after the break, [Design/Forge] demonstrates a clever method for fitting polyurethane rubber “tires” onto 3D printed hubs which is sure to be of interest to anyone who’s in the market for high quality bespoke wheels for their project. The final result looks extremely professional, and while there’s a considerable amount of preparation that goes into it, once you’re set up you should be able to pump these out quickly and cheaply.

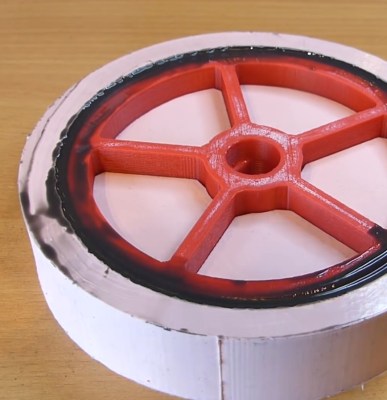
The process begins with a 3D printed mold pattern, which includes the final tire tread texture. This means you can create tire treads of any design you wish, which should have some creative as well as practical applications. The printed part is then submerged in silicone rubber and allowed to cure for 8 hours. Once solidified, the silicone rubber becomes the mold used for the next steps, and the original printed part is no longer needed.

The second half of the process is 3D printing the wheels to which the tires will be attached. These will be much smaller than the original 3D printed component, and fit inside of the silicone mold. The outside diameter of the printed wheel is slightly smaller than the inside diameter of the mold, which gives [Design/Forge] the space to pour in the pigmented polyurethane rubber. The attentive viewer will note that the 3D printed wheel has a slight ribbed texture designed into it, so that there will be more surface area for the polyurethane to adhere to. Once removed from the mold and cleaned up a bit, the final product really does look fantastic; and reminds us of a giant scale LEGO wheel.

Whether you’re casting metal parts or just want a pair of truly custom earbuds, creating silicone molds from 3D printed parts is an extremely useful skill to familiarize yourself with. Though even if you don’t have a 3D printer, there’s something to be said for knowing how to mold and cast real-world objects as well.

Continue reading “3D Printed Wheels Get Some Much Needed Grip”

Smoothing PLA With Two Paints

There was a time when most 3D printers used ABS plastic. It stinks, is probably bad for you, and tends to warp unless printed in a heated enclosure. So most people have gone to something else, mostly PLA. But ABS also dissolves in a readily-available solvent, acetone, and this is useful for smoothing the layer artifacts from a 3D print. [3DSage] has a technique that works for PLA or — he says — probably any filament. You can see what he’s doing in the video below.

The video starts out with a recap of things most Hackaday readers will already know. But hang in there because at about 1:20, he reveals his method.

Continue reading “Smoothing PLA With Two Paints”

Polyurethane, Meet 3D Printing

3D printing makes prototyping wonderful. But what do you do when your plastics of choice just aren’t strong enough? For [Michael Memeteau], the answer was to combine the strength of a vacuum-poured polyurethane part with the ease of 3D-printed molds. The write-up is a fantastic walk through of a particular problem and all of the false steps along the way to a solution.

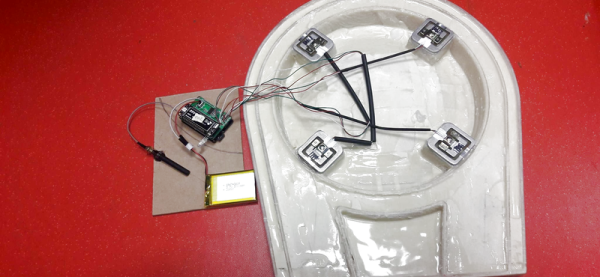
The prototype is a connected scale for LPG canisters, so the frame would have to support 80 kg and survive an outdoor environment. Lego or MDF lattice were considered and abandoned as options early on. 3D printing at 100% infill might have worked, but because of the frame’s size, it would have to be assembled in pieces and took far too long anyway.

The next approach was to make a mold with the 3D printer and pour the chosen polyurethane resin in, but a simple hollow mold didn’t work because the polyurethane heats as it cures. The combined weight and heat deformed the PLA mold. Worse, their polyurethane of choice was viscous and cured too quickly.

The solution, in the end, was a PET filament that deforms less with heat, clever choice of internal support structures to hold the stress in while being permeable, and finally pouring the polyurethane in a vacuum bag to help it fill and degas. The 3D-printed hull is part of the final product, but the strength comes from the polyurethane.

Mold-making is one of the killer apps of 3D printing. We’ve seen 3D prints used as molds for spin-casting hollow parts, and used as a sacrificial shell for otherwise epoxy parts. But for really complex shapes, strength, and ease of fabrication, we have to say that [Michael]’s approach looks promising.