Two lamp versions side by side - one desk lamp and one spotlight lamp, both turned on and shining

A Tale Of Two LÄMPs

Building with LEDs is a hacker pastime like no other – what’s more, if you keep playing with LED tech out there, you’re bound to build something elegant and noteworthy. For today’s fix of beautiful LED devices, take a look at the two LÄMP creations of [Jana Marie], both LED projects building upon one another. It’s not just your regular RGB LEDs – she adds a healthy mix of white and yellow LEDs, making for colors way more natural-looking and pleasant to the eye!

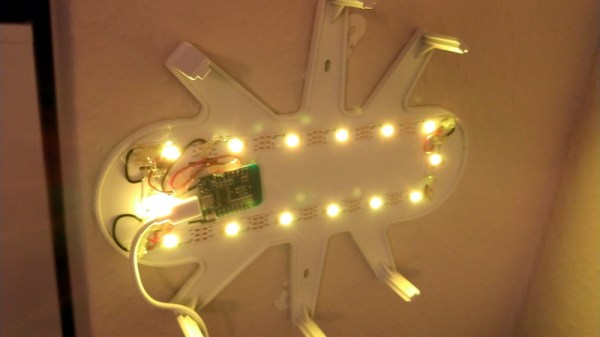
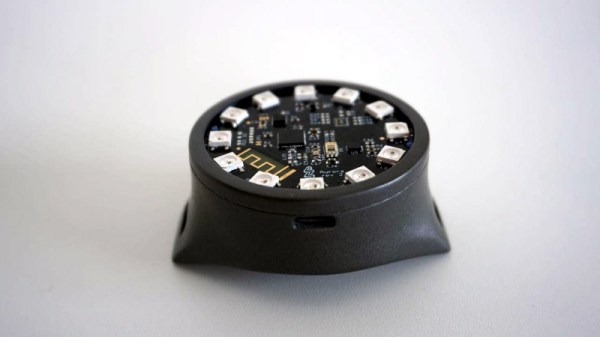
The first one is the LAEMP-Panel, a two-PCB sandwich, combining into a spot light you can use for any purpose where some extra LED would really shine – be it photography, accent, or mood lighting. All of these LEDs are individually controlled and from the SK6812 family, half of them YYW and half RGB variation. As for the base board, the controller is an ESP32, paired to an E75 ZigBee module – this spot light is built to be part of your home’s ZigBee network. If you look at the base board’s KiCad files, you will also notice six-pin headers on five edges – and they’re there for a reason.

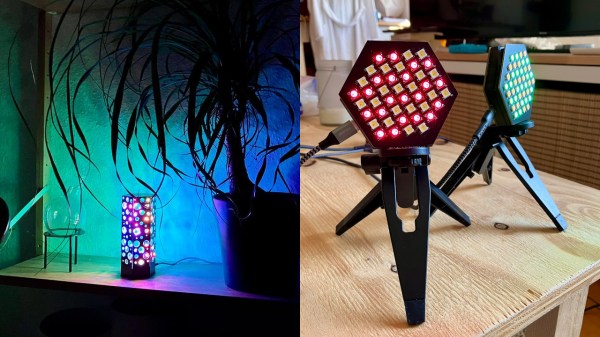
The sister project to this one, the LAEMP-Prism, is a remarkable hexagonal lamp built upon the LAEMP-Panel’s PCB base, but in a desk-friendly form-factor. Six extra side panels with a generous amount of circular cutouts give you a total of 291 LEDs, mix of yellow, white and RGB as before – we got to say, from the pictures we found, it looks like a gorgeous thing to have in your house!

Such is a story of building a spotlight and a desk lamp, both using the same hardware base to accomplish quite different purposes. As is [Jana-Marie]’s tradition, these two lamps are fully open-source, complete with instructions on assembling them – everything is ready for you if you’d like to build one of your own, whichever version it may be! When it comes to lamp-building projects that excel at looks, one can’t forget the two other lamps we’ve seen a few years ago – one built with fiber optics, and another in the shape of the Moon.

Image showing differences between WS2815 and WS2813 LED strips - the WS2815 strip lighting is more uniform throughout the strip's length.

Teaching You Everything You Might Have Missed About Addressable LEDs

Often, financial motivation results in people writing great educational material for hackers. Such is absolutely the case with this extensive documentation blog post on addressable LEDs by [DeRun]. This article could very be named “Addressable LEDs 101”, and it’s a must-scroll-through for anyone, whether you’re a seasoned hacker, or an artist with hardly any technical background and a desire to put LEDs in your creations.

This blog post is easy to read, painting a complete picture of what you can expect from different addressable LED types, and with apt illustrations to boot. Ever wonder which one of the addressable strips you should get from your retailer of choice, and what are the limitations of any specific type? Or, perhaps, you’d like to know – why is it that a strip with a certain LED controller is suspiciously cheap or expensive? You’re more than welcome to, at least, scroll through and fill into any of your addressable LED knowledge gaps, whether it’s voltage drops, color accuracy differences, data transfer protocol basics or dead LED failsafes.

Addressable LEDs have a special place in our hearts, it’s as if the sun started shining brighter after we’ve discovered them… or, perhaps, it’s all the LEDs we are now able to use. WS2812 is a staple of the addressable LED world, which is why we see them even be targets of both clone manufacturers and patent trolls. However, just like the blog post we highlight today mentions, there’s plenty of other options. Either way do keep coming cover a new addressable LED-related hack, like rewriting their drivers to optimize them, or adding 3.3V compatibility with just a diode.

We thank [Helge] for sharing this with us!

Triangle Tiles Form Blinky Networks Using Clever Interconnects

We love to see LEDs combined in all shapes and sizes, so we were especially ticked when we caught a glimpse of [Debra Ansell]’s (also known as [GeekMomProjects]) interlocking triangular TriangleLightPanel system glowing on our screen. This unusually shaped array seemed to be self supporting and brightly glowing, so we had to know more.

The TriangleLightPanel is a single, triangular, light panel (refreshing when everything is in the name, isn’t it?).  Each panel consists of a single white PCBA holding three side-firing SK6812 LEDs aimed inward, covered by transparent acrylic. When the LEDs are doing their thing, the three-position arrangement and reflective PCB surface does diffuses the light sufficiently to illuminate each pane — if not perfectly evenly — very effectively. Given the simple construction it’s difficult to imagine how they could be significantly improved.

The real trick is the mechanical arrangement. Instead of being connected with classic Dupont jumper wires and 0.1″ headers or some sort of edge connector, [Debra] used spring contacts. But if you’re confused by the lack of edge-plated fingers think again; the connectors are simple plated strips on the back. There is a second PCBA which effectively acts as wires and a surface to mount the spring contacts on, which is bolted onto the back of the connected leaves to bridge between each node. The tiles need to be mechanically connected in any case, so it’s a brilliantly simple way to integrate the electrical connection with the necessary mechanical one.

All the requisite source files are available on the project’s GitHub page and the original Tweets announcing the project are here for reference. We can’t wait to see what this would look like with another 30 or 40 nodes! Enterprising hackers are already building their own setup; see [arturo182]’s 24 tile array glowing after the break.

Continue reading “Triangle Tiles Form Blinky Networks Using Clever Interconnects”

New Part Day: SK6812 Mini-E. A Hand Solderable Neopixel Compatible LED!

Normally when we give you a New Part Day piece, it concerns a component that you will have never seen before. The subject of this find by [Robert Fitzsimons] then is a slight departure from that norm, given that the SK6812 Mini-E is a WS2812 or Neopixel compatible multi-colour LED of a type that has been available for a while now.

What makes this component new though is its packaging. The Mini-E variant of the SK6812 only appeared last year and has now found its way through to smaller order quantities on AliExpress. Its special feature is that it has a set of flat leads rather than the usual pads on the underside of the package. This means that unlike its predecessors it is readily hand solderable, as he demonstrates by attaching a set of leads to one.

The leads emerge halfway up the side of the device, which seems designed to be mounted recessed within a PCB hole. He demonstrates this with a piece of stripboard, and remarks that they would make a good choice for many small projects such as Shitty Add-On boards.

We’ve touched the leadless SK6812s a few times before, along the way remarking that in some respects they are better than the WS2812 they follow.

Continue reading “New Part Day: SK6812 Mini-E. A Hand Solderable Neopixel Compatible LED!”

IKEA Cloud Lamp Displays The Weather With An ESP8266

The IKEA DRÖMSYN is a wall mounted cloud night light that’s perfect for a kid’s room. For $10 USD, it’s just begging for somebody to cram some electronics in there and make it do something cool. Luckily for us, [Jodgson] decided to take on the challenge and turned this once simple lamp into a clever weather display. It even still works as an LED lamp, if you’re into that sort of thing.

After stripping out the original hardware, [Jodgson] installed a Wemos D1 Mini and a string of fourteen SK6812 RGB LEDs that run down the length of the cloud’s internal structure. Weather data is pulled down with the OpenWeatherMap API, and conditions are displayed through various lighting colors and effects.

Sunny days are represented with a nice yellow glow, and a cloudy forecast looks like…well it’s already a white cloud so that one’s pretty easy. If rain is expected the cloud turns blue and the bottom LEDs flicker a bit to represent raindrops. When there’s a thunderstorm, the cloud will intermittently flash random LEDs on the strip a bit brighter than their peers; a really slick effect that gets the point across immediately.

This isn’t the first time we’ve seen somebody take a cheap light from IKEA and turn it into something much more impressive with the ESP8266. Just like with that previous project, we wouldn’t be surprised to see this particular modification popping up more in the future.

A Stylish Solution For Bike Navigation

[André Biagioni] is developing an open hardware bicycle navigation device called Aurora that’s so gorgeous it just might be enough to get you pedaling your way to work. This slick frame-mounted device relays information to the user through a circular array of SK6812 RGB LEDs, allowing you to find out what you need to know with just a quick glance down. No screen to squint at or buttons to press.

The hardware has already gone through several revisions, which is exactly what we’d expect to see for an entry into the 2019 Hackaday Prize. The proof of concept that [André] zip-tied to the front of his bike might have worked, but it wasn’t exactly the epitome of industrial design. It was enough to let him see that the idea had merit, and from there he’s been working on miniaturizing the design.

So how does it work? The nRF52832-powered Aurora connects to your phone over Bluetooth, and relays turn-by-turn navigation information to you via the circular LED array. This prevents you from having to fumble with your phone, which [André] hopes will improve safety. When you’re not heading anywhere specific, Aurora can also function as a futuristic magnetic compass.

With what appears to be at least three revisions of the Aurora hardware already completed by the time [André] put the project up on Hackaday.io, we’re very interested in seeing where it goes from here. The theme for this year’s Hackaday Prize is moving past the one-off prototype stage and designing something that’s suitable for production, and so far we’d say the Aurora project is definitely rising to the challenge.

Continue reading “A Stylish Solution For Bike Navigation”

CNC Turns A Single PCB Into Origami Hemisphere

Trying to make a hemispherical surface out of a PCB is no easy feat. Trying to do that and make the result a working circuit is even harder. Doing it with one solid piece of FR4 seems impossible, right?

Not so much. [brainsmoke] came up with a clever way to make foldable, working PCBs that can be formed into hemispheres. The inspiration for this came from a larger project that resulted in a 32-cm diameter LED-studded sphere, which a friend thought would make a swell necklace if it was scaled down. That larger sphere was made somewhat like a PCB soccer ball, with individual panels soldered together. [brainsmoke] didn’t relish juggling dozens of tiny PCBs to make a necklace-sized version, so the unfolded pattern for half a deltoidal hexecontahedron was laid out as one piece on single-sided FR4. The etched boards were then cut out on a CNC mill, with the joints between the panels cut as V-grooves from the rear of the board. By leaving just enough material to act as a live hinge, [brainsmoke] was able to fold the pattern up into a hemisphere while leaving the traces intact. The process was fussy and resulted in a lot of broken FR4 and traces, but with practice and the use of thicker board material and heavier copper, the hemisphere came together. The video below shows the final product

This objet d’art is [brainsmoke]’s entry in the Circuit Sculpture Contest, which is just wrapping up wrapped up last week. We can’t wait to share some of the cool things people came up with in this contest, which really seemed to get the creative juices flowing.

Continue reading “CNC Turns A Single PCB Into Origami Hemisphere”