Minimal Blinky Project Makes The Chip The Circuit Board

We’ve got a thing for projects that have no real practical value but instead seek to answer a simple yet fundamental question: I wonder if I can do that? This dead-bug style 555 blinky light is one of those projects, undertaken just to see how small a circuit can be. Pretty small, as it turns out, and we bet it can get even smaller.

[Danko]’s minimal circuit is about as small as possible for the DIP version of the venerable 555 chip. The BOM is stripped to the bone: just the chip, three resistors, a capacitor, and an LED. All the discrete components are SMDs in 0805. The chip’s leads are bent around the package to form connections, and the SMDs bridge those “traces” to complete the circuit. [Danko] shows the build in step-by-step detail in the video below. There’s some fairly fine work here, but we can’t help wondering just how far down the scale this could be pushed. We know someone’s made a smaller blinky using a tiny microcontroller, but we’d love to see this tried with the BGA version of the chip which is only 1.4 mm on a side.

Cheers to [Danko] for trying this out and having some fun with an old chip. He seems to have a bit of a thing for the 555; check out this cute robot sculpture that’s built around the chip.

Continue reading “Minimal Blinky Project Makes The Chip The Circuit Board”

Launching Fireworks With Raspberry Pi This Fourth Of July

It’s that time of year again in the United States, and the skies will soon be alight with pyrotechnic displays, both professional and amateur. Amazing fireworks are freely available, sometimes legally, sometimes not. For the enthusiasts that put on homebrew displays, though, the choice between watching your handiwork or paying attention to what you’re doing while running the show is a tough one. This Raspberry Pi fireworks show controller aims to fix that problem.

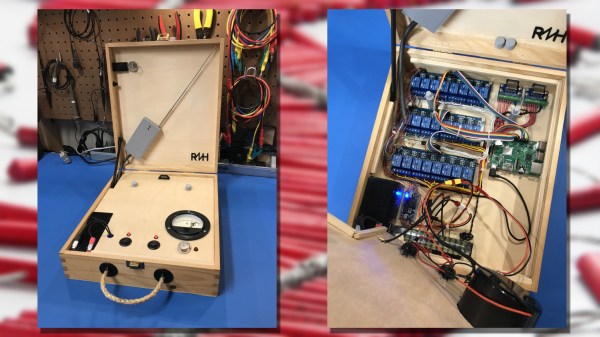
[netmagi] claims his yearly display is a modest affair, but this controller can address 24 channels, which would be a pretty big show in any neighborhood. Living inside an old wine box is a Raspberry Pi 3B+ and three 8-channel relay boards. Half of the relays are connected directly to breakouts on the end of a long wire that connect to the electric matches used to trigger the fireworks, while the rest of the contacts are connected to a wireless controller. The front panel sports a key switch for safety and a retro analog meter for keeping tabs on the sealed lead-acid battery that powers everything. [netmagi] even set the Pi up with WiFi so he can trigger the show from his phone, letting him watch the wonder unfold overhead. A few test shots are shown in the video below.

As much as we appreciate the DIY spirit, it goes without saying that some things are best left to the pros, and pyrotechnics is probably one of those things. Ever wonder how said pros pull it off? Here’s a behind-the-scenes look.

Continue reading “Launching Fireworks With Raspberry Pi This Fourth Of July”

Battery-Powered Watering Timer Converted To Solar On The Cheap

Watering the garden or the lawn is one of those springtime chores that is way more appealing early in the season than later. As the growing season grinds along, a chore that seemed life-giving and satisfying becomes, well, just another chore, and plants often suffer for it.

Automating the watering task can be as simple as buying a little electronic timer valve that turns on the flow at the appointed times. [A1ronzo] converted his water hose timer to solar power. Most such timers are very similar, with a solenoid-operated pilot valve in line with the water supply and an electronic timer of some sort. The whole thing is quite capable of running on a pair of AA batteries, but rather than wasting money on new batteries several times a season, he slipped a LiPo pack and a charge controller into the battery case slot and connected a small solar panel to the top of the controller.

The LiPo is a nominal 3.7-volt pack, so he did a little testing to make sure the timer would be OK with the higher voltage. The solar panel sits on top of the case, and the whole thing should last for years. And bonus points for never having to replace a timer that you put away at the end of the season with batteries still in it, only to have them leak. Ask us how we know.

Like the best of hacks, this one is quick, easy and cheap — $15 in parts, aside from the timer. There are more complicated irrigation solutions, of course, one of which even won the Hackaday Prize once upon a time. But this one has us ordering parts to build our own right now.

How the 555 timer IC works

Learning The 555 From The Inside

One way to understand how the 555 timer works and how to use it is by learning what the pins mean and what to connect to them. A far more enjoyable, and arguably a more useful way to learn is by looking at what’s going on inside during each of its modes of operation. [Dejan Nedelkovski] has put together just such a video where he walks through how the 555 timer IC works from the inside.

We especially like how he immediately removes the fear factor by first showing a schematic with all the individual components but then grouping them into what they make up: two comparators, a voltage divider, a flip-flop, a discharge transistor, and an output stage. Having lifted the internals to a higher level, he then walks through examples, with external components attached, for each of the three operating modes: bistable, monostable and astable. If you’re already familiar with the 555 then you’ll enjoy the trip down memory lane. If you’re not familiar with it, then you soon will be. Check out his video below.

Continue reading “Learning The 555 From The Inside”

Push Big Red Button, Receive Power.

As with the age-old panic after realizing you have left an oven on, a candle lit, and so on, a soldering tool left on is a potentially serious hazard. Hackaday.io user [Nick Sayer] had gotten used to his Hakko soldering iron’s auto shut-off and missed that feature on his de-soldering gun of the same make. So, what was he to do but nip that problem in the bud?

Instead of modding the tool itself, he built an AC plug that will shut itself off after a half hour. Inside a metal project box — grounded, of course — an ATtiny85 is connected to a button, an opto-isolated TRIAC AC power switch, and a ‘pilot’ light indicating power. After a half hour, the ATtiny triggers the opto-isolator and turns off the outlet, so [Sayer] must push the button if he wants to keep working. He notes you can quickly double-tap the button for a simple timer reset.

Continue reading “Push Big Red Button, Receive Power.”

Don’t Miss The Bus: A One-Day Build

Sometimes the most satisfying hacks are those that spring from a situation where resources are limited, either by choice or by chance. Constraints tend to stir the creative juices.

Serial Hackaday poster [limpkin] limited himself to a one-day build with what he had on hand for this bus-route countdown timer. Full points for actually building something useful, and extra credit for making something to keep his wife from being late for work.

The principle is simple: scrape a web page to find out how much time is left before either of two busses leaves his wife’s stop, and display the number of minutes left on a huge LED display. The parts bin gave up everything needed, including an ESP8266, a boost converter, a charge controller, and the display and driver. We’re skeptical that the PCB was fabricated the same day; looks like [limpkin] is only counting the design and coding time in his 10-hour build. Still, it’s a testament to what’s possible with a deep inventory and the skills to put it to use.

Check out some of [limpkin]’s other hacks, like this Formula-E race car PCB or his adventures in laundry larceny. Oh, and he also used to write for Hackaday.

Push Button, Receive Beverage!

Here’s a rec-room ready hack: an automatic drink dispenser.

[truebassB]’s dispenser operates around a 555 timer, adjusted by a potentiometer. Push a button and a cup pours in a few seconds, or hold the other button to dispense as much as you want.

The dispenser is made from MDF and particle board glued together, with some LEDs and paper prints to spruce it up. Just don’t forget a small spill sink for any miscalculated pours. You needn’t fret over the internals either, as the parts are easily acquired: a pair of momentary switches, a 12V micro air pump, a brass nozzle, food-safe pvc tube,  a custom 555 timing circuit — otherwise readily available online — a toggle switch, a power supply plug plus adapter and a 12V battery.

Continue reading “Push Button, Receive Beverage!”