Adding Bluetooth And A Lightning Connector To Beats Pro Headphones

Beats

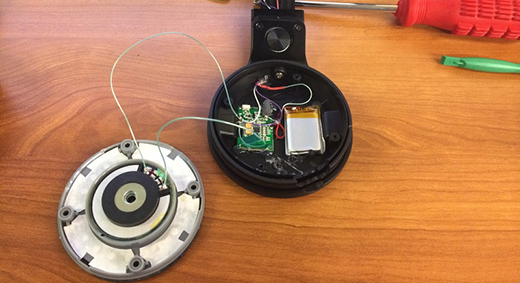
Not wanting to wait for Apple to step up their game and complete their purchase of Beats headphones, [Carnivore] decided he wanted his own pair of Apple-compatible Beats cans with Bluetooth. He created something that will probably be for sale in the Apple store come Christmas: a pair of Beats Pro headphones with Bluetooth and a Lightning connector for charging.

[Carnivore] liked the sound of his Beats Pro headphones but hated the wires. After disassembling the headphones, he carefully rewired the speakers with smaller gauge wire, added a small Bluetooth module and battery, and sealed everything back up.

There are a few interesting bits to this build – by getting rid of all external wires, [Carnivore] was left with a few holes in the headphones. These were a perfect place to add a 3D printed mount for the power button and the Lightning adapter taken from an Apple Lightning extension connector.

Thanks [Tony] for the tip!

A 3D Printed Brushless Motor

brushlessBuilding electronics with 3D printers is something we see hitting the tip line from time to time, but usually these are printed circuits, not electromechanical parts like motors, solenoids, and relays. [pitrack] thought he could do better than printing out a few blinking LED circuits and designed and built a brushless motor, the same kind you would find on electric model planes and quadcopters.

In every brushless DC motor, there are a few common parts: the rotor has a few powerful magnets embedded in it, a stators with coils of wire, and the an enclosure to keep everything together. [pitrack] printed all these parts off on his Makerbot, winding each of the three coils with about 400 turns of 26 AWG magnet wire. Also embedded in the stator are a trio of hall effect sensors to make the control via an Arduino and an L6234 motor driver easy.

For his next trick, [pitrack] is going to test the efficiency of the motor and attempt to optimize it. In the long term, it should be possible to parameterize the design of one of these printed motors, effectively allowing anyone to type in the torque and Kv rating of a desired motor, plug that into an equation, and have a motor design come out the other end.
Continue reading “A 3D Printed Brushless Motor”

Giant Spirograph Delights Children, Dwarfs Banana

giant spirographLate last year at a craft show, [hahabird] and a friend came across a laser-cut Spirograph and they both had a go at it. After mocking his friend’s lack of fine motor skills, [hahabird] was struck with the idea of making a giant-scale Spirograph that would (hopefully) be less frustrating for kids of all ages.

He generated the gears using an InkScape plugin, and then moved the project to Illustrator for adjustments. After nesting the inner gear drawings, he was able to print them out on one 3×3′ piece of paper at the local FedEx-Kinko’s. To make a template for routing he pieces that make up the eight-foot diameter outer ring, [hahabird] first cut it out of MDF and then bolted that to plywood. The outer ring’s size was dictated by the number of sections that fit on a 4×8 piece of plywood.

The challenge of the inner cogs was to make them move smoothly and still mesh with the teeth of the outer ring. [hahabird] solved this by mounting casters on raised platforms, which double nicely as handles. Each inner cog has a series of PVC couplers that take the 1″ PVC chalk holder insert.

So far, [hahabird] has cut 22-, 35-, and 44-tooth cogs, all of which are painted in nice, bright colors. According to his reddit comments, he will have a video or gif of it in a few days. We hope he makes the plus sign cog and the tongue depressor piece, too.

A Cheap DIY Smoke Detector That Can Save Lives

2014-07-19-16.33.53 A faulty wire, a discarded burning cigarette, or a left-on curling iron can trigger sparks of fire to engulf everything nearby until all that’s left is brittle mounds of smoldering ash. Which is why smoke detectors are so important. They are life saving devices that can wake people up sleeping inside, well before the silent, but deadly carbon monoxide starts to kick in. But what happens if no one is home, and the alarm begins to blare? The place burns down into the ground without the owners knowing.

So when [Martin] purchased a battery-powered smoke detector and rigged it up to notify him exactly when the piezo siren is activated, the evolution of the automatic fire alarm continued into the realm of wireless internet-connected things.

His home automation system (a Raspberry Pi running Node-Red) links to a Funky ATTiny84-based sensor and transmits the data wirelessly, redirecting the information to his phone. SMS messages can be sent, as well as emails and pushbullet notifications. Once the piezo siren starts to sing, the system alerts him that smoke has been detected and that he should check on it as soon as possible.

The electronics fit perfectly inside the case waiting for any smoky disturbance in the room to light up. And what makes this project even better, besides the life saving capabilities and the instant push notifications, is that it was hooked up for the cheap. No need to buy a brand-new, expensive Nest protect, when all it takes it a sensor or two and a Raspberry Pi to hack the fire alarm that already sits in the house.

This video coming up after the break shows how simple it is to make. Continue reading “A Cheap DIY Smoke Detector That Can Save Lives”

Infinity Mirror Clock: There’s A Time Joke There Somewhere

Infinity Mirror Clock

We don’t think we’ve seen an Infinity Mirror Clock before, but we love this new twist on an old favorite. Different colors distinguish between seconds, minutes and hours, and an additional IR sensor detects when someone is directly in front of the clock and switches the LEDs off, allowing it to be used as a normal mirror. This build is the work of [Dushyant Ahuja], who is no stranger to hacking together clocks out of LEDs. You can tell how much progress he’s made with the mirror clock by taking a glance at his first project, which is an impressive creation held together by jumbles of wire and some glue.

[Dushyant] has stepped up his game for his new clock, attaching an LED strip along the inside of a circular frame to fashion the infinity mirror effect. The lights receive a signal from an attached homemade Arduino board, which is also connected to a real-time clock (RTC) module to keep time and to a Bluetooth module, which allows [Dushyant] to program the clock wirelessly rather than having to drag out some cords if the clock ever needs an adjustment.

Stick around after the jump for a quick demonstration video. The lights are dazzling to watch; [Dushyant] inserted a stainless steel plate at the center of the circle to reflect the outer rim of LEDs. After a quick rainbow effect, it looks like the mirror enters clock mode. See if you can figure out what time it is. For a more step-by-step overview of this project, swing by his Instructables page.

Continue reading “Infinity Mirror Clock: There’s A Time Joke There Somewhere”

Teaching The Word Clock Some New Tricks

wordclock2014

[Joakim] has built a clock that spells out the time in words. Wait a second – word clock, what is this, 2009? Word clocks are one of those projects that have become timeless. When we see a build that stands out, we make sure to write it up. [Joakim’s] clock is special for a number of reasons. The time is spelled out in Norwegian, and since the clock is a birthday gift for [Daniel], [Joakim] added the his full name to the clock’s repertoire.

One of the hard parts of word clock design is controlling light spill. [Joakim] used a simple 3D printed frame to box each LED in. This keeps the spill under control and makes everything easier to read. The RGB LED’s [Joakim] used are also a bit different from the norm. Rather than the WS2812 Neopixel, [Joakim] used LPD8806 LED strips. On the controller side [Joakim] may have gone a bit overboard in his choice of an Arduino Yun, but he does put the ATmega328 and Embedded Linux machine to good use.

The real magic happens at boot. [Daniel’s] name lights up in red, with various letters going green as each step completes. A green ‘D’ indicates an IP address was obtained from the router’s DHCP server. ‘N’ switches to green when four NTP servers have been contacted, and the Linux processor is reasonably sure it has the correct time. The last letter to change will be the ‘E’, which reports ambient light.

[Joakim] added a web interface to trigger his new features, such as a rainbow color palette, or the ability to show minutes by changing the color of the letters K,L,O,K. The final result is a slick package, which definitely brings a 2009 era design up to 2014 standards!

THP Entry: Tinusaur AVR Platform Teaches Noobs, Plays Game Of Life

tinusaur[Neven Boyanov] says there’s nothing special about Tinusaur, the bite-sized platform for learning and teaching the joys of programming AVRs. But if you’re dying to gain a deeper understanding of your Arduino or are looking to teach someone else the basics, you may disagree with that assessment.

Tinusaur is easy to assemble and contains only the components necessary for ATTiny13/25/45/85 operation (the kit comes with an ’85). [Neven] saved space and memory by forgoing USB voltage regulator. An optional button cell mount and jumper are included in the kit.

[Neven] is selling boards and kits through the Tinusaur site, or you can get the board from a few 3rd party vendors. His site has some projects and useful guides for assembling and driving your Tinusaur. He recently programmed it to play Conway’s Game of Life on an 8×8 LED matrix. If you’re looking for the zero-entry side of the AVR swimming pool, you can program it from the Arduino IDE. Be warned, though; they aren’t fully compatible.


SpaceWrencherThe project featured in this post is an entry in The Hackaday Prize. Build something awesome and win a trip to space or hundreds of other prizes.