NFC Ring Lock Box

NFC Ring Lock Box

[Nairod785] wanted to build a lock box that would lock from the inside. He started with an inexpensive, plain wooden box. This kept the cost down but would also allow him to easily decorate the box later on using a wood burning tool.

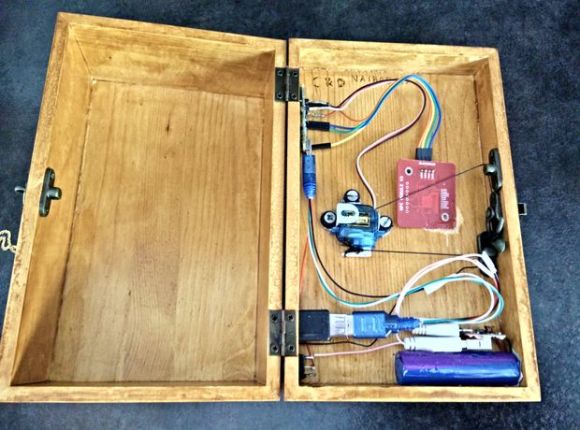
To keep the box locked, he installed a simple latch on the inside. The latch is connected to a servo with string. When the servo rotates in one direction, it pulls the string and releases the latch. When the servo is rotated in the opposite direction, the latch closes and locks the box once again.

If you are going to have a locked box, then you are also going to need a key to open it. [Nairod785] used a ring with a built-in NFC tag, similar to the ring featured back in March. Inside of the box is a PN532 NFC module. The walls of the box were a little too thick for the reader to detect the ring, so [Nairod785] had to scratch the wall thickness down a bit. The NFC module is connected to an Arduino Nano. Communications are handled with I2C.

The NFC ring actually has two different NFC tags in it; one on each side. [Nairod785] had to program both of the tag ID’s into the Arduino to ensure that the ring would work no matter the orientation.

The system is powered by a small rechargeable 5V battery. [Nairod785] wired up a USB plug flush with the box wall so he can easily charge up the battery while the box is locked. It also allows him to reprogram the Arduino if he feels so inclined. There is also a power switch on the side to conserve energy.

The Berlin Cyberbeetle With Its Own TV

13_Cyberbeetle

The evolution of the mere beetle has transformed from organic matter into robotic gears, circuits, and wires. This Cyberbeetle project was born during an open culture hackathon in Berlin throughout a few months time period. The event was called Coding for Vinci and was held from April into July 2014. The project used an Arduino and combined openly licensed biology related pictures and sounds from the museums in the area in a fun and playful way.

[Kati] and [Tomi] based the design on a gorgeous Chalcosoma atlas beetle species which was found in insect box scans that were taken from a nearby museum. The cool thing about this project is that the Cyberbeetle that [Kati] and [Tomi] created has its own hi-tech insect box with various special features. For instance, when the box was rotated on its side, small doors were revealed that when opened unveiled a tiny home theater system with a hi-definition flat screen, audio system and infrared communication. Inside the horn of the Cyberbeetle was an infrared receiver, which allowed the creature to interface with its TV program when it started. Music videos as well excited the robotic insect.

The project was awarded the “Funniest hack” prize during the hackathon. And a video of it can be seen after the break:

Continue reading “The Berlin Cyberbeetle With Its Own TV”

Reverse Engineering A GPS Watch To Upload Custom Firmware


Sometimes GPS watches are too good to be left with their stock firmware. [Renaud] opened his Kalenji 300 GPS watch, reverse engineered it in order to upload his own custom firmware.

The first step was to sniff the serial traffic between the PC and the microcontroller when upgrading firmware to understand the protocol and commands used. [Renaud] then opened the watch, figured out what the different test points and components were. He used his buspirate with OpenOCD to extract the existing STM32F103 firmware. The firmware helped him find the proper value to store in a dedicated register for the boot loader to start.

By looking at the disassembly code he also found the SPI LCD initialization sequence and discovered that it uses a controller similar to the ST7571. He finally compiled his own program which uses the u8glib graphics library. Follow us after the break for the demonstration video.

Continue reading “Reverse Engineering A GPS Watch To Upload Custom Firmware”

3D Printed Virtual Reality Goggles

gaming-loop

Oculus, as we know, was acquired by Facebook for $2 billion, and now the VR community has been buzzing about trying to figure out what to do with all this newly accessible technology. And adding to the interest, the 2nd iteration of the development kits were released, causing a resurgence in virtual reality development as computer generated experiences started pouring out from of every corner of the world. But not everyone can afford the $350 USD price tag to purchase one of these devices, bringing out the need for Do-It-Yourself projects like these 3D printed wearable video goggles via Adafruit.

The design of this project is reminiscent of the VR2GO mobile viewer that came out of the MxR Lab (aka the research environment that spun out Palmer Lucky before he created Oculus). However, the hardware here is more robust and utilizes a 5.6″ display and 50mm aspheric lenses instead of a regular smart phone. The HD monitor is held within a 3D printed enclosure along with an Arduino Micro and 9-DOF motion sensor. The outer hood of the case is composed of a combination of PLA and Ninjaflex printing-filament, keeping the fame rigid while the area around the eyes remain flexible and comfortable. The faceplate is secured with a mounting bracket and a pair of aspheric lenses inside split the screen for stereoscopic video. Head straps were added allowing for the device to fit snugly on one’s face.

At the end of the tutorial, the instructions state that once everything is assembled, all that is required afterwards is to plug in a 9V power adapter and an HDMI cable sourcing video from somewhere else. This should get the console up and running; but it would be interesting to see if this design in the future can eliminate the wires and make this into a portable unit. Regardless of which, this project does a fantastic job at showing what it takes to create a homemade virtual reality device. And as you can see from the product list after the break, the price of the project fits under the $350 DK2 amount, helping to save some money while still providing a fun and educational experience.

Continue reading “3D Printed Virtual Reality Goggles”

Commodore 1530 Datasette Gets A Digital Counter

Ah, the humble Commodore 1530 Datasette drive. It never enjoyed much popularity in the USA, but it was the standard for quite some time in Europe. [DerSchatten13] still uses and loves his 1530. When a co-worker showed him some 7-segment bubble LEDs, he knew what he had to do. Thus the 1530 digital counter (translated) was born.

[DerSchatten13] started out by building his design on a breadboard. He used every I/O pin on an ATtiny2313 to implement his circuit. Tape motion is detected by a home-made rotary encoder connected to the original mechanical counter’s belt drive. To keep the pin count down, [DerSchatten13] multiplexed the LEDs on the display.

Now came the hard part, tearing into the 1530 and removing the mechanical counter. [DerSchatten13] glued in some standoffs to hold the new PCB. After rebuilding the circuit on a piece of perfboard, he installed the new parts. The final result looks great on the inside. From the outside, one would be hard pressed to tell the digital counter wasn’t original equipment.

Operation of the digital counter is identical to the analog unit – with one exception. The clear button now serves double duty. Pressing and holding it saves the current count. Save mode is indicated by turning on the decimal point. If the user rewinds the tape, the counter will stop the motor when the saved count is reached. Cueing up that saved program just got a heck of a lot easier!

Continue reading “Commodore 1530 Datasette Gets A Digital Counter”

An Open Source 1MHz Arbitrary Waveform Generator With An Awesome UI

1MHZ DDS


[Herp] just shared a nice 1MHz Arbitrary Waveform Generator (right click -> translate to English as google translation links don’t work) with a well designed user interface. His platform is based around a PIC32, a TFT module with its touchscreen and the 75MHz AD9834 Direct Digital Synthesizer (DDS). Of course the latter could generate signals with frequencies up to 37.5MHz… but that’s only if two output points are good enough for you.

As you can see in the video embedded below, the ‘tiny dds’ can generate many different kinds of periodic signals and even ones that are directly drawn on the touchscreen. The offset and signal amplitude can be adjusted using several operational amplifiers after the DDS ouput and a separate SMA TTL output is available to use a PIC32 PWM signal. The platform can read WAV audio files stored on microSD cards and also has an analog input for signal monitoring. Follow us after the break for the video.

Continue reading “An Open Source 1MHz Arbitrary Waveform Generator With An Awesome UI”

DEFCON 22: Hack All The Things

This morning I went to a fantastic talk called Hack All the Things. It was presented by GTVHacker. If you don’t recognize the name, this is the group that hacked the GoogleTV. They haven’t stopped hacking since that success, and this talk is all about 20+ devices that they’ve recently pwned and are making the info public (that link still had oath when I checked but should soon be public).

The attacks they presented come in three flavors: UART, eMMC, and command injection bugs. I’m going to add the break now, but I’ll give a rundown of most of the device exploits they showed off. I found all amusing, and often comical.

Continue reading “DEFCON 22: Hack All The Things”