Closed Loop Control For 3D Printers

One of the bigger problems with any CNC machine or 3D printer is the issue of missed steps when moving the toolhead. If a stepper motor misses a step, the entire layer of the print – and every layer thereafter – will be off by just a tiny bit. Miss a few more steps, and that print will eventually make its way into the garbage. [Misan] has the solution to this: closed loop control of DC motors for a 3D printer.

Most printer firmwares use an open loop control system for moving their motors around. Step a few times in one direction, and you know where the nozzle of a 3D printer will be. Missed steps confound the problem, and there’s no way for the firmware to know if the nozzle is where it should be at any one time.

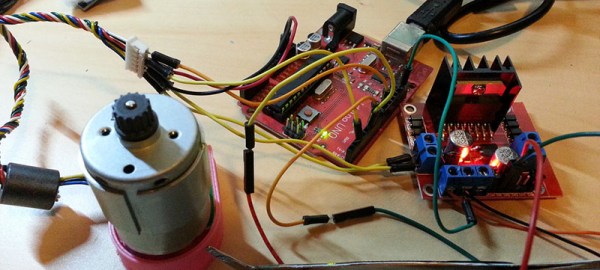
[Misan]’s solution to this was a DC motor coupled to an optical encoder. Both the motor and the encoder are connected to an Arduino Pro Mini which receives step and direction commands from the printer controller. The controller takes care of telling the motor where to go, the Arduino takes care of making sure it gets there.

The entire build is heavily derived from ServoStrap, but [Misan] has a very cool demo of his hardware: during a print, he can force the X and Y axes to either side, and the Arduino in each motor will move the print head back to where it needs to be. You can check that out below.

Continue reading “Closed Loop Control For 3D Printers”

Retrotechtacular: The Sylvania Tube Crusher

This week, we’re switching off the ‘Tube and taking a field trip to Emporium, Pennsylvania, home of the Sylvania vacuum tube manufacturing plant. Now, a lot of companies will tell you that they test every single one of their products, ensuring that only the best product makes it into the hands of John Q. Public. We suspect that few of them actually do this, especially these days. After all, the more reliable the product, the longer it will be before they can sell you a new one.

sylvania-tube-crusher-thumb
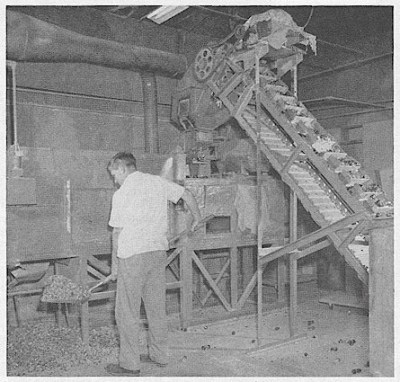
For Sylvania, one of the largest tube manufacturers of the golden age, this meant producing a lot of duds. A mountain of them, in fact, as you can see in the picture above. This article from the January 1957 issue of Popular Electronics vilifies forgers who used all kinds of methods to obtain defective tubes. They would then re-brand them and pass them off as new, which was damaging to Sylvania’s good name and reputation.

In addition to offering a reward for turning in known tube forgers, Sylvania did the most reasonable thing they could think of to quash the gray market, which was building a tube-crushing machine. Pulverizing the substandard tubes made sure that there were no “factory seconds” available to those fraudsters. After crushing shovelful after shovelful of tubes, the glass splinters were removed through a flotation separation process, and the heavy metals were recovered.

Did we get you all hot about tubes? Here’s how Mullard made their EF80 model.

[Thanks for the tip, Fran!]

Retrotechtacular is a weekly column featuring hacks, technology, and kitsch from ages of yore. Help keep it fresh by sending in your ideas for future installments.

Hackaday.io Land Rush: Vanity URLs

Hurry! Carve out your Hackaday.io homestead with a vanity URL. You can see I’ve already secured hackaday.io/mike, but get in before the rest of Hackaday finds out and you can you have ‘/tom’, ‘/jane’, or ‘/zerocool’. (Don’t do it… you can be more creative than zerocool!)

Whether you already have an account, or if you want to create one right now, the next time you log into Hackaday.io the interface will give you the opportunity to choose your vanity address. Like the Oklahoma land rush, we’re sure there will be a swell of folks looking to squat on the most pristine land. So if your first name is already taken, now is the perfect time to re-invent your perfect username.

For those that need a jump start picking their slug, we want to hear your favorite screen name/handle/user alias of all time in the comments. At the risk of embarassing [Jeff Keyzer], I have to say his alias (and company name) Mighty Ohm is pretty spectacular. Can anyone beat it?

Dreamcast Controller

A SEGA Dreamcast Controller With A Built-in Screen

[Fibbef] was hard at work on a project for a build-off competition when he accidentally fried the circuit board. Not one to give up easily, he opted to start a new project with only two days left in the competition. He managed to modify a SEGA Dreamcast controller to hold a color screen in that short amount of time.

The Dreamcast controller’s shape is somewhat conducive to this type of mod. It already has a small window to ensure the view of the visual memory card is not obstructed. Unfortunately [Fibbef’s] screen was a bit too large for this window. That meant he would have to expand the controller and the circuit board.

After taking the controller apart, he desoldered the memory card connectors. He then cut the circuit board cleanly in half vertically. He had to re-wire all of the traces back together by hand. It turned out initially that he had messed something up and accidentally fried the right half of the controller. To fix it, he cut a second controller in half and soldered the two boards together.

With some more horizontal space to work with on the PCB side of things, [Fibbef] now needed to expand the controller’s housing. He cut the controller into several pieces, making sure to keep the start button centered for aesthetics. He then used duct tape to hold popsicle sticks in place to make up for the missing pieces of the case. All of the sticks were then covered with a thick layer of ABS cement to make for a more rigid enclosure. All of this ended up being covered in Bondo, a common trick in video game console mods. It was then sanded smooth and painted with black primer to make for a surprisingly nice finish.

The screen itself still needed a way to get power and a video signal. [Fibbef] built an adapter box to take both of these signals and pass them to the controller via a single cable. The box as a USB-A connector for power input, and a composite connector for video. There’s also a USB-B connector for the output signals. [Fibbef] uses a standard printer USB cable to send power and video signals to the controller. The end result looks great and serves to make the Dreamcast slightly more portable. Check out the demo video below to see it in action. Continue reading “A SEGA Dreamcast Controller With A Built-in Screen”

A Wireless Web-Connected Morse Code Keyer

[Kevin] recently scored a Morse code keyer/sounder unit from the 1920s on eBay. While many hams would love to use an old keyer for CW, [Kevin] took a different route and repurposed it into a wireless web-connected morse code keyer.

[Kevin] mounted an Arduino Yun under the keyer, which listens for user input and provides web connectivity. The Yun connects to [Kevin]’s open-source web API he calls “morsel,” which allows it to send and receive messages with other morsel users. When a message is keyed in, the Yun publishes it to the API. When another keyer queries the API for incoming messages, the Yun downloads the morse sequence and replays it on the sounder.

[Kevin] also added some copper electrodes to the top of his enclosure, which act as capacitive buttons while keeping the keyer’s old-school appearance. The left button replays the most recently received message, and the right button sets the playback speed. Check out the video after the break to hear and see the keyer in action.

Thanks for the tip,  [Jarrod].

Continue reading “A Wireless Web-Connected Morse Code Keyer”

HotWheels

DIY Hot Wheels Drag Race Timer

[Apachexmd] wanted to do something fun for his three-year-old son’s birthday party. Knowing how cool race cars are, he opted to build his own Hot Wheels drag race timer. He didn’t take the easy way out either. He put both his electronics and 3D printing skills to the test with this project.

The system has two main components. First, there’s the starting gate. The cars all have to leave the gate at the same time for a fair race, so [Apachexmd] needed a way to make this electronically controlled. His solution was to use a servo connected to a hinge. The hinge has four machine screws, one for each car. When the servo is rotated in one direction, the hinge pushes the screws out through holes in the track. This keeps the cars from moving on the downward slope. When the start button is pressed, the screws are pulled back and the cars are free to let gravity take over.

The second component is the finish line. Underneath the track are four laser diodes. These shine upwards through holes drilled into the track. Four phototransistors are mounted up above. These act as sensors to detect when the laser beam is broken by a car. It works similarly to a laser trip wire alarm system. The sensors are aimed downwards and covered in black tape to block out extra light noise.

Also above the track are eight 7-segment displays; two for each car. The system is able to keep track of the order in which the cars cross the finish line. When the race ends, it displays which place each car came in above the corresponding track. The system also keeps track of the winning car’s time in seconds and displays this on the display as well.

The system runs on an Arduino and is built almost exclusively out of custom designed 3D printed components. Since all of the components are designed to fit perfectly, the end result is a very slick race timer. Maybe next [Apachexmd] can add in a radar gun to clock top speed. Check out the video below to see it in action. Continue reading “DIY Hot Wheels Drag Race Timer”

Arduino Calculator

High Cost Arduino Calculator Is Unwieldy, Still Cool Though

One of [Kale_3D]’s teachers had made an Arduino-powered calculator. It wasn’t robust and didn’t last too long in the classroom environment. After the non-functional calculator sat around the class for a while, [Kale_3D] decided he would give a shot at repairing it. Along the way the project didn’t just get repaired, it got a full rebuild.

This calculator uses a full 16 button matrix keypad. The Arduino deciphers button pushes with the help of the Keypad library, at which time the appropriate character is displayed on the 2×8 LCD screen. Selecting the function is a little different from normal since this project is limited to 16 buttons. Two of the buttons allow scrolling through not only standard arithmetic functions but trigonometric functions also. This was one of the features that the previous version was not capable of.

To protect the components, an enclosure was made out of 1/4″ laser cut wood. The pieces have notched edges to permit a nice fit. Even so, corner blocks were added to give the case even more rigidity.

Yes, this calculator is not practical, but that’s not the point. In the end [Kale_3D] felt that the project was definitely worth doing. He had learned a bunch of stuff about Arduino and especially code debugging! Most important of all he had a good time building it. There’s a video after the break showing how it works. The code and wiring diagrams are available for download on the project’s Instructable page.

Continue reading “High Cost Arduino Calculator Is Unwieldy, Still Cool Though”