Tripping Out: A Field Guide To Circuit Protection

My introduction to circuit protection came at the tender age of eight. Being a curious lad with an inventive – and apparently self-destructive – bent, I decided to make my mother a lamp. I put a hose clamp around the base of a small light bulb, stripped the insulation off an old extension cord, and jammed both ends of the wires under the clamp. When I plugged my invention into an outlet in the den, I saw the insulation flash off the cord just before the whole house went dark. Somehow the circuit breaker on the branch circuit failed and I tripped the main breaker on a 200 amp panel. My mother has never been anywhere near as impressed with this feat as I was, especially now that I know a little bit more about how electricity works and how close to I came to being a Darwin Award laureate.

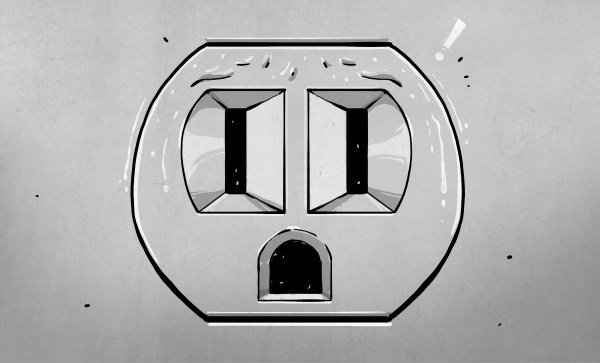
To help you avoid a similar fate, I’d like to take you on a trip (tee-hee!) through the typical household power panel and look at some of the devices that stand at the ready every day, waiting for a chance to save us from ourselves. As a North American, I’ll be focusing on the residential power system standards most common around here. And although there is a lot of technology that’s designed to keep you safe as a last resort, the electricity in your wall can still kill you. Don’t become casual with mains current!

Continue reading “Tripping Out: A Field Guide To Circuit Protection”

A Win For The Raspberry Pi Compute Module

News comes from the Raspberry Pi Foundation, of something of a coup for their Compute Module product. Support for it is to be integrated into NEC’s line of commercial displays, and the electronics giant has lined up a list of software partners to provide integrated signage solutions for the platform.

It is interesting to note how NEC have done this, while it’s being spun by the Foundation as a coup for them the compute module sits on a daughter board in a slot on the back of the display rather than on the display PCB itself. They are likely hedging their bets with this move, future daughter boards could be created to provide support for other platforms should the Compute Module board fail to gain traction.

Given that this relates to a high-end commercial product from just one manufacturer, what’s in it for us in the hardware community? After all, it’s not as if you’ll be seeing Compute Module slots in the back of domestic TVs or monitors from NEC or any other manufacturer in the near future. The answer is that such a high-profile customer lends the module platform a commercial credibility that it may not yet have achieved.  Until now, it has found a home mainly in more niche or boutique products, this appearance in something from a global manufacturer takes it to a new level. And as the module finds its way into more devices the chances of them coming within the reach of our community and providing us with opportunities for adapting them for our purposes through the Pi platform become ever greater.

The use of the Compute Module in displays made for public signage is oddly a continuation of an unseen tradition for ARM-based machines from Cambridge. Aside from British schools a significant market for the Acorn Archimedes platform that spawned ARM was the embedded signage market, and even today there are still plenty of signs concealing RiscOS machines out there in the wild.

We covered the launch of the Compute Module in 2014, but it’s fair to say it’s not appeared much since in the world of Raspberry Pi projects from hardware hackers. This is not because it’s not a good platform; more likely that the Raspberry Pi models A, B, and particularly the Zero are so much cheaper when you consider the significant cost of the Compute Module development board. At the Raspberry Pi 4th birthday party earlier this year, while covering the event as your Hackaday scribe but also wearing my metaphorical Pi kit supplier and Pi Jam organizer hats I stood up in the Q&A session and asked the Foundation CEO Phil Colligan to consider a hardware developer program for the platform. Perhaps a cut-down Compute Module developer board would be an asset to such a program, as well as driving more adoption of that particular board.

Scissors Make Great Automatic Cable Cutters

The team at [2PrintBeta] required a bunch of cables, heat shrink, and braid to be cut for their customers. They looked into an industrial cable cutter, but decided the price was a little too high, so they decided to make their own. They had a bunch of ideas for cutting: Using a razor blade?  Or a Dremel with a cutting wheel? What they came up with was a DIY cable cutter that uses a pair of scissors, a pair of stepper motors, a pair of 3D printed wheels and an Arduino.

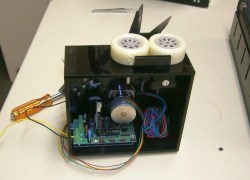
The first thing the team had to do was to mount the scissors so they would cut reliably. One of the stepper motors was attached to a drive wheel that had a bolt mounted on it. This went through one of the scissors’ handles, the other handle was held in place on the machine using screws. The second stepper motor was used to rotate the wheels that drives the cable through to the correct length. [2PrintBeta] used a BAM&DICE shield and two DICE-STK stepper motor drivers on an Arduino Mega to control the cutter.

The [2PrintBeta] team are pretty good at doing things themselves, as we’ve seen previously with their DIY plastic bender. And again, with this automatic cable cutter, they’ve seen a need and resolved it using the things at their disposal and some DIY ingenuity.

Continue reading “Scissors Make Great Automatic Cable Cutters”

Hackaday Prize Entry: Simpsons Hands

The creators of this Hackaday Prize entry say every month a new 3D-printed prosthetic solution comes on the scene. That doesn’t mean they’re not doing something different with their entry; yes, they’re still building a prosthetic hand, but they’re putting their own spin on it. This one isn’t using a string/cable/tendon setup, and the hand doesn’t even have four fingers. [Giovanni] and [Jenny] are going their own way, and what they’ve come up with is pretty special.

The most obvious feature of this prosthetic hand is a missing digit – Simpsons Hands – but this makes a lot of sense if you think about it. It’s doubtful any 3D-printed prosthetic hand will play a piano or touch type in the near future, so a pinkie finger is an appendix; an unneeded vanity that just increases the BOM and makes things harder to fit together.

Apart from the Simpsons Hands, this prosthetic hand is more or less what you would expect. The circuitry is just an Adafruit ATmega board, the mechanism is just a few servos, and the mechanics are well designed in carbon fiber PLA. What makes this prosthetic hand special for the team is that it’s the first of its kind in their native Colombia. Even if there’s a new 3D-printed prosthetic hand on Thingiverse every few weeks, this project makes it a truly global effort, and a great entry for the Hackaday Prize.

The BITX Transceiver Comes Of Age

There was a time when the idea of building your own single-sideband transceiver was too daunting for all but the most hardcore of amateur radio constructors. After all the process of creating SSB is complex enough in itself without adding the extra complexity of a receiver and the associated switching circuitry.

In 2003 an Indian radio amateur, [Ashhar Farhan], [VU2ESE] changed all that. His BitX SSB transceiver used a bidirectional amplifier design and readily available components such that it could be built by almost anyone using dead bug construction techniques for an extremely reasonable price.

Over the years since [Ashhar] first published his circuit, his design has been taken and enhanced, been presented in kit form, and extended to other bands by multiple other radio amateurs. Until now though it seems as though he himself has taken very little advantage of his work.

It is therefore with great interest that we note a new 40-meter BitX transceiver on the market from a company founded by the man himself. The transceiver itself is an Indian-assembled PCB with an updated circuit using a 12 MHz IF, varicap tuning, and large surface-mount components for easy modification. Just as with the original circuit, there is a full technical run-down of its operation should you wish to build one yourself. For a rather impressive $45 though you might wish to put down the soldering iron, it looks very much worth the wait for international postage.

We don’t often feature commercial product launches here on Hackaday, though we are besieged by people trying to persuade us to do so. So why this one? When the creator of a design that has been as significant as the BitX has been to its community of builders releases a new version it is newsworthy in itself, and if they are commercializing their work then they deserve that reward.

We’ve featured the BitX here in the past, with a rather impressive dead-bug build, and a look at a multiband version. We’re sure that this design thread has more to deliver, and look forward to more.

Thanks [WB9FLW] for the tip.

Turning Broken Toy Into Laser Target Practice

[Mathieu] wrote in with his laser target practice game. It’s not the most amazing hack in the history of hackery, but it’s an excellent example of the type of simple and fun things you can do with just a little bit of microcontrollering.

Flasergun8irst off, the gun is a broken toy gun that used to shoot something other than red collimated light beams. The Arduino knockoff inside reacts to a trigger pull and fires the laser for around 200 milliseconds. The gun also has a “gas gauge” that fills up with repeated shots and cools down over time. And therein lies the game — a simple race to ten, where each player only has a fixed number of shots over time.

The targets are simply a light sensor, scorekeeping LED display, and a buzzer that builds tension by beeping at you as the countdown timer ticks down. The bodies are made out of 3D-printed corners that connect some of [Mathieu]’s excess wooden goat-cheese lids.

All the code is up on GitHub so you can make your own with stuff that you’ve got lying around the house. The “gun” can be anything that you can embed a laser in that makes it aimable. Good clean fun!

Germans React To UK’s Micro:bit

Getting kids interested in programming is all the rage right now, and the UK is certainly taking pole position with its BBC micro:bit, just recently distributed to every seventh-grader in the land. Germany, proud of its education system and technological prowess, is caught playing catch-up. Until now.

The Calliope Mini (translated here) is essentially a micro:bit clone, but one that has learned from the experience of its spiritual forefather — the connection points are spread around the outside of the board where the crocodile clips won’t accidentally touch each other.

Not content to simply copy, the Calliope also adds additional functionality. A microphone and speaker are integrated onboard, as is a Grove-style I2C connector. They’ve even added a TI DRV8837 H-bridge motor driver, so students could make a rolling robot straight out of the box.

Continue reading “Germans React To UK’s Micro:bit”