The Poynting Vector Antenna

Radio amateurs are inventive people, and though not all of them choose to follow it there is a healthy culture of buildng radio equipment among them. In particular the field of antennas is where you’ll find a lot of their work, because the barrier to entry can be as low as the cost of a reel of wire.

Over the years a number of innovative antenna designs have come from radio amateurs’ experimentation, and it’s one of the more recent we’d like to share with you today following a [Southgate ARC] story about a book describing its theory (Here’s an Amazon link to the book itself). The Poynting Vector antenna has been one of those novel designs on the fringes for a while now, it has been variously described as the “Super-T”, or the “flute”. Its party piece is tiny dimensions, a fraction of the size of a conventional dipole, and it achieves that by the interaction between a magnetic field across the plates of a capacitor in a tuned circuit and the electric field between a very short pair of dipole radiators. The trade-off is that it has an extremely high Q and thus a narrow bandwidth, and since its feeder can become part of its resonant circuit it is notoriously difficult to match to a transmitter. [Alan MacDonald, VE3TET] and [Paul Birke, VE3PVB] have a detailed page on the development of their Poynting antenna which takes the reader through the details of its theory and the development of their practical version.

In the roof space above the room in which this is being written there hangs a traditional dipole for the 20m amateur band. Though it is a very effective antenna given that it is made from a couple of pieces of wire and a ferrite core it takes most of the length of the space, and as we’re sure Hackaday readers with callsigns will agree a relatively tiny alternative is always very welcome.

If antennas are a mystery to you then we’d suggest you read an introduction to antenna basics to get you started.

Amstrad On An FPGA

If you are from the United States and of a certain age, it is very likely you owned some form of Commodore computer. Outside the US, that same demographic was likely to own an Amstrad. The Z80-based computers were well known for game playing. [Freemac] implemented a working Amstrad CPC6128 using a Xilinx FPGA on a NEXYS2 demo board.

The wiki posting is a bit long, but it covers how to duplicate the feat, and also gives technical details about the design. It also outlines the development process used ranging from starting with a simple Z80 emulation and moving on to more sophisticated attempts. You can see a video of the device below.

Continue reading “Amstrad On An FPGA”

Keep An Old Real Time Clock Module Ticking

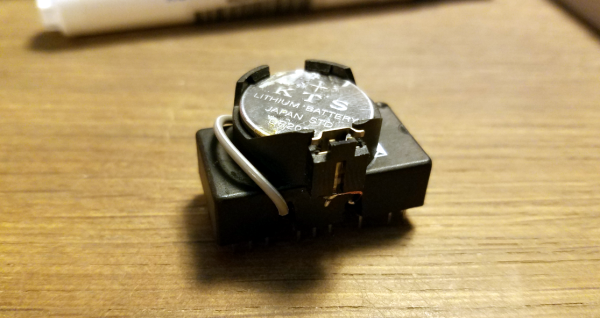
Sometimes we run into real problems restoring old machines. [RedruM69] recently ran into a system with a dead Real Time Clock (RTC) module. These modules were used on computers and all sorts of other equipment, storing time, date, and 100 or so bytes of battery backed SRAM (before the days of cheap, plentiful flash memory). Often an external coin cell would supply power to the module. In some cases though, cost savings would take over, and the battery would be incorporated into the module. Such is the case with many Dallas Semiconductor models, and the benchmarq bq3287 module [RedruM69] was working with. If we’re reading the date code right, the module was produced in mid 1995 so we’re well past the advertised 10 year battery life.

Apparently Texas Instruments is the current owner of this design, and they even have a datasheet online. (PDF link). It turns out that the bq3287 is a descendant of the bq3285, except that the battery pin is internally disconnected. For most people this would mean a search for a compatible replacement. An industrious hacker might even whip up something compatible from modern components. Not [RedruM69] though. He broke out his Dremel tool and cut into the potted case. Exposing the internal connections above pins 16 and 20 allowed him to solder two wires on. Connecting these wires to an external coin cell brought the module back to life.

[RedruM69] isn’t the first one to perform this hack. Sun computers kept their MAC address in chips like this. When the battery went dead, the computer was off the network. Hackers have been cutting the modules open and adding batteries for years. You could always forgo RTC modules completely and use the power grid as your timebase.

Air Conditioner Speaks Serial, Just Like Everything Else

Like so many other home appliances, it’s likely that even your air conditioner has a serial interface buried inside it. If you’re wondering why, it’s because virtually every microcontroller on the planet has a UART built in, and it’s highly useful for debugging during the development process, so it makes sense to use it. Thus, it was only a matter of time before we saw a hacked airconditioner controlled by a Raspberry Pi.

[Hadley] was growing frustrated with the IR remote for his Mitsubishi air conditioner; it can issue commands, but it’s a one way interface – there’s no feedback on current status or whether commands are received, other then the occasional beep or two. Deciding there had to be a better way, [Hadley] grabbed a Saleae Logic Analyser and started probing around, determining that the unit spoke 5 V TTL at 2400 bps with even parity. The next step was to start talking back.

Continue reading “Air Conditioner Speaks Serial, Just Like Everything Else”

CES17: Arduino Unveils LoRa Modules For The Internet Of Things

WiFi and Bluetooth were never meant to be the radios used by a billion Internet of Things hats, umbrellas, irrigation systems, or any other device that makes a worldwide network of things interesting. The best radio for IoT is something lightweight which operates in the sub-Gigahertz range, doesn’t need a lot of bandwidth, and doesn’t suck down the power like WiFi. For the last few years, a new low-power wireless communication standard has been coming on the scene, and now this protocol — LoRa — will soon be available in an Arduino form factor.

The Primo, and NRF

It’s not LoRa, but the Arduino Primo line is based on the ESP8266 WiFi chip and a Nordic nRF52832 for Bluetooth. The Primo comes in the ever-familiar Arduino form factor, but it isn’t meant to be an ‘Internet of Things’ device. Instead, it’s a microcontroller for devices that need to be on the Internet.

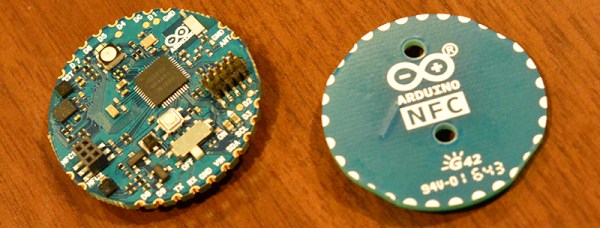
Also on display at CES this year is the Primo Core which we first saw at BAMF back in May. It’s a board barely larger than a US quarter that has a few tricks up its sleeve. The Primo Core is built around the nRF52832, and adds humidity, temperature, 3-axis magnetometer and a 3-axis accelerometer to a square inch of fiberglass.

The Primo Core has a few mechanical tricks up its sleeve. Those castellated pins around the circumference can be soldered to the Alice Pad, a breakout board that adds a USB port and LiPo battery charger.

LoRa

Also on deck at the Arduino suite were two LoRa shields. In collobration with Semtech, Arduino will be releasing the pair of LoRa shields later this year. The first, the Node Shield, is about as simple as it can get — it’s simply a shield with a LoRa radio and a few connectors. The second, the Gateway Shield, does what it says on the tin: it’s designed to be a gateway from other Arduino devices (Ethernet or WiFi, for example) to a Node shield. The boards weren’t completely populated, but from what I could see, the Gateway shield is significantly more capable with support for a GPS chipset and antenna.

A partnership with Cayenne and MyDevices

Of course, the Internet of Things is worthless if you can’t manage it easily. Arduino has struck up a partnership with MyDevices to turn a bunch of low-bandwidth radio and serial connections into something easy to use. Already, we’ve seen a few builds and projects using MyDevices, but the demos I was shown were extremely easy to understand, even if there were far too many devices in the room.

All of this is great news if you’re working on the next great Internet of Things thing. The Primo Core is one of the smallest wireless microcontroller devices I’ve seen, and the addition of LoRa Arduino shields means we may actually see useful low-bandwidth networks in the very near future.

Creating A PCB In Everything: Creating A Custom Part In Fritzing

This is the continuation of a series of posts where I create a schematic and PCB in various EDA tools. Already, we’ve looked at Eagle CAD, KiCad, and took a walk down memory lane with one of the first PCB design tools for the IBM PC with Protel Autotrax. One of the more controversial of these tutorials was my post on Fritzing. Fritzing is a terrible tool that you should not use, but before I get to that, I need to back up and explain what this series of posts is all about.

The introduction to this series of posts laid it out pretty bare. For each post in this series, I will take a reference schematic for a small, USB-enabled ATtiny85 development board. I recreate the schematic, recreate the board, and build a new symbol and footprint in each piece of software. That last part — making a new symbol and footprint — is a point of contention for Fritzing users. You cannot create a completely new part in Fritzing. That’s a quote straight from the devs. For a PCB design tool, it’s a baffling decision, and I don’t know if I can call Fritzing a PCB design tool now.

Continue reading “Creating A PCB In Everything: Creating A Custom Part In Fritzing”

Supercharged, Fuel Injected V10 Engine, At 1/3 Scale

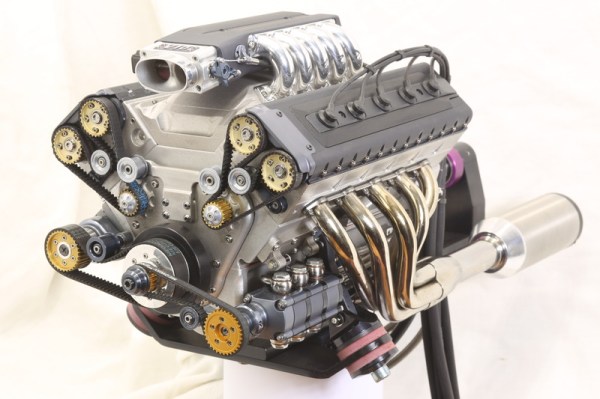
Nearly three years in the making, behold the raw power and precision of this 1/3-scale V10 engine.

Coming in at 125 cubic centimeters displacement, [Keith Harlow]’s fuel injected masterpiece isn’t too far from the size of some motor scooter engines. We doubt the local Vespa club would look upon it as legit mod, but we’d love to see it. [Keith]’s build log is a long series of forum posts, but from what we’ve seen it looks like every part was made by hand with the exception of the fuel injection system. Even the caps for the spark plugs were custom injection molded right in [Keith]’s shop. And it appears that no CNC was used – even those intake headers and the rotors for the supercharger were hogged out of aluminum using a manual mill. The exhaust headers alone are straight up works of art. There’s a staggering amount of work here, which begs the question: why? The answer in this case is obviously, “Because he can.”

Few builds compare to the level of craftsmanship on display here. The Clickspring skeleton clock comes to mind, but for model engine builds we’d have to point to [Keith]’s earlier 1/4-scale V8 engine. And we’ll hasten to add that as much time as [Keith] has spent building these works of mechanical art, he’s probably dedicated just as much time to documenting them and giving back to his community. We can all learn a lesson from that.

Continue reading “Supercharged, Fuel Injected V10 Engine, At 1/3 Scale”