Retrotechtacular: Information From The Days When Colour TV Was New

By the time colour TV came to the United Kingdom, it was old news to Americans. Most of the viewing public on the Western side of the Atlantic had had the opportunity to see more than black-and-white images for years when in 1967 the BBC started transmitting its first colour channel, BBC2.

For Americans and continental Europeans, the arrival of colour TV had been an incremental process, in which the colour subcarrier had been added to their existing transmission standard. Marketed as “compatible color” to Americans, this ensured that their existing black-and-white TV sets had no need for replacement as the new transmissions started.

The United Kingdom by contrast had been one of the first countries in the world to adopt a television standard in the 1930s, so its VHF 405-line positive-modulation black-and-white services stood alone and looked extremely dated three decades later. The BBC had performed experiments using modified round-CRT American sets to test the feasibility of inserting an NTSC colour subcarrier into a 405-line signal, but had eventually admitted defeat and opted for the Continental 625-line system with the German PAL colour encoding. This delivered colour TV at visibly better quality than the American NTSC system, but at the expense of a 15-year process of switching off all 405-line transmitters, replacing all 405-line sets, and installing new antennas for all viewers for the new UHF transmissions.

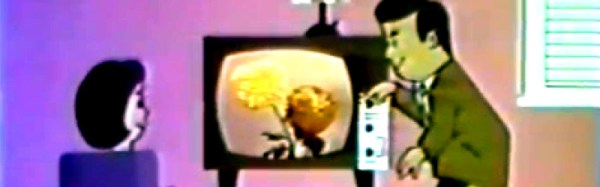
Such a significant upgrade must have placed a burden upon the TV repair and maintenance trade, because as part of the roll-out of the new standard the BBC produced and transmitted a series of short instructional animated films about the unfamiliar technology, which we’ve placed below the break. The engineer is taken through the signal problems affecting UHF transmissions, during which we’re reminded just how narrow bandwidth those early UHF Yagis must have been, then we are introduced to the shadowmask tube and all its faults. The dreaded convergence is introduced, as these were the days before precision pre-aligned CRTs, and we briefly see an early version of the iconic Test Card F. Finally we are shown the basic procedure for achieving the correct white balance. There is a passing reference to dual-standard sets, as if convergence for colour transmissions wasn’t enough of a nightmare a lot of the early colour sets incorporated a bank of switches on their PCB to select 405-line or 625-line modes. The hapless engineer would have to set up the convergence for both signals, something that must have tried their patience.

The final sequence looks at the hand-over of the new set to the customer. In an era in which we are used to consumer electronics with fantastic reliability we would not be happy at all with a PAL set from 1967. They were as new to the manufacturers as they were to the consumers, so the first generation of appliances could hardly have been described as reliable. The smiling woman in the animated film would certainly have needed to call the engineer again more than once to fix her new status symbol.

Continue reading “Retrotechtacular: Information From The Days When Colour TV Was New”

Hakko FX-901: Better Than TS-100?

You’ve surely seen the TS-100 soldering iron. It has an OLED display, an ARM processor, and will run with an external battery pack. They are not too pricey, but at $80 or so they aren’t exactly an impulse buy, either. [Drone Camps RC] used one in the field and decided to try a Hakko FX-901 instead. He did a video review that you can see below.

The FX-901 is about half the price of a TS-100. Granted, it doesn’t have a fancy display and you can’t hack it to play Tetris. However, it does take batteries (including rechargeable) without an external pack. The manufacturer claims up to two hours of use and that it will melt solder in 40 seconds. From the video, the iron actually melted solder in under 30 seconds. The two hours, by the way, is with rechargeables. Alkaline AA batteries should give about 70 minutes of operation.

Continue reading “Hakko FX-901: Better Than TS-100?”

Video Streaming Like Your Raspberry Pi Depended On It

The Raspberry Pi is an incredibly versatile computing platform, particularly when it comes to embedded applications. They’re used in all kinds of security and monitoring projects to take still shots over time, or record video footage for later review. It’s remarkably easy to do, and there’s a wide variety of tools available to get the job done.

However, if you need live video with as little latency as possible, things get more difficult. I was building a remotely controlled vehicle that uses the cellular data network for communication. Minimizing latency was key to making the vehicle easy to drive. Thus I set sail for the nearest search engine and begun researching my problem.

My first approach to the challenge was the venerable VLC Media Player. Initial experiments were sadly fraught with issues. Getting the software to recognize the webcam plugged into my Pi Zero took forever, and when I did get eventually get the stream up and running, it was far too laggy to be useful. Streaming over WiFi and waving my hands in front of the camera showed I had a delay of at least two or three seconds. While I could have possibly optimized it further, I decided to move on and try to find something a little more lightweight.

Continue reading “Video Streaming Like Your Raspberry Pi Depended On It”

LEGO Prototyping With Tinkercad’s Brick Mode

[Andrew Sink] made a brief video demonstrating how he imported an STL of the well-known 3D Benchy tugboat model, and instead of sending it to a 3D printer used the Brick Mode feature to make a physical copy out of LEGO bricks in an eye-aching kaleidoscope of colors.

For those of you who haven’t used Tinkercad lately, Brick Mode allows you to represent a model as LEGO bricks at various scales. You model something as usual (or import a model) and by pushing a single button, render it in LEGO as accurately as can be done with standard bricks.

In addition, [Andrew] shows how the “Layers” feature can be used as a makeshift assembly guide for the model, albeit with a couple of quirks that he explains in the video embedded below.

Continue reading “LEGO Prototyping With Tinkercad’s Brick Mode”

Pedal-Pi, Simple Programmable Guitar Pedal

For several years, [Ray] and [Anna], the team behind ElectroSmash, have been smashing audio electronics and churning out some sweet DIY audio gear. This time around, they’ve built Pedal-Pi — a simple programmable guitar pedal based around the Raspberry-Pi Zero. It is aimed at hackers, programmers and musicians who want to experiment with sounds and learn about digital audio. A lot of effort has gone in to documenting the whole project. Circuit analysis, a detailed BoM, programming, assembly and background information on related topics are all covered on their Forum.

The hardware is split in to three parts. On the input, a MCP6002 rail-to-rail op-amp amplifies and filters the analog waveform and then a MCP3202 ADC digitizes it to a 12-bit signal. The Pi-Zero then does all of the DSP, creating effects such as distortion, fuzz, delay, echo and tremolo among others. The Pi-Zero generates a dual PWM signal, which is combined and filtered before being presented at the output. The design is all through hole and the handy assembly guide can be useful for novices during assembly.  The code examples include a large number of pedal effects, and if you are familiar with C, then there’s enough information available to help you write your own effects.

Even if you don’t plan on building one, technical background such as the Basics of Audio DSP in C for Raspberry Pi Zero, Using MCP3202 ADC with Raspberry Pi Zero and PWM Audio on Raspberry Pi Zero ought to make for interesting reading. Check out the video after the break detailing the build.

If you’d like to check out some of their earlier work, check out 1WAMP, an Open Hardware Guitar Amplifier and pedalSHIELD, an opensource Arduino Guitar Pedal.

Continue reading “Pedal-Pi, Simple Programmable Guitar Pedal”

Relay Computer: You Can Hear It Think

Modern digital computers have complex instruction sets that runs on state-of-the-art ALUs which in turn are a consequence of miniaturized logic gates that are built with tiny transistors. These tiny transistors are essentially switches. You could imagine replacing with electromagnetic relays, and get what is called a relay computer. If you can imagine it, someone’s done it. In this case, [jhallenworld].

The Z3 was the first working programmable, fully automatic digital computer designed by Konrad Zuse. The board employs modern semiconductor devices such as memory and microcontrollers, however, the CPU is all relays. A hexadecimal keyboard allows for program entry and a segment display allows tracking the address and data. The program is piped into serial to the parallel decoder and fed to the CPU where the magic happens. Since the core is electromechanical it is possible to connect the output to peripherals such as a bell as demonstrated near the end of the video.

This project is a good balance of retro and modern to be useful to anyone interested in mechanical computers and should be a lot of fun for the geek kind. Hacking this computer to modify the instruction set should be equally rewarding and a good exercise for students of computing theory.

There is a SourceForge page dedicated to the project with the details on the project including the instruction set and architecture. Check out the video below and if you are inspired by the project, be sure to check out the [Clickity Clack]’a Videos on designing a relay computer bit by bit.

Antenna Basics By Whiteboard

Like a lot of people, [Bruce] likes radio controlled (RC) vehicles. In fact, many people get started in electronics motivated by their interest in RC. Maybe that’s why [Bruce] did a video about antenna basics where he spends a little more than a half hour discussing antennas. You can see the video below.

[Bruce] avoids any complex math and focuses more on intuition about antennas, which we like. Why does it matter that antennas are cut to a certain length? [Bruce] explains it using a swing and a grandfather clock as an analogy. Why do some antennas have gain? Why is polarization important? [Bruce] covers all of this and more. There’s even a simple experiment you can do with a meter and a magnet that he demonstrates.

Continue reading “Antenna Basics By Whiteboard”