Coin Cell Challenge: Use Coin Cell, Win Prizes

Today, we’re calling all hackers to do the most with a single coin cell. It’s the Coin Cell Challenge, and we’re looking for everything from the most low-power electronics to a supernova in a button cell battery.

Electronics are sucking down fewer and fewer amps every year. Low power is the future, and we’re wondering how far we can push the capabilities of those tiny discs full of power. The Coin Cell Challenge is your chance to plumb the depths of what can be done with the humble coin cell.

This is a contest, and as with the tradition of the Open 7400 Logic Competition and the recent Flashing Light Prize, we want to see what the community can come up with. The idea is simple: do something cool with a single coin cell and you’ll secure your fifteen minutes of fame and win a prize.

Three Challenges

To kick this contest off, we’re opening up three challenges to all contenders to the world heavyweight champion of button cell exploits. The first, the Lifetime Award, will go to whoever can run something interesting the longest amount of time on a coin cell. The Supernova Award is the opposite – what is the most exciting thing you can do with a button cell battery, lifetime be damned? The Heavy Lifting Award will go to the project that is the most unbelievable. If you think you can’t do that with a coin cell battery — lifting a piano or starting a car, for example — odds are you probably can. We want to see it.

Prizes and Rules

All Hackaday hardware hacking challenges need prizes, and for this one, we’re rolling out the red carpet. We’re offering up cash prizes for the top coin cell hacks. There are three $500 USD cash prizes, one for each winner of the Lifetime, Supernova, and Heavy Lifting awards. We’re not stopping there, because the top twenty builds overall will each receive $100 in Tindie credit, where the winners can cash in on some artisanal electronics sold by the people who design them.

What do you have to do to get in on this action? First, you need to build something. This something must be powered by nothing more than a single coin cell battery and must include some type of electronics. We also want this to be Open Source, and you’ll need to start a project on hackaday.io. The full rules are available over here, but don’t wait — the deadline for entry is January 8th, 2018.

We’re excited to see what the community comes up with, and who will find a production coin cell that’s the size of a dinner plate. This is going to be a great contest with overheating coin cells and tiny bits of metal flying across the room. This is going to be a contest filled with blinkies and wireless devices that run for far, far too long. Someone is going to misread the rules and tape together a meter tall pile of coin cells. It’s going to be awesome, so start your project now.

Peer Review In The Age Of Viral Video

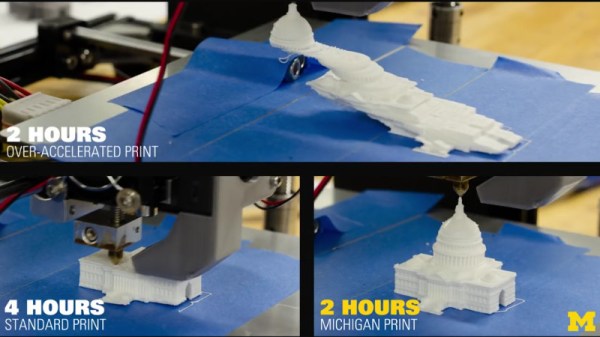
Recently, a YouTube video has been making the rounds online which shows a rather astounding comparison between two printed models of the US Capitol. Starting with the line “3-D PRINTERS CAN NOW PRINT TWICE AS FAST”, the video shows that one print took four hours to complete, and the other finished in just two hours by virtue of vibration reducing algorithms developed at the University of Michigan. The excitement around this video is understandable; one of the biggest limitations of current 3D printer technology is how long it takes to produce a model of acceptable quality, and if improvements to the software that drives these machines could cut total print time in half, the ramifications would be immense.

In only a few weeks the video racked up tens of thousands of views, and glowing articles popped up with headlines such as: “How to cut 3D print times in half by the University of Michigan” and “University of Michigan professor doubles 3D printing speeds using vibration-mitigating algorithm“. Predictably, our tips line lit up with 3D printer owners who wanted to hear more about the incredible research that promised to double their print speed with nothing more than a firmware update.

The only problem is, the video shows nothing of the sort. What’s more, when pushed for details, the creators of the video are now claiming the same thing.

Continue reading “Peer Review In The Age Of Viral Video”

MeatBagPnP Makes You The Automatic Pick And Place

It’s amazing how hackers are nowadays building increasingly complex hardware with SMD parts as small as grains of sand. Getting multilayer PCB’s and soldering stencils in small quantities for prototyping is easier than ever before. But Pick-and-Place — the process of taking parts and stuffing them on the PCB in preparation for soldering — is elusive, for several reasons. For one, it makes sense only if you plan to do volume production as the cost and time for just setting up the PnP machine for a small run is prohibitive. And a desktop PnP machine isn’t yet as ubiquitous as a 3D printer. Placing parts on the board is one process that still needs to be done manually. Just make sure you don’t sneeze when you’re doing it.

Of course the human is the slow part of this process. [Colin O’Flynn] wrote a python script that he calls MeatBagPnP to ease this bottleneck. It’s designed to look at a row in a parts position file generated from your EDA program and highlight on a render of the board where that part needs to be placed. The human then does what a robotic PnP would have done.

A bar code scanner is not necessary, but using one does make the process a bit quicker. When you scan a code on the part bag, the script highlights the row on the spreadsheet and puts a marker on the first instance of it on the board. After you’ve placed the part, pressing the space bar puts a marker on the next instance of the same value. The script shows it’s done after all parts of the same value are populated and you can then move on to the next part. If you don’t have a bar code scanner handy, you can highlight a row manually and it’ll tell you where to put that part. Check it out in the video below.

Of course, before you use this tool you need some prior preparation. You need a good PNG image of the board (both sides if it is double-sided) scaled so that it is the same dimensions as the target board. The parts position file generated from your EDA tool must use the lower left corner of the board as the origin. You then tell the tool the board dimensions and it scales up everything so that it can put the red markers at the designated XY positions. The script works for single and double-sided boards. For a board with just a few parts, it may not be worth the trouble of doing this, but if you are trying to manually populate a complex board with a lot of parts, using a script like this could make the process a lot less painful.

The project is still fresh and rough around the edges, so if you have comments or feedback to offer, [Colin] is listening.

[Colin]’s name ought to ring a bell — he’s the hacker who built ChipWhisperer which took 2nd Prize at The Hackaday Prize in 2014. The MeatBagPnP project is a result of having worked at building increasingly complex boards manually and trying to make the process easier. In addition to the walk-through of how the script works after the break we’ve embedded his other video from three years back when he was stuffing parts — including BGA’s — the hard way and then reflowing them in a Chinese oven with hacked firmware.

Continue reading “MeatBagPnP Makes You The Automatic Pick And Place”

High-Speed Drones Use AI To Spoil The Fun

Some people look forward to the day when robots have taken over all our jobs and given us an economy where we can while our days away on leisure activities. But if your idea of play is drone racing, you may be out of luck if this AI pilot for high-speed racing drones has anything to say about it.

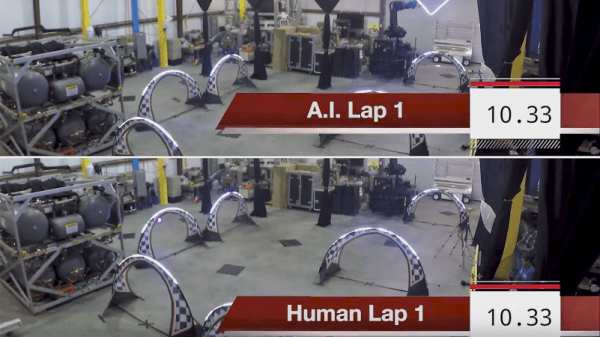
NASA’s Jet Propulsion Lab has been working for the past two years to develop the algorithms needed to let high-performance UAVs navigate typical drone racing obstacles, and from the look of the tests in the video below, they’ve made a lot of progress. The system is vision based, with the AI drones equipped with wide-field cameras looking both forward and down. The indoor test course has seemingly random floor tiles scattered around, which we guess provide some kind of waypoints for the drones. A previous video details a little about the architecture, and it seems the drones are doing the computer vision on-board, which we find pretty impressive.

Despite the program being bankrolled by Google, we’re sure no evil will come of this, and that we’ll be in no danger of being chased down by swarms of high-speed flying killbots anytime soon. For now we can take solace in the fact that JPL’s algorithms still can’t beat an elite human pilot like [Ken Loo], who bested the bots overall. But alarmingly, the human did no better than the bots on his first lap, which suggests that once the AI gets a little creativity and intuition like that needed to best a Go champion, [Ken] might need to find another line of work.

Continue reading “High-Speed Drones Use AI To Spoil The Fun”

Gamify Your Workout With This Wearable Console Controller

‘Tis soon to be the season when resolutions falter and exercise equipment purchased with the best of intentions is cast aside in frustration. But with a little motivation, like making your exercise machine a game console controller, you can maximize your exercise gear investment and get in some guilt-free gaming to boot.

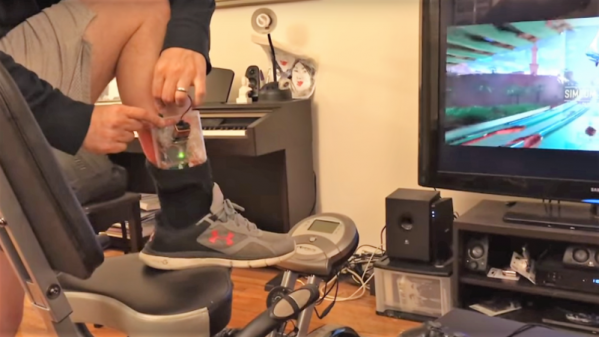
Honestly, there is no better motivation for keeping up with exercise than taking classes, but not many people have the discipline — or the pocketbook — to keep going to the gym for the long haul. With this in mind, [Jason] looked for a way to control PS4  games like Mario Karts or TrackMania with his recumbent bike. In an attempt to avoid modifying the bike, [Jason] decided on a wearable motion sensor for his ankle. Consisting of an Uno, an MPU9250 accelerometer, and a transmitter for the 433-MHz ISM band, the wearable sends signals to a receiver whenever the feet are moving. This simulates pressing the up arrow controller key to set the game into action. Steering and other game actions are handled by a regular controller; we’d love to see this expanded to include strain gauges on the recumbent bike’s handles to allow left-right control by shifting weight in the seat. Talk about immersive gameplay!

While we like the simplicity of [Jason]’s build and the positive reinforcement it provides, it’s far from the first exercise machine hack we’ve seen. From making Google Street View bike-controlled to automatically logging workouts, exercise machines are ripe for the hacking.

Continue reading “Gamify Your Workout With This Wearable Console Controller”

The Chemistry And Engineering Of DIY Photochromic Glass

[Ben Krasnow] is no stranger to exploring the more arcane corners of hackerdom, and the latest video on his “Applied Science” channel goes into a field few DIYers have touched: homemade glass, including the photochromic variety.

That DIY glassmaking remains a largely untapped vein is not surprising given what [Ben] learned over the last months of experimenting. With searing temperatures bordering on the unobtainable, volatile ingredients that evaporate before they can be incorporated, and a final product so reactive that a platinum crucible is the best vessel for the job, glassmaking is not easy, to say the least. Glassmaking doesn’t scale down from an industrial process very well, it seems. Nonetheless, [Ben] came up with a process that could be replicated using common enough ingredients and a simple electric kiln modded with a PID controller for pinpoint temperature setting. And while Luxottica has nothing to worry about yet, he did manage to get some clearly if subtly photochromic samples, despite the challenges.

Without a doubt, [Ben] crossed over into “mad scientist” territory a while back, and we think it’s great. What other way is there to describe a guy who has an electron microscope, a high-power ruby laser, a CT scanner, and a cookie making robot in his basement? Whatever you call it, we like the results.

Continue reading “The Chemistry And Engineering Of DIY Photochromic Glass”

Tricked-Out Tablet Becomes Workbench Tool

The workbench of the typical electronics hobbyist today would probably be largely recognizable by Heathkit builders back in the 60s and 70s. But where the techs and tinkerers of yesteryear would have had a real dead-tree SAMS Photofact schematic spread out on the bench, today you’ll get more use out of a flat-screen display for data sheets and schematics, and this handy shop Frankentablet might be just the thing to build.

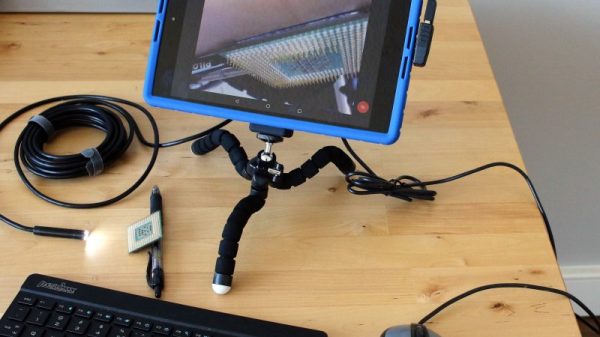
Tablets like the older Nexus 9 that [enginoor] used as the basis for this build have a little bit of a form-factor problem because unlike a laptop, a tablet isn’t very good at standing up on its own. To fix that, they found a suitable silicone skin for the Nexus, and with some silicone adhesive began bedazzling the back of the tablet. A bendy tripod intended for phones was added, and with the tablet able to stand on its own they maximized the USB port with a right angle adapter and a hub. Now the tablet has a USB drive, a mouse, and a keyboard, ready for perusing data sheets online. And hackers of a certain age will appreciate the eyeball-enhancing potential of the attached USB microscope.

[enginoor]’s bench tablet is great, but we’ve seen full-fledged bench PCs before too. Take your pick — wall mounted and floating, or built right into the workbench.

Thanks to [ccvi] for the tip.