Building A Portable Solar-Powered Spot Welder: Nearly Practical!

Last time, we covered storing and charging a 3000 Farad supercapacitor to build a solar-powered, portable spot welder. Since then, I’ve made some improvements to the charging circuit and gotten it running. To recap, the charger uses a DC-DC buck converter to convert a range of DC voltages down to 2.6 V. It can supply a maximum of 5 A though, and the supercapacitor will draw more than that if allowed to.

Capacitor charge current decreases with time as the capacitor charges. Source: Hyperphysics

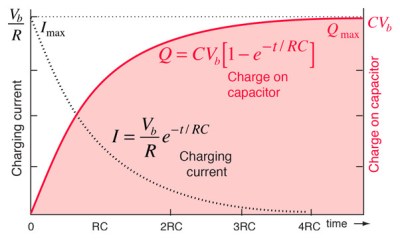
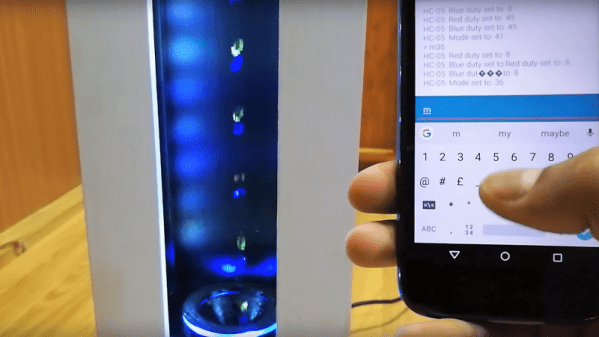
After some failed attempts, I had solved that by passing the buck converter output through a salvaged power MOSFET. A spare NodeMCU module provided pulse width modulated output that switched the MOSFET on for controlled periods of time to limit the charging current. That was fine, but a constant-voltage charger really isn’t the right way to load up a capacitor. Because the capacitor plates build up a voltage as it charges, the current output from a constant-voltage charger is high initially, but drops to a very low rate in the end.

Continue reading “Building A Portable Solar-Powered Spot Welder: Nearly Practical!”

Reverse Engineer An X-Ray Image Sensor

If you think of a medical x-ray, it is likely that you are imagining a photographic plate as its imaging device. Clipped to your tooth by your dentist perhaps, or one of the infamous pictures of the hands of [Thomas Edison]’s assistant [Clarence Madison Dally].

As with the rest of photography, the science of x-ray imaging has benefited from digital technology, and it is now well established that your hospital x-ray is likely to be captured by an electronic imaging device. Indeed these have now been in use for so long that their first generation can even be bought by an experimenter for an affordable sum, and that is what the ever-resourceful [Lucy Fauth] with the assistance of [Jana Marie Hemsing], has done. Their Trophy DigiPan digital x-ray image sensor was theirs for around a hundred Euros, and though it’s outdated in medical terms it still has huge potential for the x-ray experimenter.

The write-up is a fascinating journey into the mechanics of an x-ray sensor, with the explanation of how earlier devices such as this one are in fact linear CCD sensors which track across the exposed area behind a scintillator layer in a similar fashion to the optical sensor in a flatbed scanner. The interface is revealed as an RS422 serial port, and the device is discovered to be a standalone unit that does not require any commands to start scanning. On power-up it sends a greyscale image, and a bit of Sigrok examination of the non-standard serial stream was able to reveal it as 12-bit data direct from the sensor. From those beginnings they progressed to an FPGA-based data processor and topped it all off with a very tidy power supply in a laser-cut box.

It’s appreciated that x-rays are a particularly hazardous medium to experiment with, and we note from their videos that they are using some form of shielding. The source is a handheld fluoroscope of the type used in sports medicine that produces a narrow beam. If you remember the discovery of an unexpected GameBoy you will be aware that medical electronics seems to be something of a speciality in those quarters, as do autonomous box carriers.

Continue reading “Reverse Engineer An X-Ray Image Sensor”

A Tale Of Two Phases And Tech Inertia

What kind of power service is in the United States? You probably answered 120-volt service. If you thought a little harder, you might remember that you have some 240-volt outlets and that some industrial service is three phase. There used to be DC service, but that was a long time ago. That’s about it, right? Turns out, no. There are a very few parts of the United States that have two-phase power. In addition, DC didn’t die as quickly as you might think. Why? It all boils down to history and technological inertia.

Split Phase Power by Charles Esson CC-BY-SA 3.0

You probably have quite a few 120-volt power jacks in sight. It is pretty hard to find a residence or commercial building these days that doesn’t have these outlets. If you have a heavy duty electric appliance, you may have a 240-volt plug, too. For home service, the power company supplies 240 V from a center tapped transformer. Your 120V outlets go from one side to the center, while your 240V outlets go to both sides. This is split phase service.

Industrial customers, on the other hand, are likely to get three-phase service. With three-phase, there are three wires, each carrying the line voltage but out of phase with each other. This allows smaller conductors to carry more power and simplifies motor designs. So why are there still a few pockets of two-phase?

Continue reading “A Tale Of Two Phases And Tech Inertia”

Programming Linux Devices With Arduino And The Cloud

Back in the olden days, when the Wire library still sucked, the Arduino was just a microcontroller. Now, we have single board computers and cheap microcontrollers with WiFi built in. As always, there’s a need to make programming and embedded development more accessible and more widely supported among the hundreds of devices available today.

At the Embedded Linux Conference this week, [Massimo Banzi] announced the beginning of what will be Arduino’s answer to the cloud, online IDEs, and a vast ecosystem of connected devices. It’s Arduino Create, an online IDE that allows anyone to develop embedded projects and manage them remotely.

As demonstrated in [Massimo]’s keynote, the core idea of Arduino Create is to put a connected device on the Internet and allow over-the-air updates and development. As this is Arduino, the volumes of libraries available for hundreds of different platforms are leveraged to make this possible. Right now, a wide variety of boards are supported, including the Raspberry Pi, BeagleBone, and several Intel IoT boards.

The focus of this development is platform-agnostic and focuses nearly entirely on ease of use and interoperability. This is a marked change from the Arduino of five years ago; there was a time when the Arduino was an ATmega328p, and that’s about it. A few years later, you could put Arduino sketches on an ATtiny85. A lot has changed since then. We got the Raspberry Pi, we got Intel stepping into the waters of IoT devices, we got a million boards based on smartphone SoCs, and Intel got out of the IoT market.

While others companies and organizations have already made inroads into an online IDE for Raspberry Pis and other single board computers, namely the Adafruit webIDE and Codebender, this is a welcome change that already has the support of the Arduino organization.

You can check out [Massimo]’s keynote below.

Continue reading “Programming Linux Devices With Arduino And The Cloud”

Laser Cut Your 3D Printed Trash

If you have a 3D printer, you’re surrounded by plastic trash. I’m speaking, of course, of failed prints, brims, and support material that builds up in the trash can near your printer. Although machines that turn that trash into filament exist, they’re not exactly common. But there’s another way to turn that waste into new building materials. [flowalistic], 3D designer extraordinaire, is using that trash to create panels of plastic and throwing that into a laser cutter. It’s a plastic smoothie, and if you can sort your scrap by color, the results look fantastic.

The first step in turning garbage plastic into a plastic sheet is throwing everything into a blender. Only PLA was used for this experiment because using ABS will release chlorine gas. These plastic fragments were placed in the oven, on a cookie sheet with a sheet of parchment paper. After about a half an hour of baking at 200 °C, the sheet was pressed between sheets of wood and left to cool. From there, the PLA sheet was sent to the laser cutter where it can be fabricated into rings, models, coasters, spirographs, and toys.

While this is an interesting application of trash using parts and equipment [flowalistic] had sitting around — therefore, a hack — it must be noted this should never be replicated by anyone. That big bag of scrap plastic could contain ABS, and you should never put ABS in a laser cutter unless you want your workspace to smell awful. And/or be sure to crack a window.

Introduce Yourself To A PocketBeagle With BaconBits

The PocketBeagle single-board computer is now a few months old, and growing fast like its biological namesake. An affordable and available offering in the field of embedded Linux computing, many of us picked one up as an impulse buy. For some, the sheer breadth of possibilities can be paralyzing. (“What do I do first?”) Perhaps a development board can serve as a starting point for training this young puppy? Enter the BaconBits cape.

When paired with a PocketBeagle, everything necessary to start learning embedded computing is on hand. It covers the simple basics of buttons for digital input, potentiometer for analog input, LEDs for visible output. Then grow beyond the basics with an accelerometer for I²C communication and 7-segment displays accessible via SPI. Those digging into system internals will appreciate the USB-to-serial bridge that connects to PocketBeagle’s serial console. This low-level communication will be required if any experimentation manages to (accidentally or deliberately) stop PocketBeagle’s standard USB network communication channels.

BaconBits were introduced in conjunction with the E-ALE (embedded apprentice Linux engineer) training program for use in hands-on modules. The inaugural E-ALE session at SCaLE 16X this past weekend had to deal with some last-minute hiccups, but the course material is informative and we’re confident it’ll be refined into a smooth operation in the near future. While paying for the class will receive built hardware and in-person tutorials to use it, all information – from instructor slides to the BaconBits design – is available on Github. Some of us will choose to learn by reading the slides, others will want their own BaconBits for independent experimentation. And of course E-ALE is not the only way to learn more about PocketBeagle. Whichever way people choose to go, the embedded Linux ecosystem will grow, and we like the sound of that!

LED Illusion Makes Colorful Water Drops Defy Gravity

The 60s and 70s were a great time for kitschy lighting accessories. Lava lamps, strobes, color organs, black light posters — we had it all. One particularly groovy device was an artificial rain display, where a small pump dripped mineral oil over vertical monofilament lines surrounding a small statue, with the whole thing lighted from above in dramatic fashion. If it sounds appalling, it was, and only got worse as the oil got gummy by accumulating dust and debris.

While this levitating water drops display looks somewhat similar, it has nothing to do with that greasy lamp of yore. [isaac879]’s “RGB time fountain” is actually a lot more sophisticated and pretty entrancing to watch. The time fountain idea is simple — drip water from a pump nozzle to a lower receptacle along a path that can be illuminated with flashing LEDs. Synchronizing the flashes to the PWM controlling pump speed can freeze the drops in place, or even make them appear to drip up. [isaac879] took the time fountain idea a step further by experimenting with RGB illumination, and he found that all sorts of neat effects are possible. The video below shows all the coolness, like alternating drops of different colors that look like falling — or rising — paint drops, and drops that merge together to form a new color. And behold, the mysterious antigravity cup that drips up and yet gets filled!

Allowances must be made for videos of projects that use strobes, of course. The effect of this time fountain and similar ones we’ve featured before is hard to capture, but this one still looks great to us.

Continue reading “LED Illusion Makes Colorful Water Drops Defy Gravity”