Ambient Lighting For Baby With The ESP8266

There are plenty of great reasons to have a child. Perhaps you find the idea of being harshly criticized by a tiny person very appealing, or maybe you enjoy somebody screaming nonsense at you while you’re trying to work on something. But for us, we think the best reason for procreation is getting another excuse to build stuff. It’ll be what, at least two years before a baby can solder or program a microcontroller? Somebody’s going to have to do it for them until then.

To try to help his baby daughter get on a better sleep schedule, [Amir Avni] decided to outfit her room with some “smart” lighting to establish when it’s time for her to wake up. Not only can he and his wife control the time the lights come on to “day” mode, but they can also change the colors. For example, they can switch over to a red glow at night. Despite some learning experience setbacks, the both the parents and the baby are very happy with the final product.

An ESP8266 controls a WS2812 LED strip to provide the adjustable lighting, and a DHT22 sensor was added to the mix to detect the temperature and humidity in the baby’s room. [Amir] used Blynk to quickly throw together a slick mobile application that allows for complete control of the brightness and color of light in the room, as well as provides a readout of the environmental data pulled from the DHT22.

But not everything went according to plan. [Amir] thought he could power the LED strip from the ESP8266 development board by soldering to the 5 V side of its AMS1117 voltage regulator. Which worked fine, until he turned on too many LEDs. Then it pulled too much current through a resistor connected to the regulator, and let all the magic smoke out. An important reminder of what can happen when we ask more of a circuit than what it was designed for.

We’ve covered many awesome projects that were born of a parental need, from feature packed baby monitors to devices seemingly designed to program nostalgia in the little one’s subconscious.

Social Engineering By Railways

Where do you travel every day? Are there any subtle ploys to manipulate your behavior? Would you recognize them or are they just part of the location? Social engineering sometimes gets a bad rap (or is it rep?) in the mainstream, but the public-facing edge of that sword can keep order as it does in Japanese train stations. They employ a whirlwind of psychological methods to make the stations run like clockwork.

The scope of strategies ranges from the diabolical placement of speakers emitting high-frequency tones to discourage youthful loitering to the considerate installation of blue lights to deter suicides. Not every tactic is as enlightened as suicide prevention, sometimes, just changing the grating departure buzzer to a unique tune for each station goes a long way to relieving anxiety. Who wants to stand next to an anxious traveler who is just getting more and more sweaty? Listen below the break to hear what Tokyo subway tunes sound like.

Maybe you can spot some of these tricks where you live or something similar can ease your own commute. Perhaps the nearest subway has a piano for stairs or a 3D printing cyborg.

Continue reading “Social Engineering By Railways”

Dive Inside This Old Quartz Watch

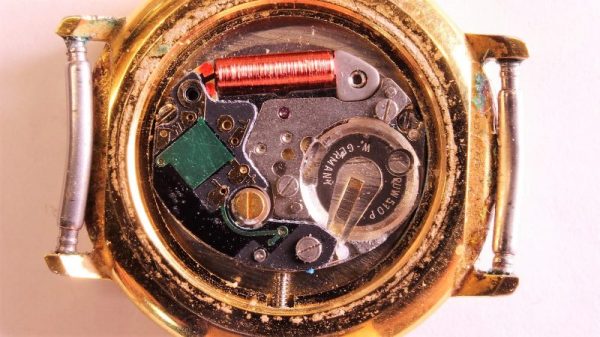
In an age of smartwatches, an analog watch might seem a little old-fashioned. Whether it’s powered by springs or a battery, though, the machinery that spins those little hands is pretty fascinating. Trouble is, taking one apart usually doesn’t reveal too much about their tiny workings, unless you get up close and personal like with this microscopic tour of an analog watch.

This one might seem like a bit of a departure from [electronupdate]’s usual explorations of the dies within various chips, but fear not, for this watch has an electronic movement. The gross anatomy is simple: a battery, a coil for a tiny stepper motor, and the gears needed to rotate the hands. But the driver chip is where the action is. With some beautiful die shots, [electronupdate] walks us through the various areas of the chip – the oscillator, the 15-stage divider cascade that changes the 32.768 kHz signal to a 1 Hz pulse, and a remarkably tiny H-bridge for running the stepper. We found that last section particularly lovely, and always enjoy seeing the structures traced out. There are even some great tips about using GIMP for image processing. Check out the video after the break.

[electronupdate] knows his way around a die, and he’s a great silicon tour guide, whether it’s the guts of an SMT inductor or a Neopixel close-up. He’s also looking to improve his teardowns with a lapping machine, but there are a few problems with that one so far.

Continue reading “Dive Inside This Old Quartz Watch”

WiFi Pool Controller Only Cost $20

Pools have come a long way. It used to be you had a pump and if you were lucky it had a mechanical timer switch on it. That was it. Now you have digital controllers and spa jets and heaters. You can even get them that connect to your home automation system. If your pool isn’t new enough to do that already, you can get a range of add-on accessories. For a price. [Rob] paid $500 to get a remote for his pool. It wasn’t even WiFi, just a simple RF remote. In 3 years, the transmitter had burned out ($300 to replace) and he decided he had enough. For $20, [Rob] added MQTT control and monitoring to his pool using an ESP8266. You can see the video description of the project below.

Naturally, the instructions are a bit specific to the Pentair system he has. However, it isn’t as specialized as you might think. The project relies on the connection for a wired “spa-side remote” that most modern pool systems support. The electrical connections for these aren’t quite standard, but they are all very similar, so you have a good chance of reproducing this for your setup assuming you have a connection for one of these wired remotes.

Continue reading “WiFi Pool Controller Only Cost $20”

Vaporwave For The Parallel Port

FM synthesis is the sound of the 1980s, it’s the sound of shopping malls and Macintosh Plus. It’s the sound of the Motorola DynaTAC, busts of Helios, and the sound of vaporwave サ閲ユ. The chips most responsible for this sound is the OPL2 and OPL3, tiny little FM synthesizers on a chip, produced by Yamaha, and the core of the AdLib and Sound Blaster sound cards. It’s the chip behind the music in all those great DOS games.

Unfortunately, computers don’t have ISA slots anymore, and cards don’t work in 486 and Pentium-based laptops, the latest hotness for retrocomputing enthusiasts. For his Hackaday Prize entry, [serdef] is bringing the sound of the 80s to the parallel port with the OPL2LPT. It’s a sound card for the parallel port that isn’t just a resistor DAC like the Covox Speech Thing.

The design of the OPL2LPT is pretty much what you would expect; it’s an OPL2 chip, opamp, a 1/8″ jack, and a few passive components. The real trick here is in the driver; by default, every DOS game around expects an Adlib card on port 338h, whereas the parallel post is at 378h. A driver takes care of this in software, but it is possible to patch a game to change every write to an Adlib card to a write to a parallel port.

Already, [serdef]’s parallel port graphics card is a real, working product and has caught the attention of Lazy Game Reviews and the 8-Bit-Guy, you can check out those video reviews below.

Continue reading “Vaporwave For The Parallel Port”

Linux Fu: Watch That Filesystem

The UNIX Way™ is to cobble together different, single-purpose programs to get the effect you want, for instance in a Bash script that you run by typing its name into the command line. But sometimes you want the system to react to changes in the system without your intervention. For example, you might like to watch a directory and kick off some program automatically when a file appears from a completed FTP transaction, without having to sit there and refresh the directory yourself.

The simple but ugly way to do this just scans the directory periodically. Here’s a really dumb shell script:

#!/bin/bash
while true
 do
   for I in `ls`
    do cat $I; rm $I
   done
 sleep 10
done

Just for an example, I dump the file to the console and remove it, but in real life, you’d do something more interesting. This is really not a good script because it executes all the time and it just isn’t a very elegant solution. (If you think I should use for I in *, try doing that in an empty directory and you’ll see why I use the ls command instead.)

Continue reading “Linux Fu: Watch That Filesystem”

Building A Knife By Hand Is Just As Hard As You Think

Carl Sagan once said: “If you wish to make an apple pie from scratch, you must first invent the universe.” In other words, the term “scratch” is really a relative sort of thing. Did you grow the apples? Did you plant the wheat to make the flour? Where do you keep your windmill, incidentally? With Carl’s words in mind, we suppose we can’t say that [Flannagill] truly built this incredible knife from scratch, after all, he ordered the sheet steel on Amazon. But we think it’s close enough.

He was kind enough to document the epic build in fantastic detail, including (crucially), the missteps he made along the way. While none of the mistakes were big enough to derail the project, he mentions a few instances where he wasted time and money trying to take shortcuts. Even if making your own knives at home isn’t on your short list of summer projects, we’d wager there’s something in this build log you can learn from regardless.

So how does one build a knife? Slowly and methodically, if what [Flannagill] has written up is any indication. It started with a sketch of the knife on a piece of paper, the outline of which was then transferred to a piece of tool steel with nothing more exotic than a permanent marker. An angle grinder was then used to follow the outline and create the rough shape of the final knife.

From there, the process is done almost entirely with hand files. Here [Flannagill] gives one of his most important pieces of advice: don’t cheap out on the tools. He bought the cheapest set of files he could, and paid the price: he says it took up to 14 hours to complete just one side of the knife. Once he switched over to higher quality files, the rest of the work went much faster.

After filing and sanding the knife blank, it went into a charcoal fire to be hardened, followed by a total of 4 hours in a 200 C (~400 F) oven to heat temper it. Finally the handle pieces (which are officially known as “scales”) were attached, and finished with considerably less labor intensive woodworking methods. The final result is a gorgeous one of a kind specimen that [Flannagill] is rightly very proud of.

If you’re worried this process looks a bit too quick and easy for you, don’t worry. You can always go the [Bil Herd] route and make a forge out of your old sink if you’d rather start your apple pie a bit closer to the tree.